
This Carrot CRM feature is only available for Scale and Team plan users.
Our Scale (InvestorFuse Pro) and Team (InvestorFuse Premium) plans are perfect for teams who want deeper insights into their lead flows and closed deals. If you’re interested in upgrading your Carrot CRM account, choose your new plan here. If you’re interested in upgrading your InvestorFuse account, please email billing@investorfuse.com
Our Groups feature is a great way to keep your team organized, so you can close more deals in less time.
With Groups, you can assign opportunities to selected team members in a round-robin fashion. This feature is useful, for example, if you have more than one Lead Manager and you want each of them to get assigned an opportunity alternately.
For example, if you serve multiple markets, you might want to create Groups for each state or local region where you do deals.
Many of our CRM users like to use Groups to organize and assign leads to team members with different roles. In this case, you might set up a group for Lead Managers, who can qualify new leads as they come in, and another group for Acquisitions, who can set up appointments and close deals with the qualified leads.
In this tutorial, we’ll cover:
- Video Tutorial: Groups
- Create Groups
- Round Robin Settings
- Group Settings
- Releasing Opportunities (Automatic and Manual)
- Moving of Unassigned Opportunity
- Sort Groups
- CRM Features to Pair with Groups
Let’s get started!
Watch Our Groups Tutorial
This video was recorded for InvestorFuse but the instructions also apply for Carrot CRM. An introduction to Groups, this video will show you the best practices to make the most out of this feature:
Create Groups
- Select a Team in the left menu
- Select Settings
- Scroll to Lead Routing & Assignment in the options
- Click Groups
- Use +Add new group to create a new group. If you are on the Carrot CRM Team plan (InvestorFuse Premium), the groups you create will be added as a group tab in the Opportunities menu to segment your opportunities.
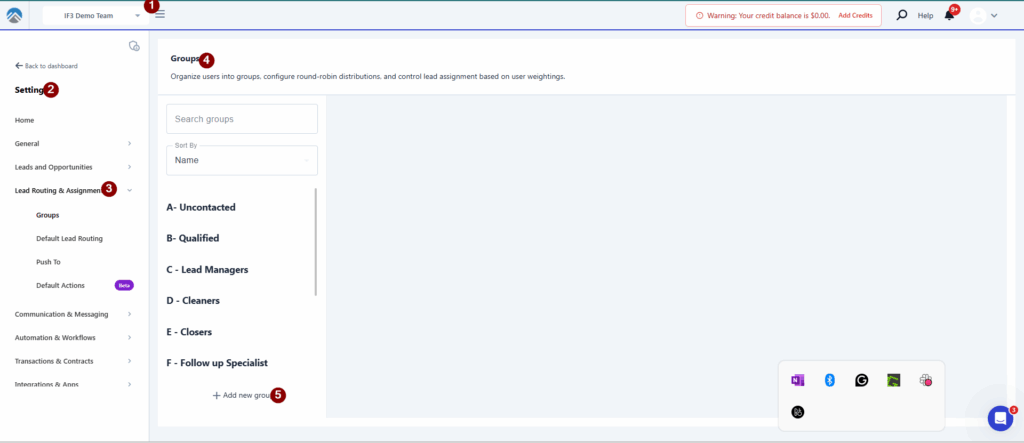
- Enter the Group name
- Click Save
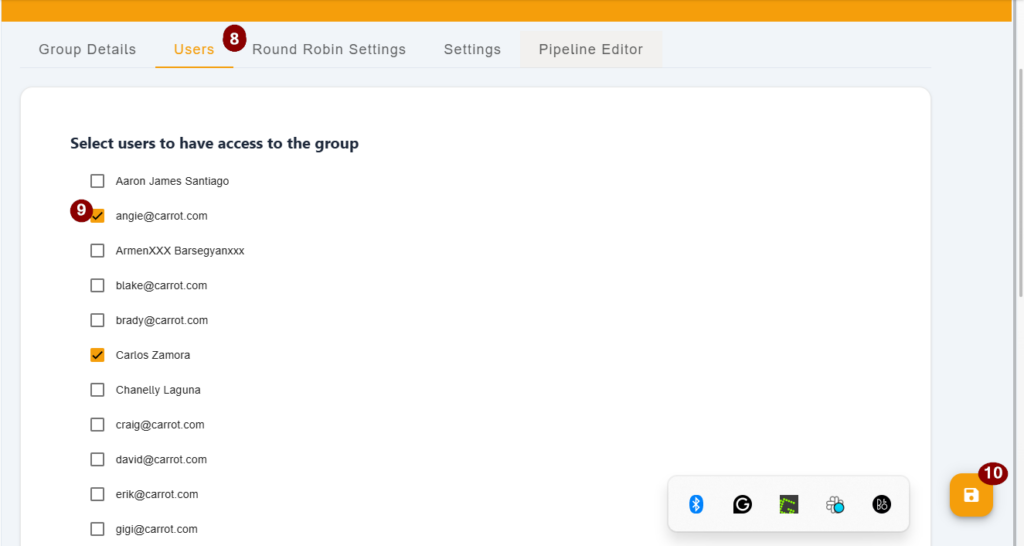
- Go to the Users tab
- Select the team members that should be in the group. If you round-robin your opportunities to this group, they will be assigned to the selected team members.
- Click 💾 the Save icon
Round Robin Settings
🥕 NOTE: The Round Robin Settings tab of Groups or Weighted Round Robin is only available for Carrot CRM Team (InvestorFuse Premium) users. If you’re interested in upgrading your Carrot CRM account, choose your new plan here. If you’re interested in upgrading your InvestorFuse account, please email billing@investorfuse.com
This setting lets you adjust the number of Opportunities a user can get from the round-robin in the form of a star rating. You can rate team members from 0 – 10 or more. Team members with fewer stars will get fewer Opportunities compared to team members with higher stars.
This is helpful to ease a new acquisition team member into the role by only assigning them the number of Opportunities that they can handle.
If you set the star to 0, the user will not get any opportunities assigned to them which you can use for when someone goes on a vacation.
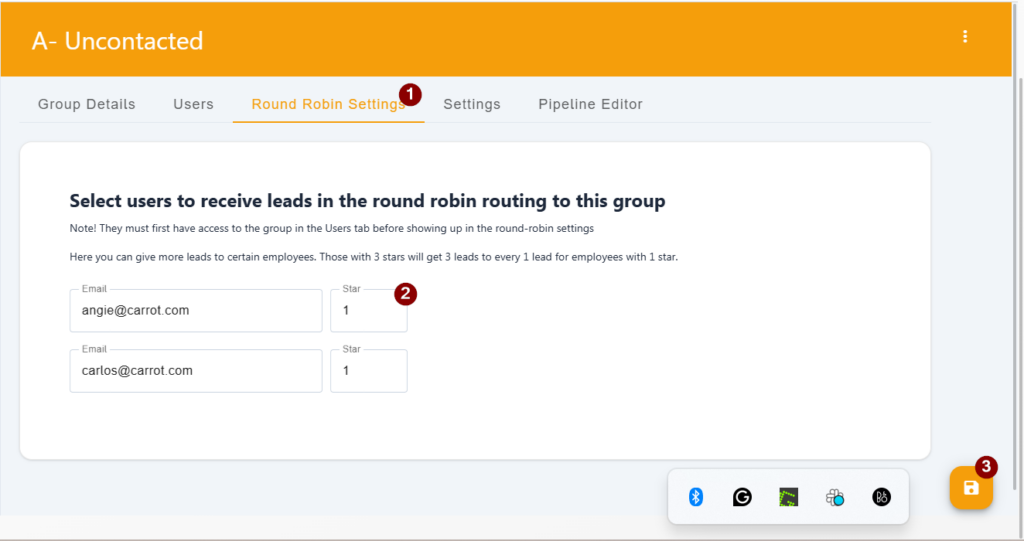
In the example below, the team member with 3 stars will get assigned three Opportunities before the other team member can get one.
- Go to the Round Robin Settings tab
- Adjust the star rating per user. If Opportunities should be distributed equally, set the stars for each user to 1. If some team members should get more Opportunities compared to others, increase their stars accordingly.
Group Settings
🥕 NOTE: The Settings tab of Groups is only available for Carrot CRM Scale (InvestorFuse Pro) and Team (InvestorFuse Premium) plans. If you’re interested in upgrading your Carrot CRM account, choose your new plan here. If you’re interested in upgrading your InvestorFuse account, please email billing@investorfuse.com
If you are on a Team (InvestorFuse Premium) plan, you have access to the deeper functionality of Groups. You get the unassigned feature where you can leave an opportunity open in a group and your agents can come in and take ownership of them on a first-come, first-serve basis. You can also set up automatic releasing rules where if an action becomes overdue for a number of days you set, it gets released to the group for someone else to take over.
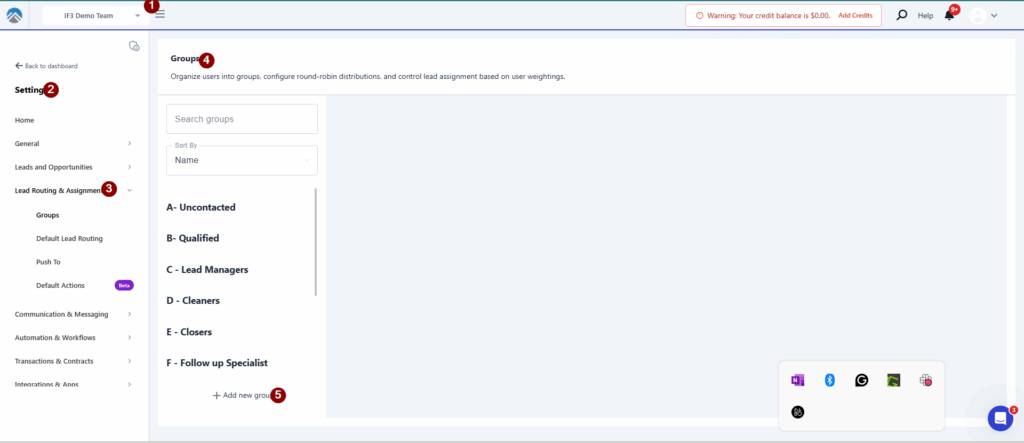
- Select a Team in the left menu
- Click Settings
- Select Lead Routing & Assignmment in the options
- Go to Groups
- Click +Add new group
- Go to the Settings tab
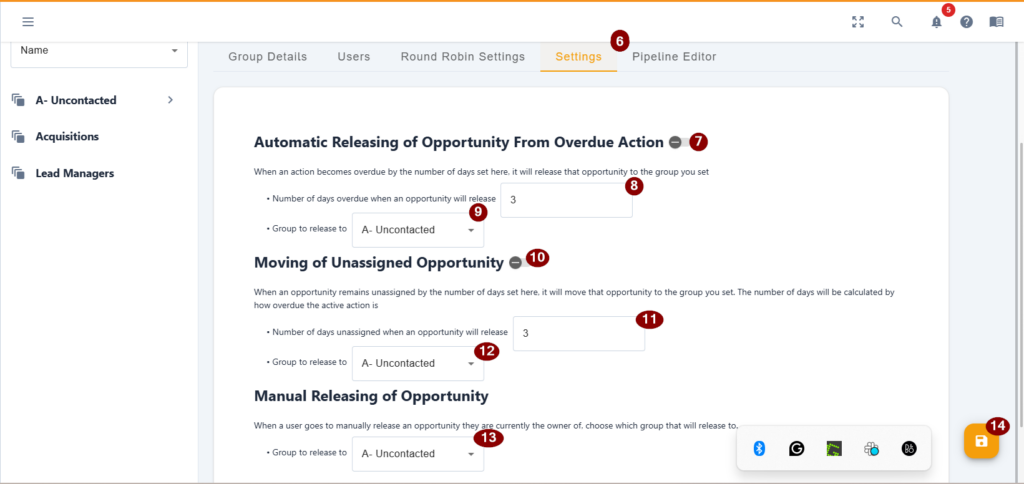
- Turn on Automatic Releasing of Opportunity if you want the opportunities to go back to the group you set if the actions become overdue by the set amount of days
- Input the number of days that actions can be overdue before being released
- Select which Group the opportunities should be released to
- Turn on Moving of Unassigned Opportunity if you want opportunities left unassigned for a set amount of days to be released to a different group
- Input the number of days that actions can be overdue before being released
- Select which Group the opportunities should be released to
- Select which Group the opportunities should be released to when doing it manually
- Click 💾 Save
Releasing Opportunities (Automatic and Manual)
Automatic Releasing of Opportunity
This function enforces accountability amongst your team members for the opportunities that are assigned to them.
If they take ownership of an opportunity and leave the next action overdue for more than the set amount of days in the settings, the opportunity will automatically be unassigned from the team member and will go back to the Group so someone else can come in and take ownership of it to continue the work.
🚨 IMPORTANT: Every day at around 3 AM EST, the script for Automatic Releasing of Opportunity is run to look for actions that are overdue past the set number of days. All opportunities that are found will be unassigned from the current owners and will go back to the Group where they are set to release.
Manual Releasing of Opportunity
You can set in which group an opportunity gets assigned when a team member manually releases it.
This can be used, for example, if you have Group A taking charge of the initial contact and Group B handling the appointments and offers. When someone from Group A completes all of their actions, you can have it so that when they manually release the opportunity, it goes straight into Group B for the next phase of the process.
Moving of Unassigned Opportunity
Turn this setting on if you are worried that your team members might leave opportunities unassigned for far too long. This moves opportunities around your groups to ensure that nothing is falling through the cracks.
Similar to the Automatic Release of Opportunity, a script is run every 3 AM EST to check for the unassigned opportunities and if one exceeds the criteria you set in the settings, the system automatically releases it to the group you set.
Sort Groups
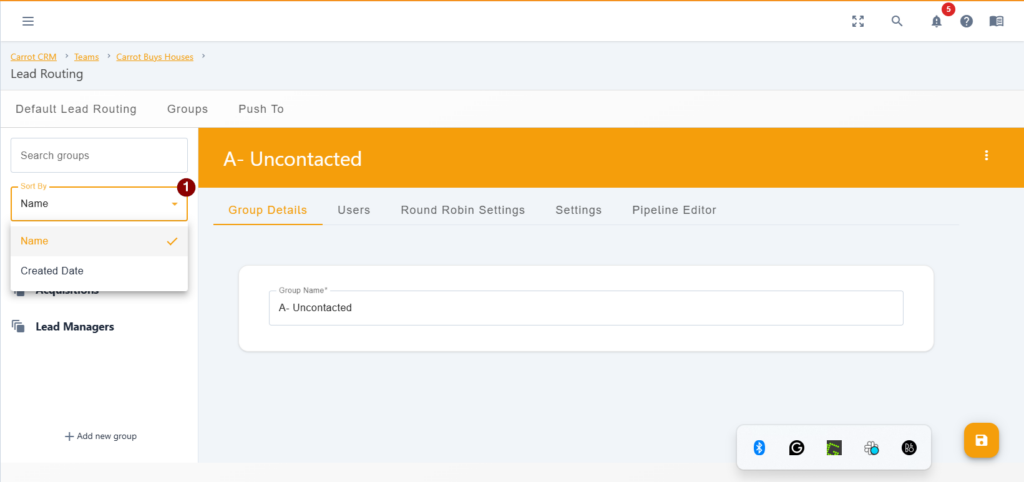
You can sort your Groups by Name (alphabetical order) or by Date Created. The way the Group Tabs are ordered in the Opportunities section will depend on how the Groups section is sorted.
CRM Features to Pair with Groups
Assign Opportunities to Groups
After creating your Groups, you can start assigning opportunities automatically to them. There are two ways to set up the Assignment settings. You can set a team-wide Assignment rule where all of the opportunities will be assigned to one group, or for a more granular approach, set each of your campaigns its own Assignment setting. Click on the article below to learn more.
Per-campaign Assignment Settings
Working on the Opportunities in a Group
Once you have created your Groups and set up the assignment, your team members can now start working on the opportunities that get assigned to the group. A Group tab will be created in the Opportunity section where all of the opportunities assigned to the group will be located. Click on the article below to learn more.
Restricting Access to Opportunities
You can restrict a team member’s access to opportunities that are not assigned to them so that they can only see the ones that they own and working on. Restrict Access can only be applied to team members with Agent roles. Click on the article below to learn more.
Opportunity Limit
Setting a limit to how many opportunities a team member can assign to themselves prevents the issue of biting more than what you can chew. This ensures that team members will not overload themselves with opportunities that they won’t be able to stay on top of.
Notifications
If you are in a group, you can get notified whenever an opportunity is assigned only to you instead of getting an alert for every opportunity that gets created.
Conclusion
In conclusion, with this article, you should be able to create, setup, edit, and sort groups depending on your team’s preferences to ensure that every opportunity is handled according to how your team is set up. For further assistance, you can search the Help Center or speak to our Support Team in Live Chat.
