
This Carrot CRM feature is only available for Scale and Team plan users.
Our Scale (InvestorFuse Pro) and Team (InvestorFuse Premium) plans are perfect for teams who want deeper insights into their lead flows and closed deals. If you’re interested in upgrading your Carrot CRM account, choose your new plan here. If you’re interested in upgrading your InvestorFuse account, please email billing@investorfuse.com
Introduction:
Templates is a way to create pre-existing tasks, custom actions, texts, and emails that you can then use to create or send to any of your Opportunities at any given time. This will help you become more efficient in sending introduction text messages for example, so you do not have to type the message every time. Instead, you save the message as a template and send it to sellers whenever you need to. Or if there is a custom action that you always create, you can save it in Templates, and that way, you no longer have to create the custom action every time.
This guide will cover:
- How to create task templates
- How to create custom action templates
- How to create text templates
- How to create email templates
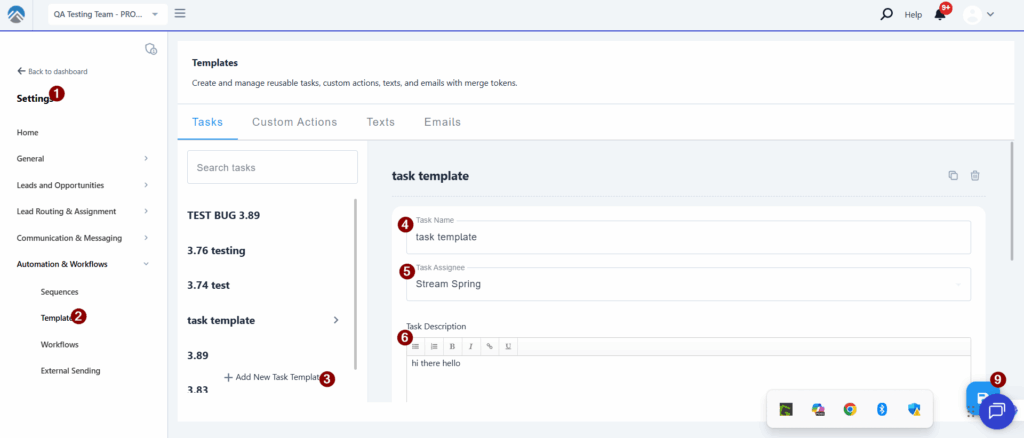
Create Task Templates
Creating task templates will allow you to assign a task from a drop-down instead of manually typing it every time. This is helpful if you assign the same tasks a lot of times
How to use Task Templates
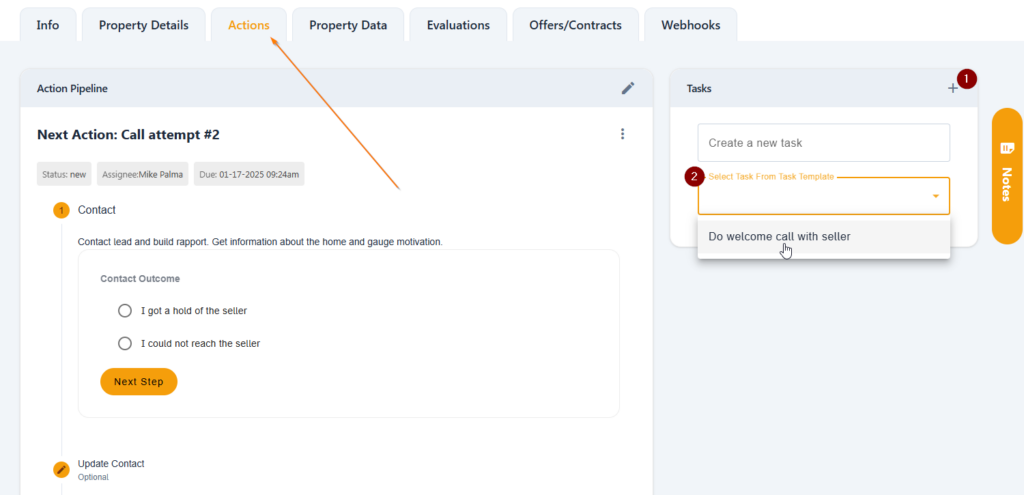
You can assign the Task template from the actions tab of an Opportunity.
- In the Actions tab of an Opportunity, click the + icon in the Tasks section
- Click the field called Select Task from Task Template and choose one from the drop-down
Create Custom Action Templates
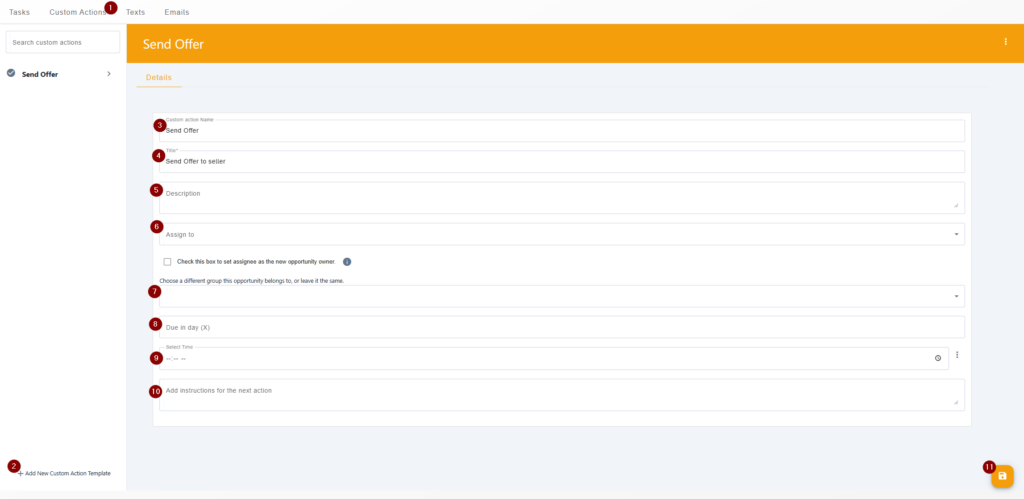
- In the Templates section, go to the Custom Actions tab
- Click +Add New Custom Action Template to create one
- Enter the name of the Template and save
- Add the Title of the action. This is what the Action will be called when assigned to an Opportunity.
- (Optional) Add a Description of the action to give more clarity for the assignee
- (Optional) Select an Assignee for the action. If left blank, you can manually assign someone whenever you create the custom action.
a. If an Assignee is selected, check the box if you want them to be the new owner of the Opportunity once the custom action is created - (Optional) Change the group where the Opportunity is under once the custom action is created.
- (Optional) Indicate how many days the action should become due after being created. If left blank, you can manually enter the due date when you create the custom action.
- (Optional) Enter a time when the custom action should be done
- (Optional) Add instructions for the assignee
- Click 💾 the save icon in the bottom-right corner of the page
How to use Custom Action Templates
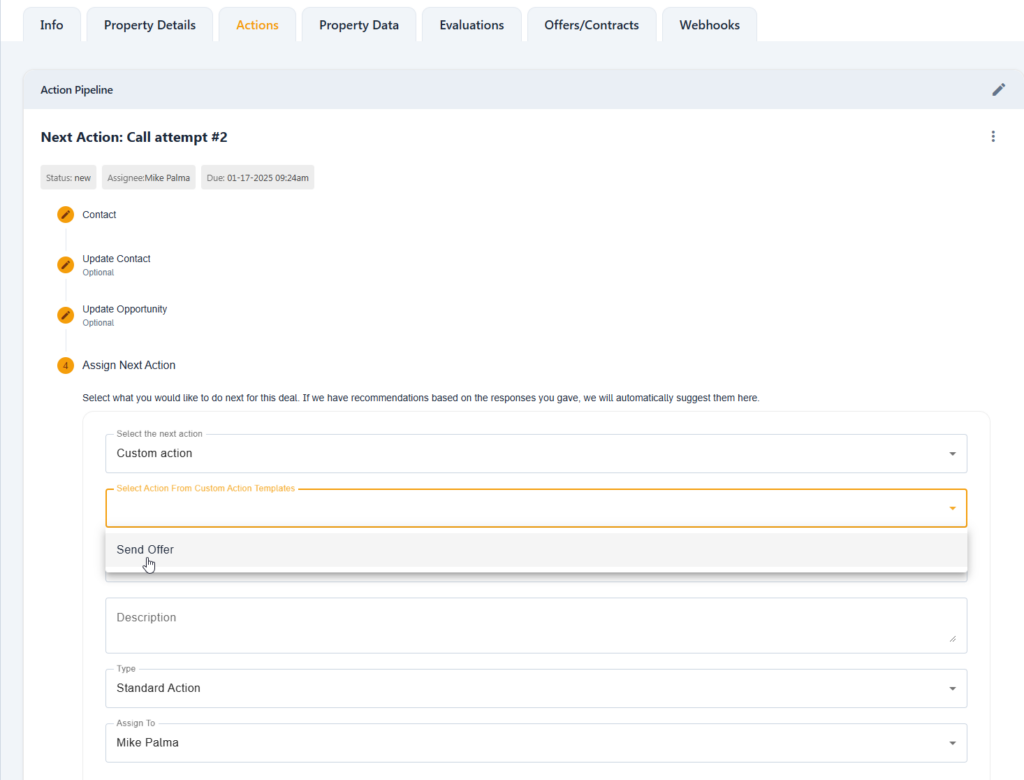
You assign custom actions from the actions tab of an Opportunity.
- In the Actions tab of an Opportunity, change your next action to Custom action
- Click Select action from customer action templates and choose one from the drop-down
Create Text Templates
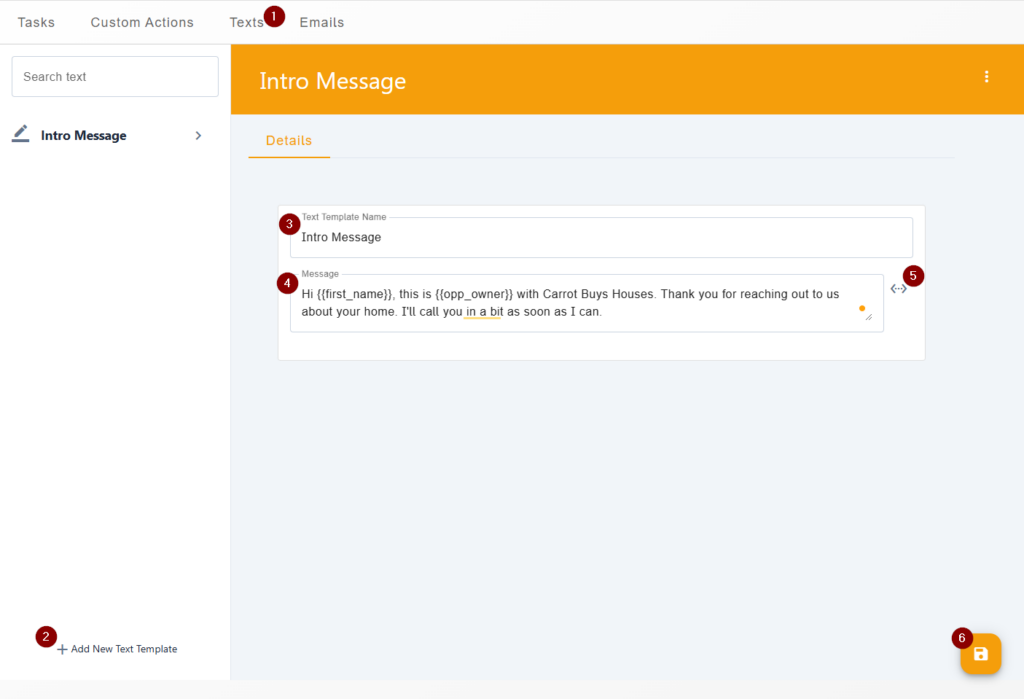
- In the Templates section, go to the Texts tab
- Click +Add New Text Template at the bottom of the page
- Enter the Text Template Name and save
- Type the message that you want to send
- You can insert tokens using the <···> icon in the right-hand corner to personalize the message
- Click 💾 the save icon in the bottom-right corner of the page
How to use Texts Templates
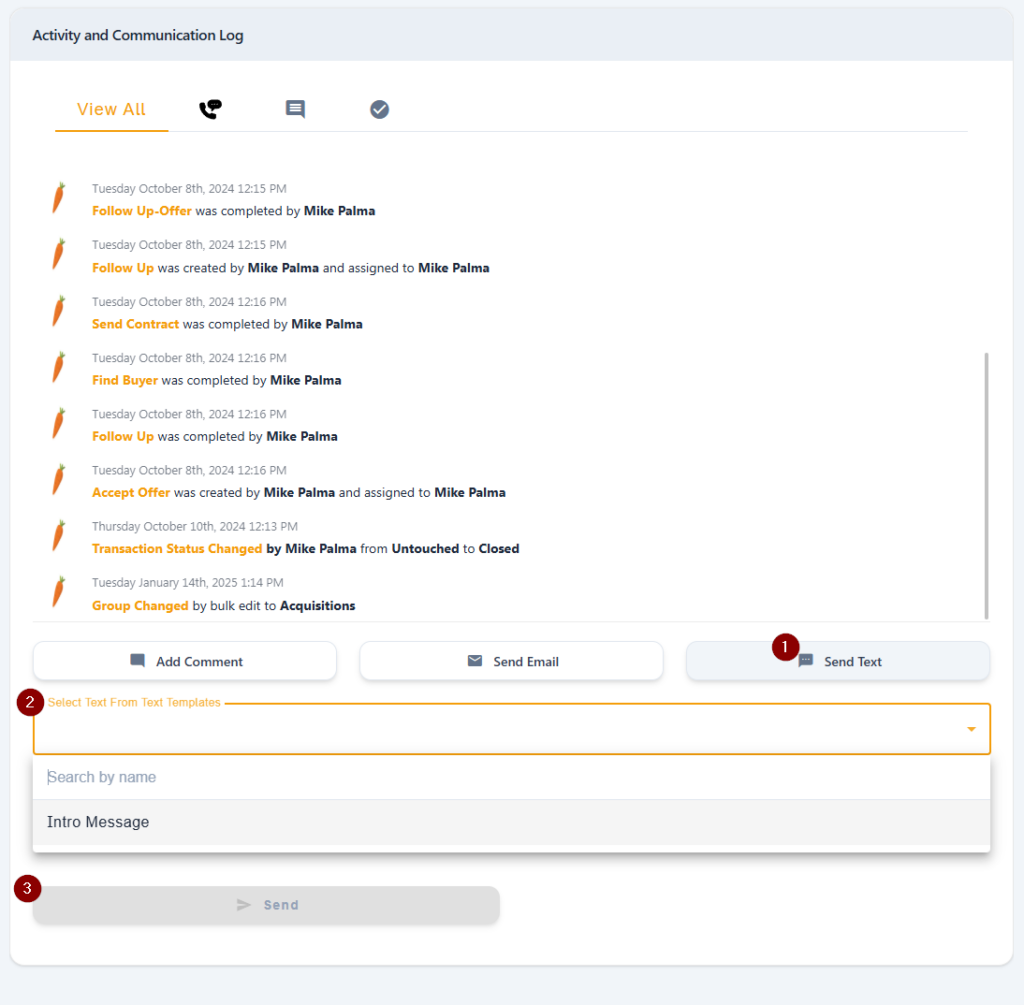
Text messages are sent through the activity and communications log of the Opportunity under the Info tab
- In the activity and communications log, click the Send Text button
- Click Select text from Text Templates and select a message from the drop-down
- Click Send
Create Email Templates
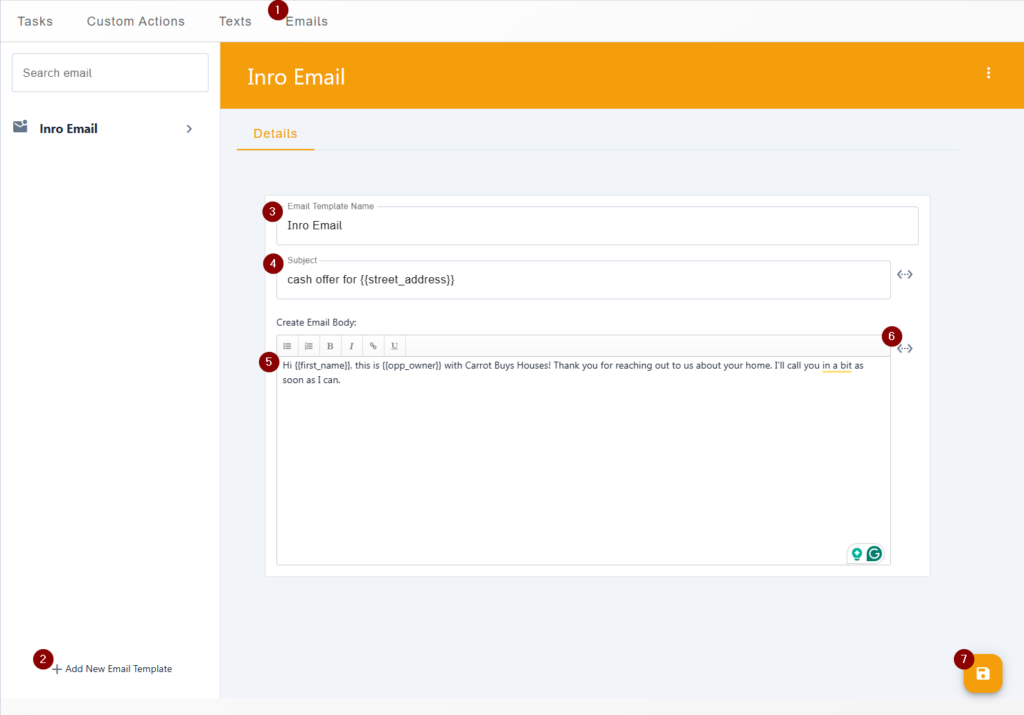
- In the Templates section, go to the Emails tab
- Click +Add New Text Template at the bottom of the page
- Enter the Email Template Name and save
- Input a subject for the email
- Type the body of the message that you want to send
- You can insert tokens using the <···> icon in the right-hand corner
- Click 💾 the save icon in the bottom-right corner of the page
How to use Email Templates
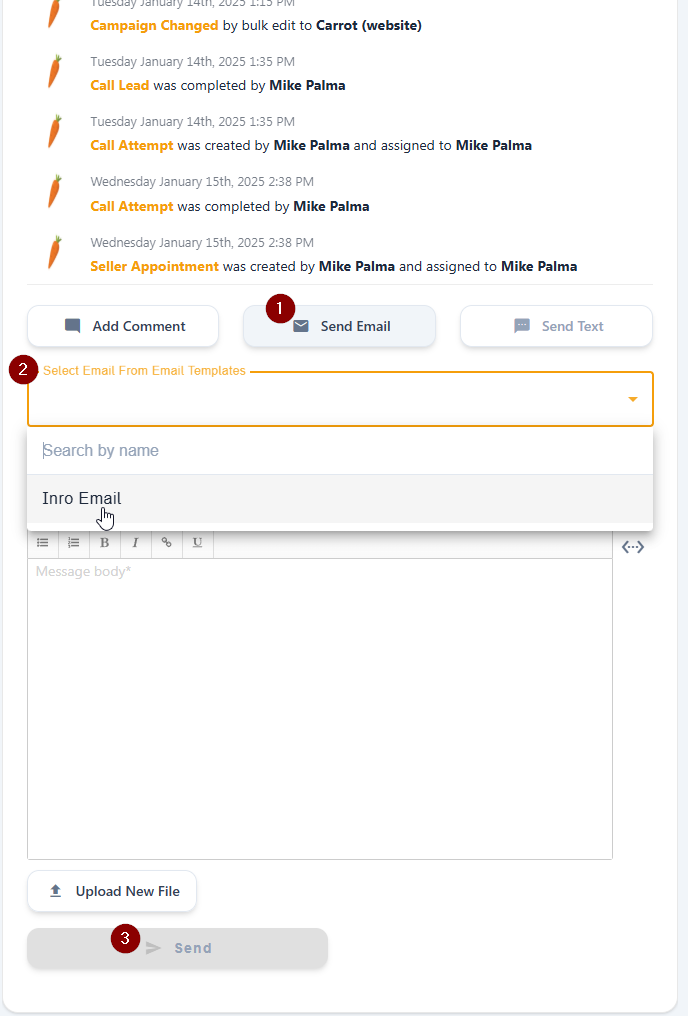
Email messages are sent through the activity and communications log of the Opportunity under the Info tab
- In the activity and communications log, click the Send Email button
- Click Select text from Email Templates and select a message from the drop-down
- Click Send
Conclusion:
Templates help make teams become more efficient when it comes to setting up tasks, custom actions, texts or emails by having a pre-set message that is ready to go when needed. It saves time, and ensures consistency in the message that is being sent out to team members and opportunities. Should you need further assistance, you can continue to search the Help Center or speak to our Support Team in Live Chat.
