
Carrot CRM is your new partner in simplifying real estate lead management!
Did you know? Carrot CRM’s Essential, Scale and Team plans come with included setup support. Our team handles setting up lead integrations for you during a simple kickoff call.
Introduction
A domain is needed for you to be able to send emails to sellers through InvestorFuse. A domain is a unique address used to access websites like investorfuse.com, carrot.com, etc. It’s worth noting that the domain does not need to have a live website to connect it with Carrot CRM or InvestorFuse. As long as you own the domain through a registrar like Godaddy, Namecheap, Google Domains, etc., it can be connected to the CRM.
If you do not have a domain but would like to send emails from the CRM, follow this guide to purchase one.
This guide will cover:
- How to link a domain to the workspace
- How to add DNS records to your domain
- How to connect a company email
- How to change the company email
- How to assign personal emails to users
Step 1: Link a Domain to the Workspace
- Go to Team Settings
- Click Messaging
- In the Workspace email section, enter the domain name that you want to use for your email i.e investorfuse.com, sellhousequick.com, etc.
- Click the Add button
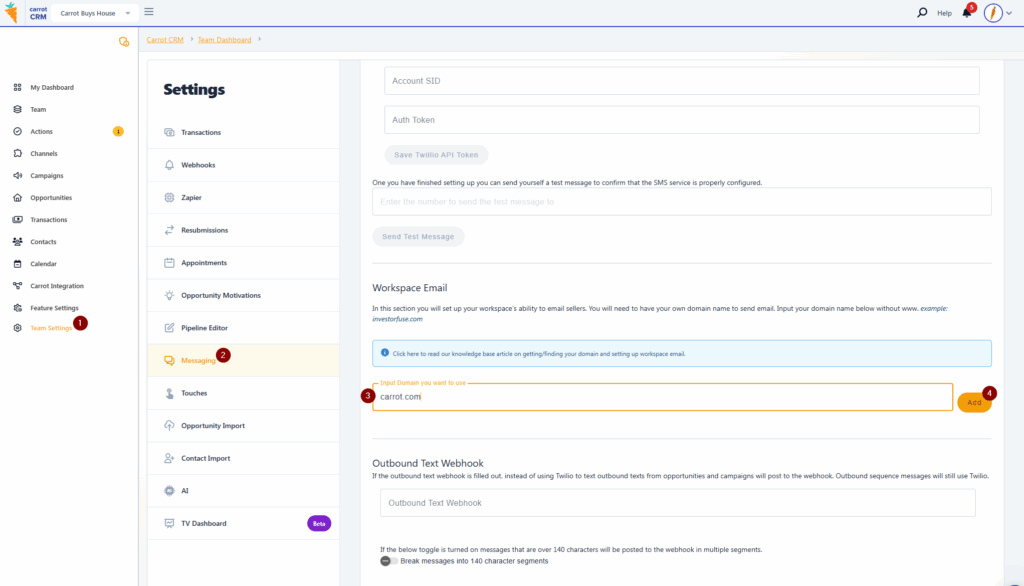
If you do not have a domain yet, you will need to buy one in order to send emails through InvestorFuse/Carrot CRM. The domain does not need to have a live website nor does it need an email functionality. As long as you own the domain, you will be able to use it for sending emails.
Step 2: Adding DNS Records to Your Domain
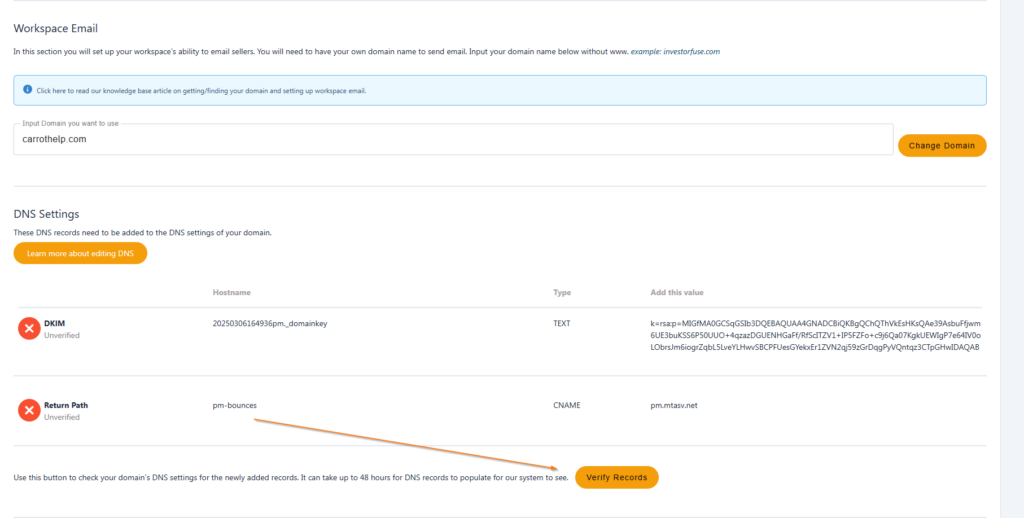
After entering your domain name, the system will generate two DNS records – TXT and CNAME records. You will need to add these records to wherever the nameservers are for your domain i.e. Godaddy, Namecheap, Google Domains, etc, in order to allow InvestorFuse to send emails using your domain.
💡If you are unsure where to add the DNS records, look up your domain using whois.com and look for the information regarding the Registrar and Name Servers. Usually, you add the DNS records to wherever your nameservers are.
If someone set up your domain for you, you will need to contact that person and they should be able to help you with adding the records.
How to add DNS records to your domain
Following the instructions below on how to add the TXT and CNAME DNS records to your domain.
💡If your domain provider is not listed above, click here to look up instructions specific to your provider. In the videos, only look for instructions on adding the DKIM and Custom Return-Path records.
After adding the DNS records to your domain, click the Verify Records button until the records are displayed as verified. It might take around 48 hours for the DNS changes to propagate in some domain providers.
Step 3: Set Up Workspace Email
After adding the DNS records to the domain and verifying them, we can now connect a general company email address to the workspace. We recommend connecting a general email like info@yourdomainname.com, sales@yourdomainname.com, offers@yourdomainname.com, etc., for the default email so that anyone can send an email and not have it look like the message is coming from someone else. You will learn how to assign a specific email per user later in this guide.
💡 The email you connect to the system does not need to exist. After you add the DNS records to your domain, you can connect any email you want to the CRM as long as it is using the same domain name.
- Enter the company email that you want to use for the team
- Add a name to the email which is what the seller will see when they receive your emails
- Click Save
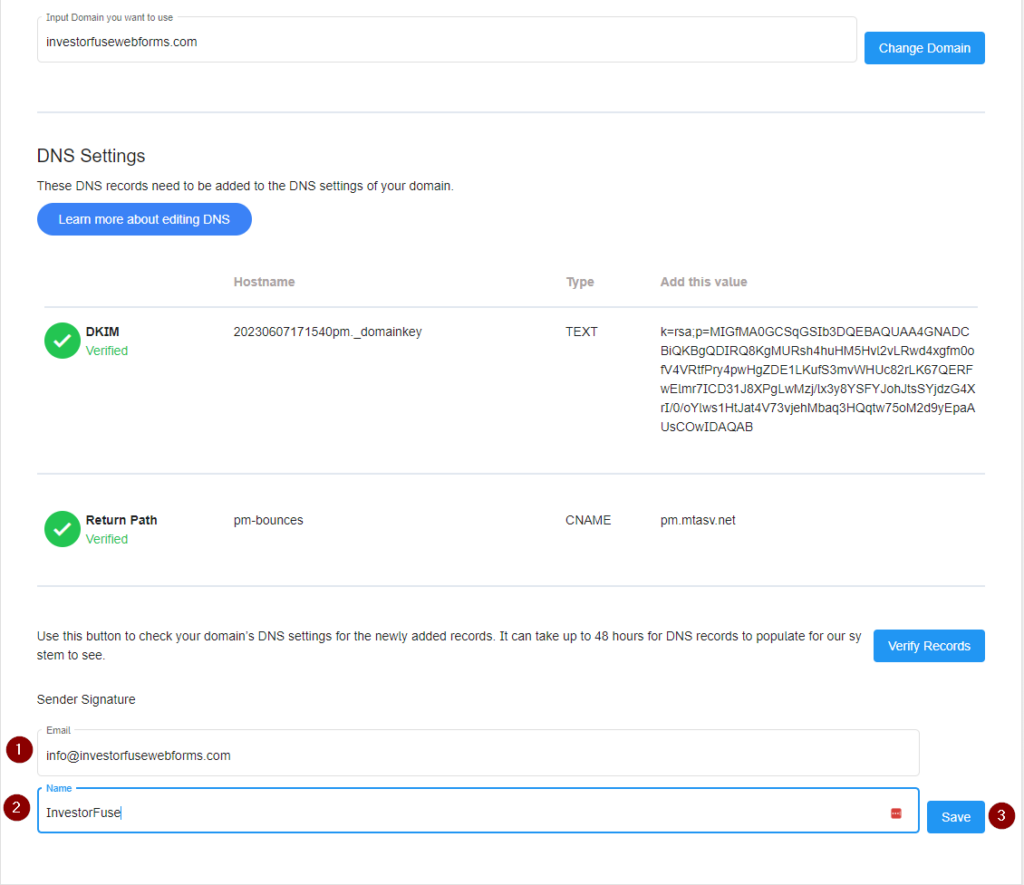
You are done after this point. You can now send emails from InvestorFuse and it will come from the email you connected. We can move on to the next part which is assigning an email for a specific user.
How to change the email
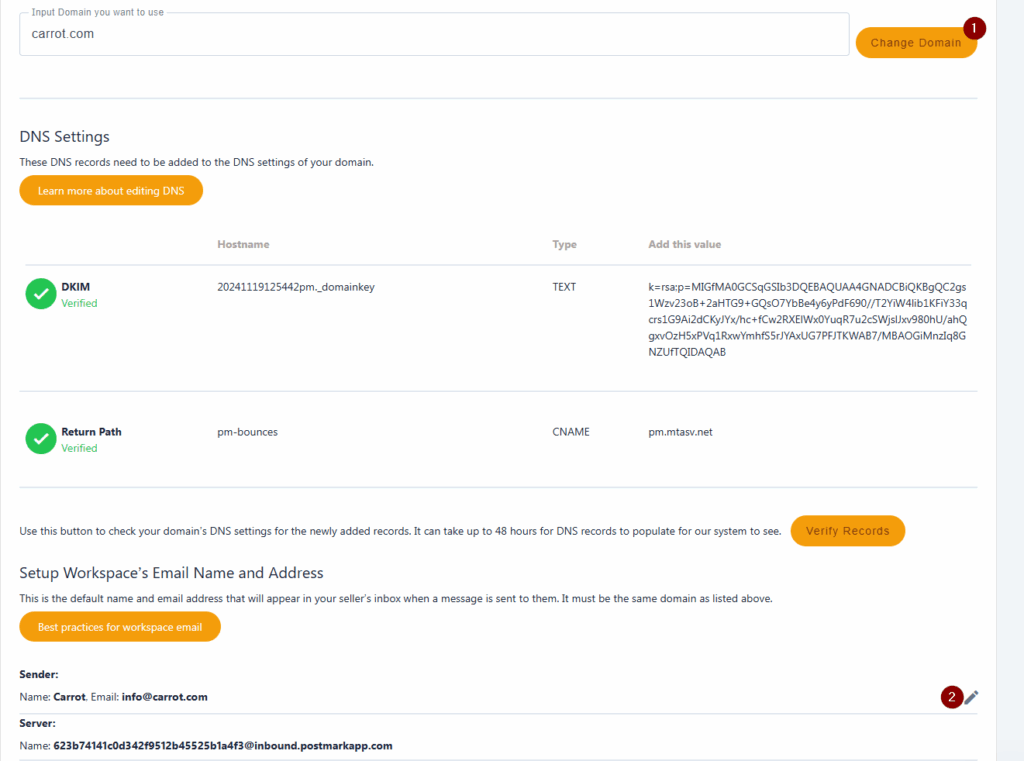
- Click the Change Domain button if you want to use a different domain name for the email. This will generate new DNS records so they will need to be added to the new domain by following Step 2 of this guide.
- If you only want to change the email from info@ to offers@, for example, click the ✏️ pencil icon to the right to edit.
Step 4: Individual Email Addresses for Users

This Carrot CRM feature is only available for Scale and Team plan users.
Our Scale (InvestorFuse Pro) and Team (InvestorFuse Premium) plans are perfect for teams who want deeper insights into their lead flows and closed deals. If you’re interested in upgrading your Carrot CRM account, choose your new plan here. If you’re interested in upgrading your InvestorFuse account, please email billing@investorfuse.com
After assigning a general company email address to the workspace, we can proceed with setting up our own personal emails. Our personal emails will be used when we send a seller an email manually. This is a personal setting so everyone in the team will have to do this part individually. If you do not set up a personal email in your profile, the system will use the general company email in your workspace when sending messages.
- In the left menu, click your profile icon
- Select My Settings in the drop-down
- Go to Messaging
- Select a team to which the personal email should be assigned. If you have 2 or more teams, you can assign different personal emails for each one.
- Enter your personal email and use the same domain name as your general company email. E.x. john@yourdomainname.com
- Add a name to the email. The seller will see this name when they receive an email from you.
- Click Save
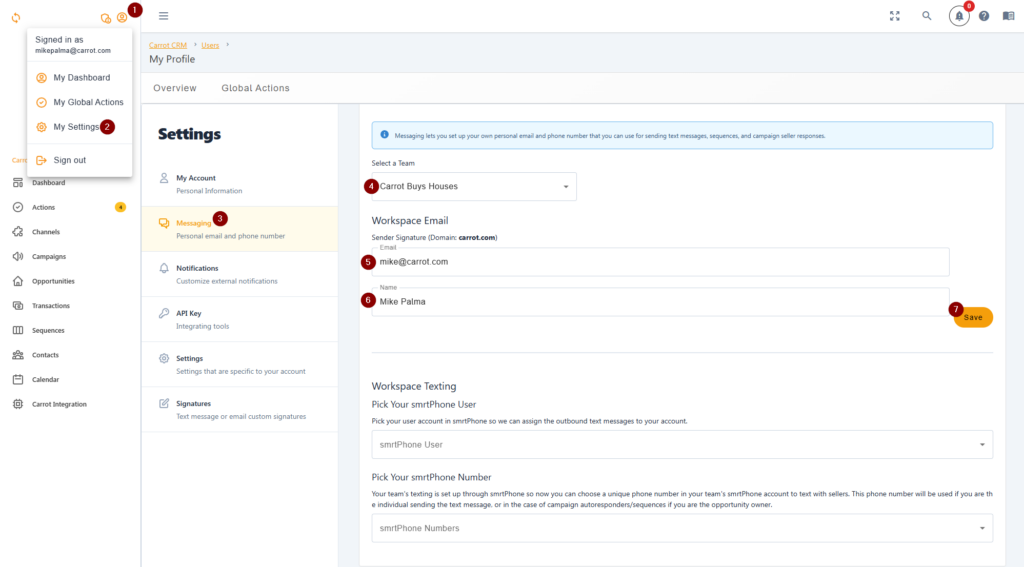
And that’s it! Now if you send an email, InvestorFuse will use your personal email and if you did not set that up, the system will use your general company email instead.
Conclusion:
By following the procedures above, you should be able to set up and test your workspace’s email functionality and ensure that it is sending out of your preferred mailbox. The guide should also allow you to set up individual emails for each users if in case that is a preferred setup for your team.
