One of the simplest Outbound Texting Options that we can integrate with is Dialpad. Unlike other phone system services that require verification and for you to reach out to them to get this feature activated; Dialpad provides you with the ease of being able to do it as long as you have the correct subscription with them, Zapier and IF3.
Resources Needed
- Owner / Manager privileges in IF3
- A Premium Zapier account
- A Pro/Enterprise Dialpad account with numbers set-up
- Super Admin access in Dialpad
API Rate Limit
Dialpad has an API Limit for sending SMS at one hundred (100) messages per minute.
Step 1: Creating a Zap
In this section, you will be guided how a Zap is set-up to receive incoming SMS data that were sent from IF3.
1. Open your Zapier account and click on the Make a Zap button.png)
2. Name your Zap
3. Choose Webhooks by Zapier as your trigger app
4. Select Catch Hook as the trigger event
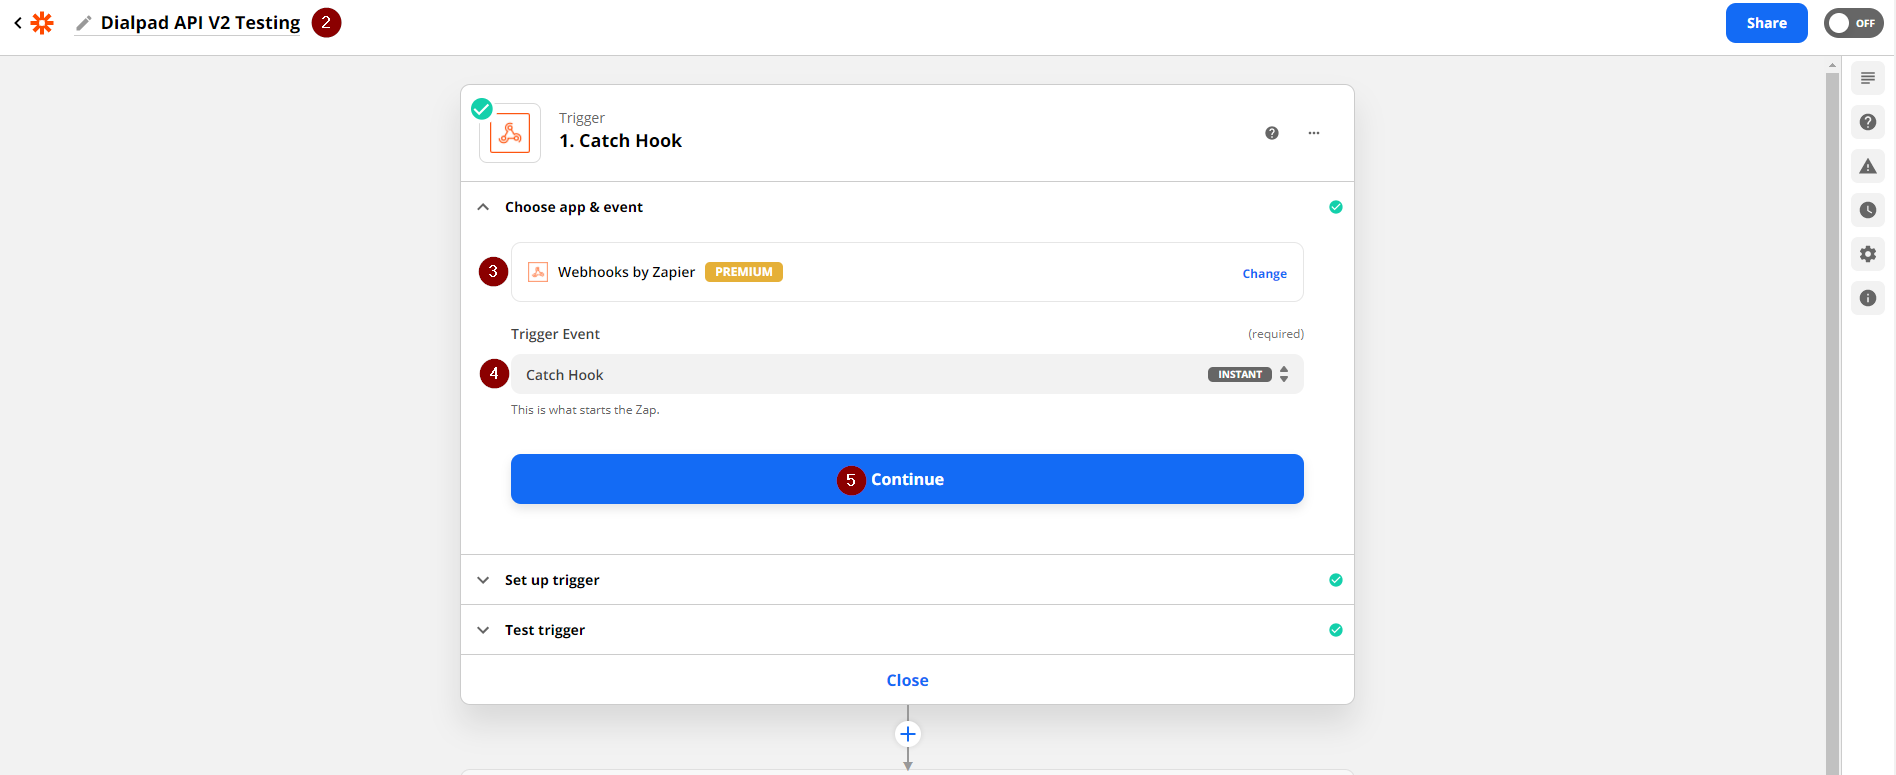
6. Copy the Webhook URL provided by the Zap
7. Click Continue
.png)
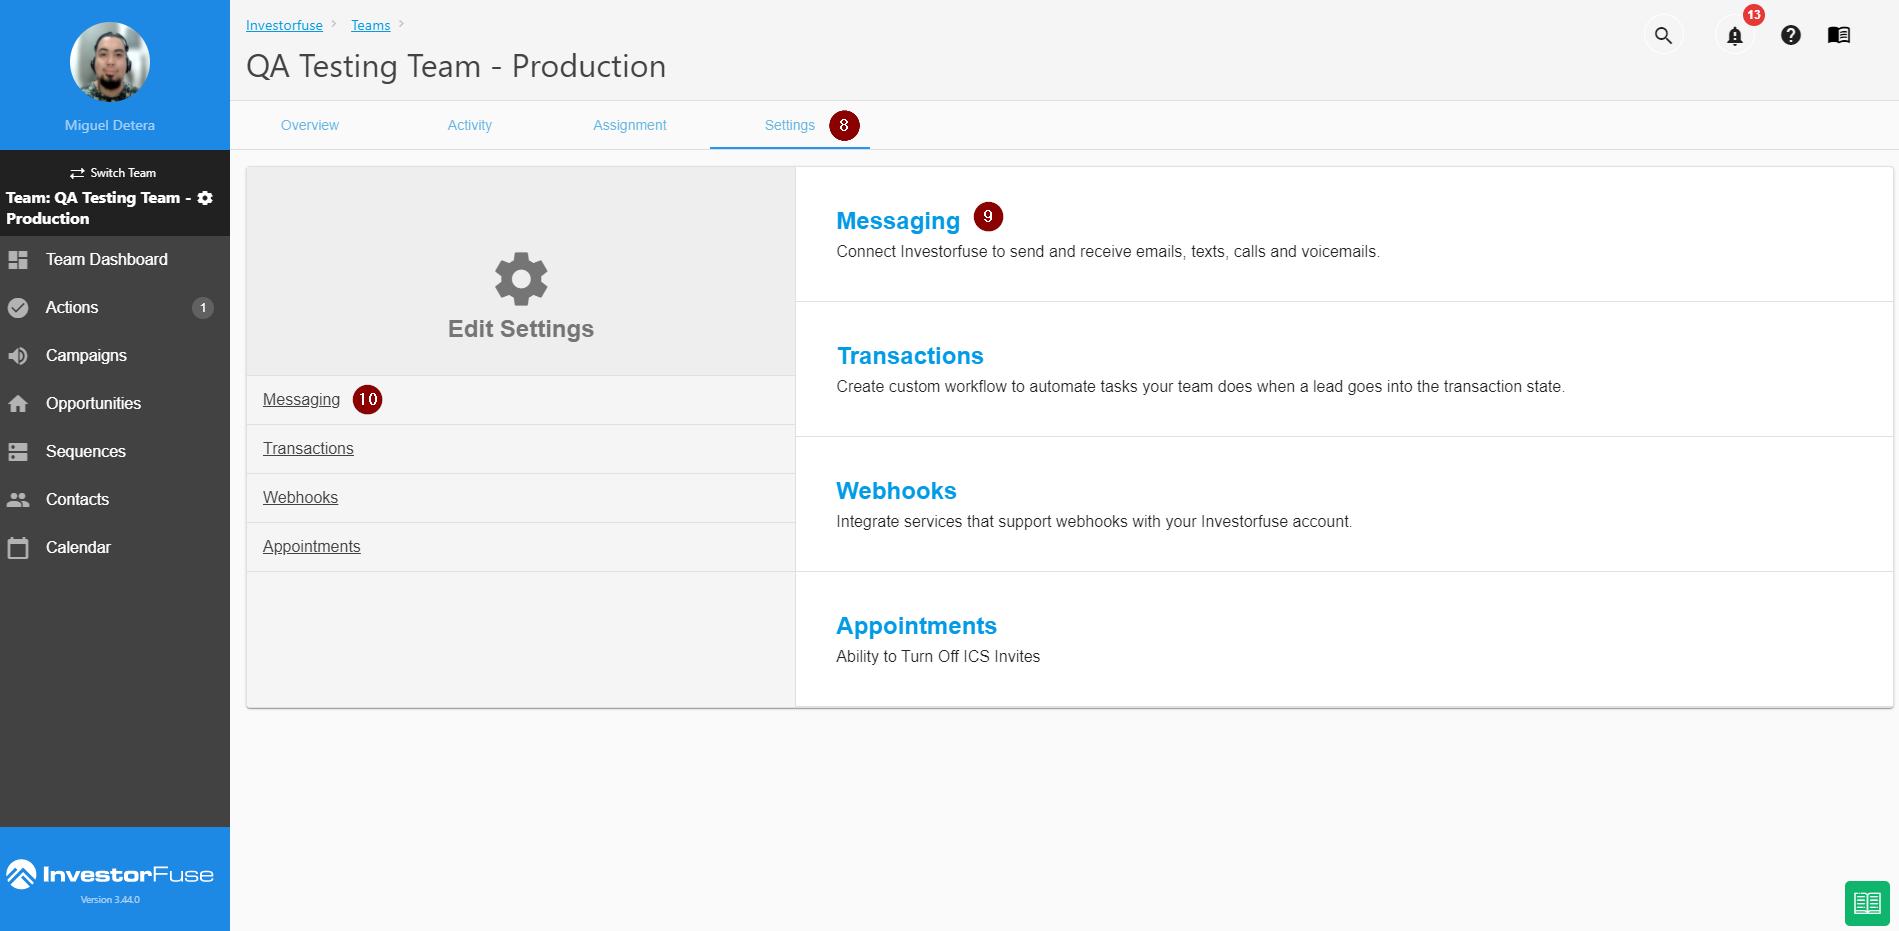
8. Log in to your IF3 account and click on the Settings tab in your Team Dashboard
9. Click on the Messaging option
10. This directs you to the same Messaging section
11. Scroll down in the Messaging section and look for the Outbound Text Webhook. Paste the Webhook URL from Zapier into the field, click out of the field for it to save automatically
12. Turn this off since Dialpad can send an SMS as one whole message
.png)
13. Go into one of your test opportunities or contacts and send an SMS
14. Click Test Trigger
.png)
15. The requests that were made on the Zap’s webhook URL will then show after testing the trigger – choose the most recent one
16. The data from the SMS that was sent from IF3 will then be displayed
Breakdown of what is being sent with every SMS:
- opportunity_id – this is the unique identifier of the opportunity in IF3
- message – this is the message that was sent from IF3
- sender_id – this is the team member that sent the SMS
- seller_id – this is the unique identifier of the contact in IF3
- seller – this is the name registered to the contact associated with the opportunity (or could just be the contact entry itself)
- seller_phone & seller_phone_non_international – this is the seller lead’s phone number that comes in two formats
- team_id – this is the unique identifier of the team’s marketspace that sent the SMS
17. After confirming that this is the message that you sent, click Continue
.png)
Step 2: Creating the Zap Action – Resources Needed
In this section, you will be shown how the data that came from IF3 is tailored to fit the phone system that will be used to send the message.
Dialpad’s End-point URL
Based on Dialpad’s API V2 Documentation for SMS, there is nothing special that needs to be added to the end-point URL – that it can be used as it is.
Dialpad’s End-point URL for SMS sending: https://dialpad.com/api/v2/sms
Your preferred Dialpad number for sending
Your Dialpad phone number and account
In Dialpad, a user will be assigned a number that would serve as their own. It is critical to ensure that the phone number that you will use for this function matches your account.
1. Log in to your Dialpad account and you will normally be greeted with this page. If not, click on the Dialpad logo on the upper-left of the page.
2. Your profile will then be displayed, look for your Dialpad number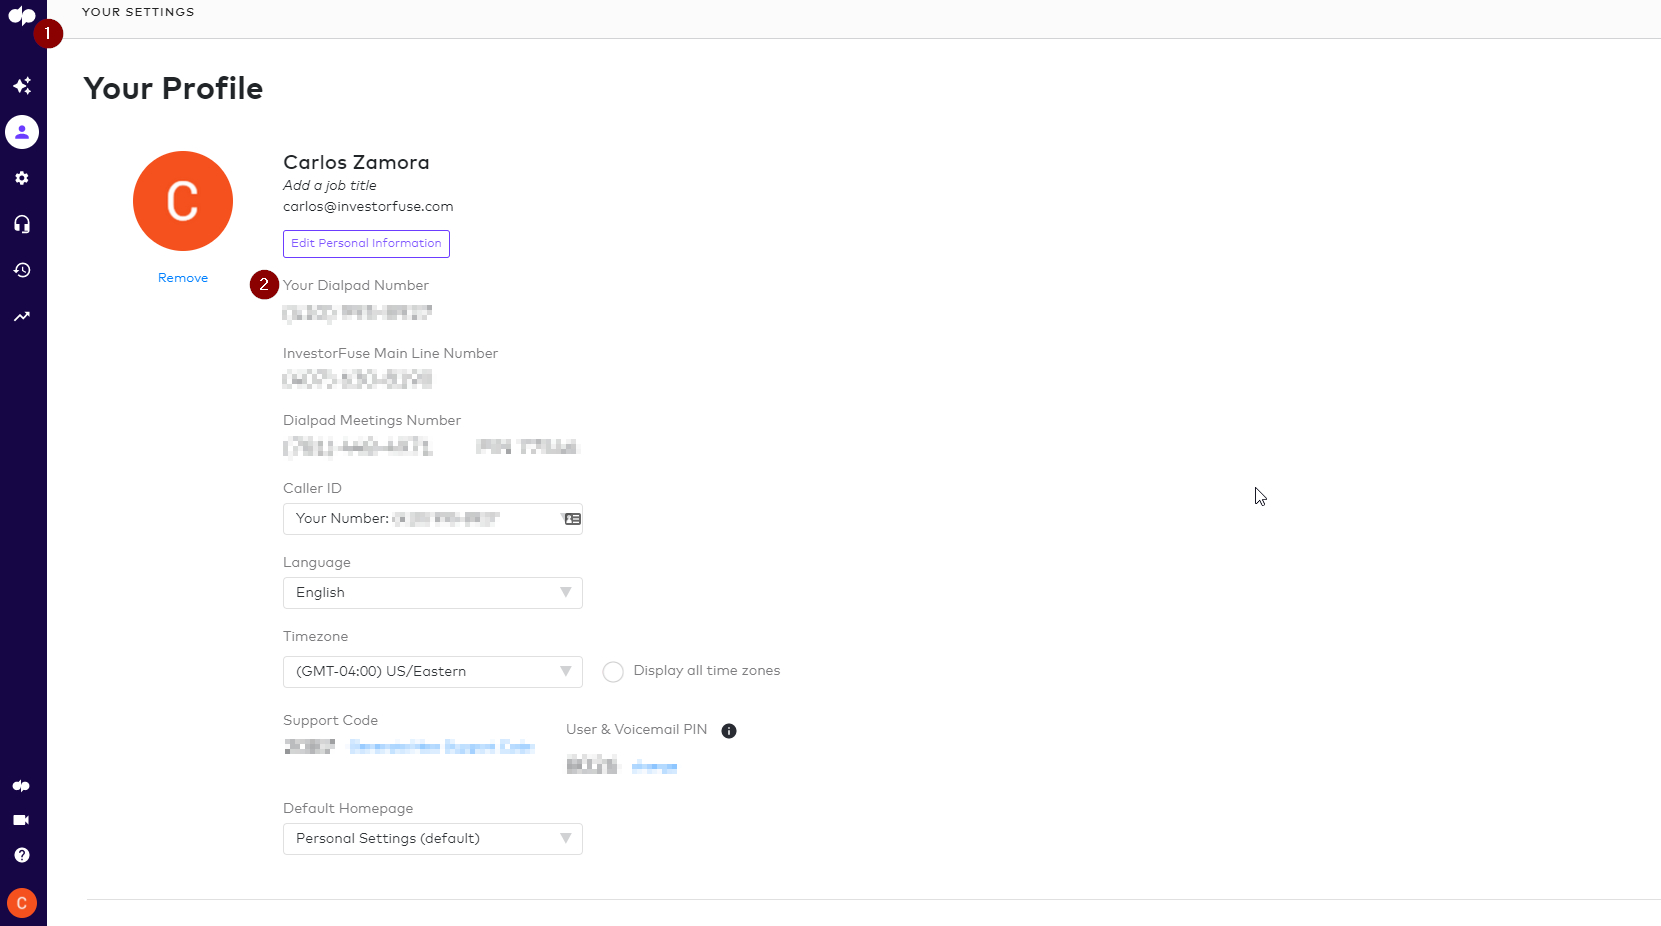
Your Dialpad API Key
Precautions about your Dialpad API Keys
- Deleted API Keys are unrecoverable
- Never share your API Key with anyone if they are not involved in this process
1. In Dialpad, click on the cog⚙️ icon
2. Make sure that the drop-down is set to My Company, under the drop-down, choose Authentication
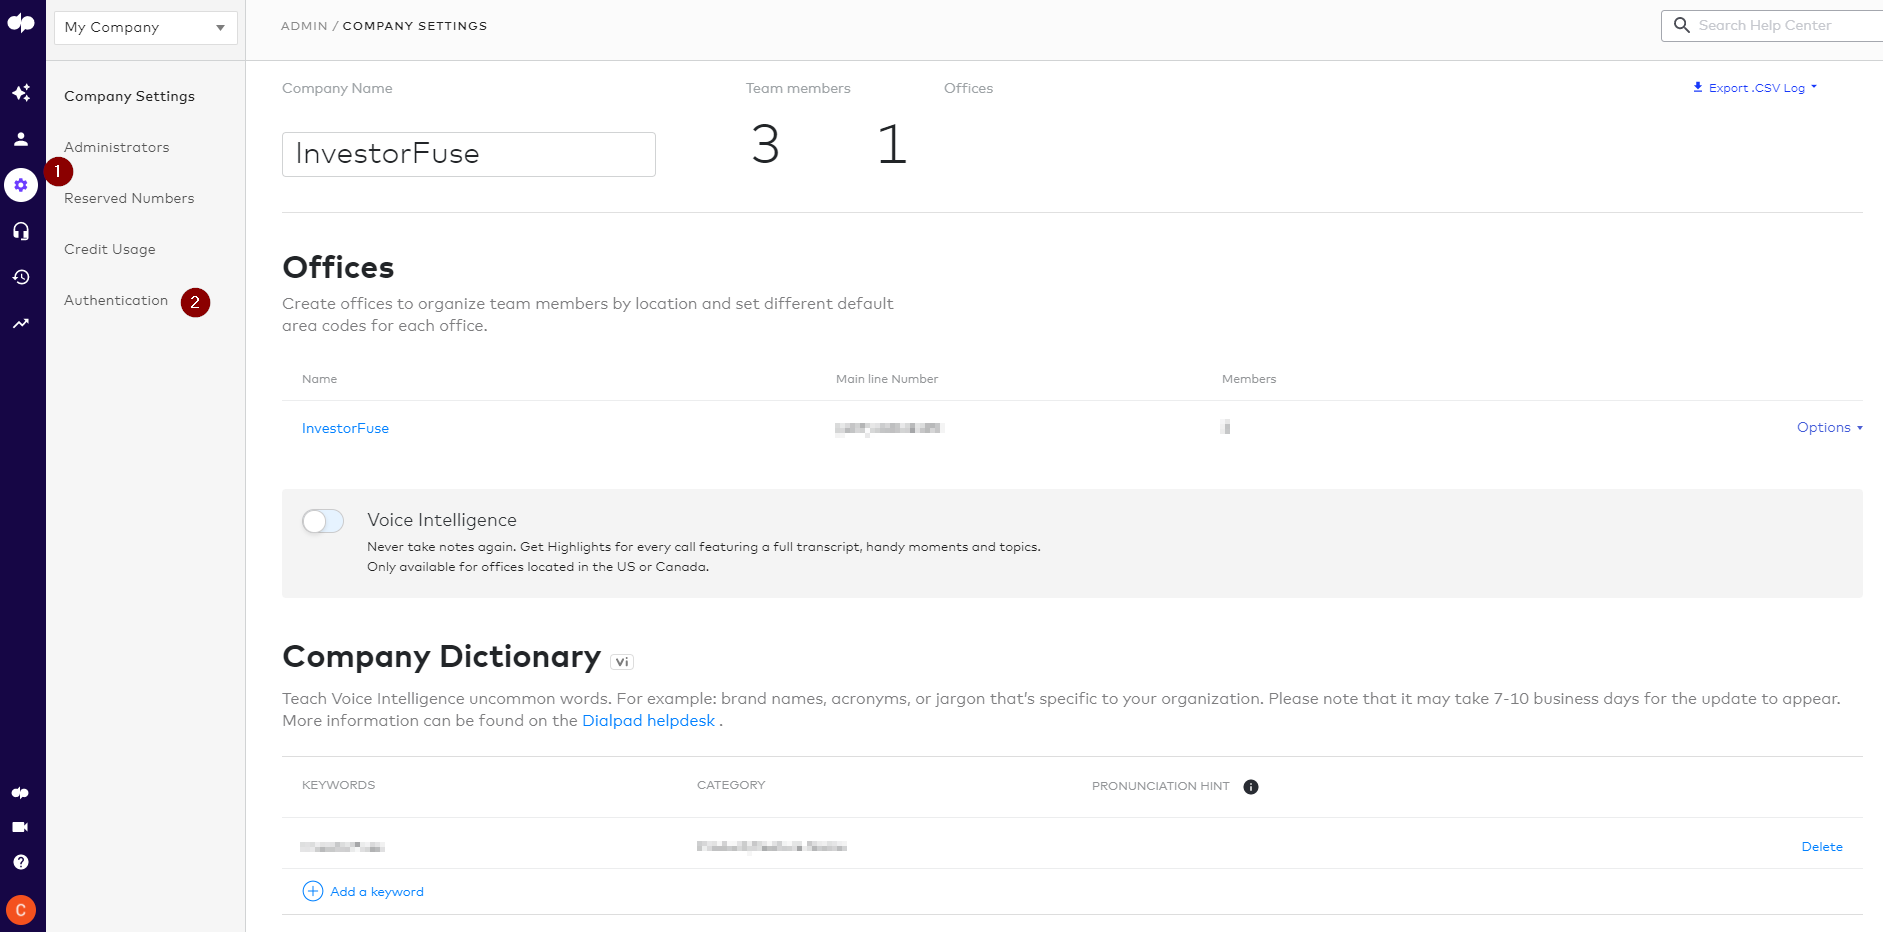
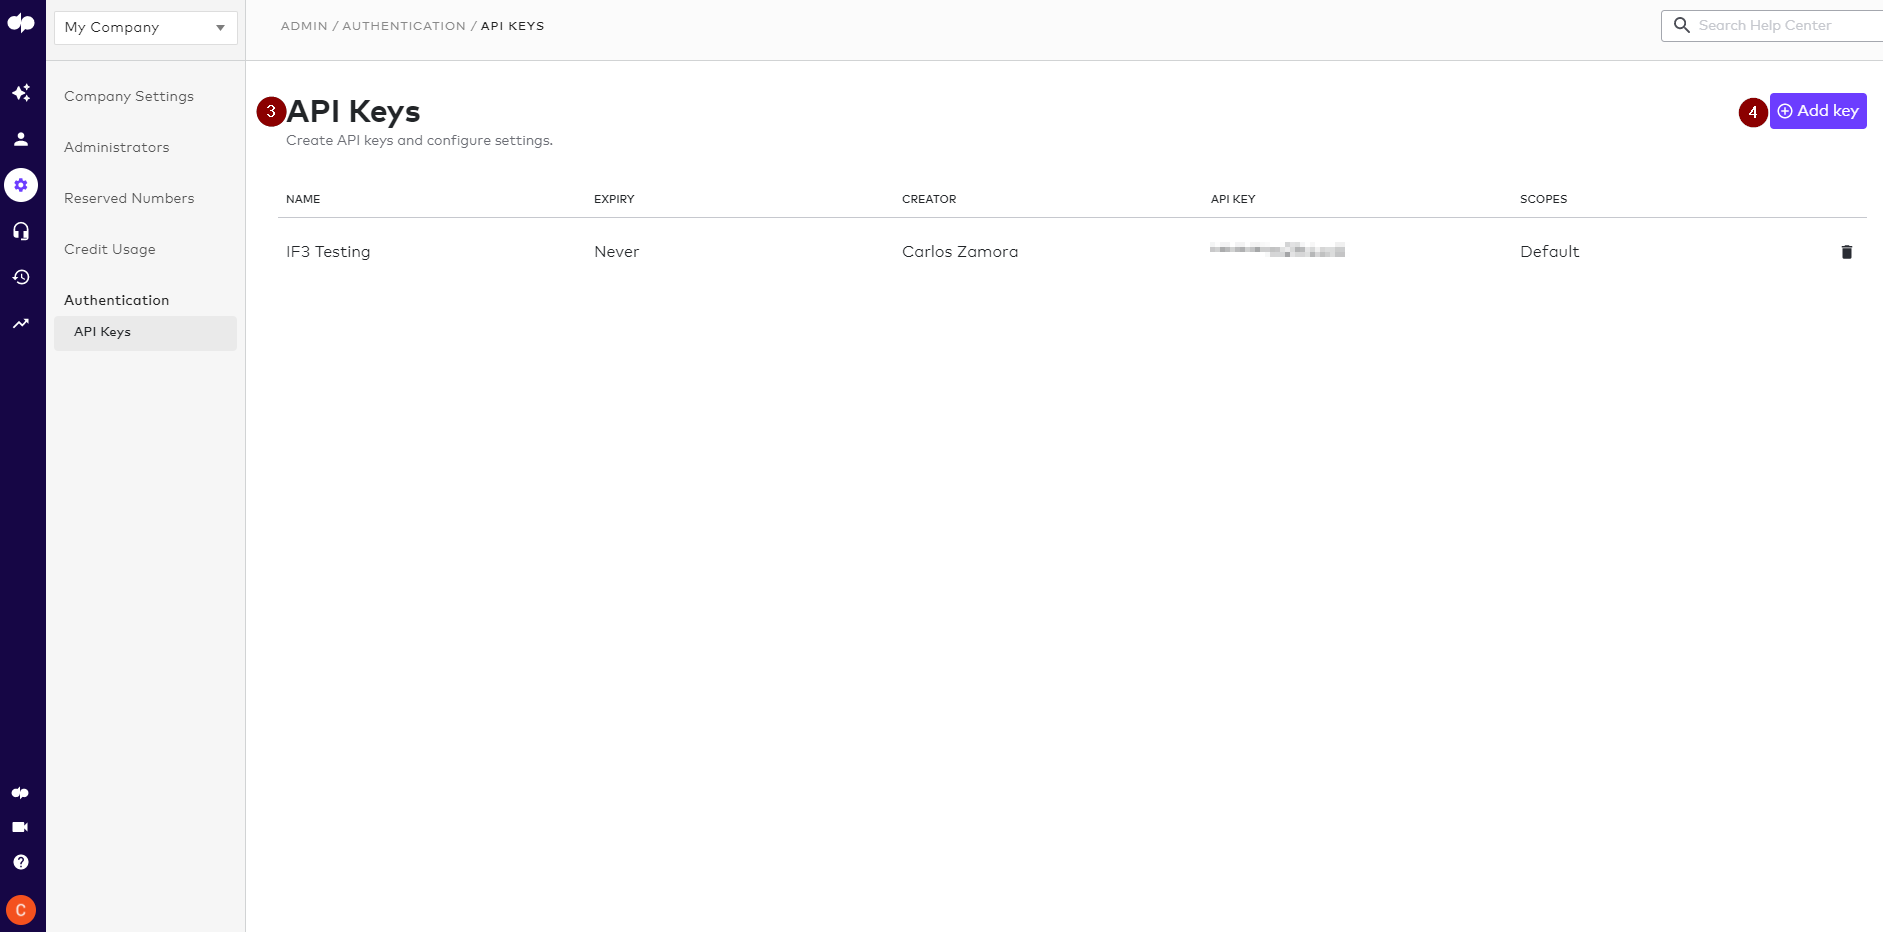
3. Under Authentication, you will be brought to the API Keys page, this page will show you all the existing API Keys that are active for your account
Caution
Deleting an API Key will disconnect any integration that is tied to it, if you are to delete an API Key always verify this with the owner of the account, or the ones that set-up an integration for your Dialpad line.
4. Click on Add key to create a new API Key for this integration
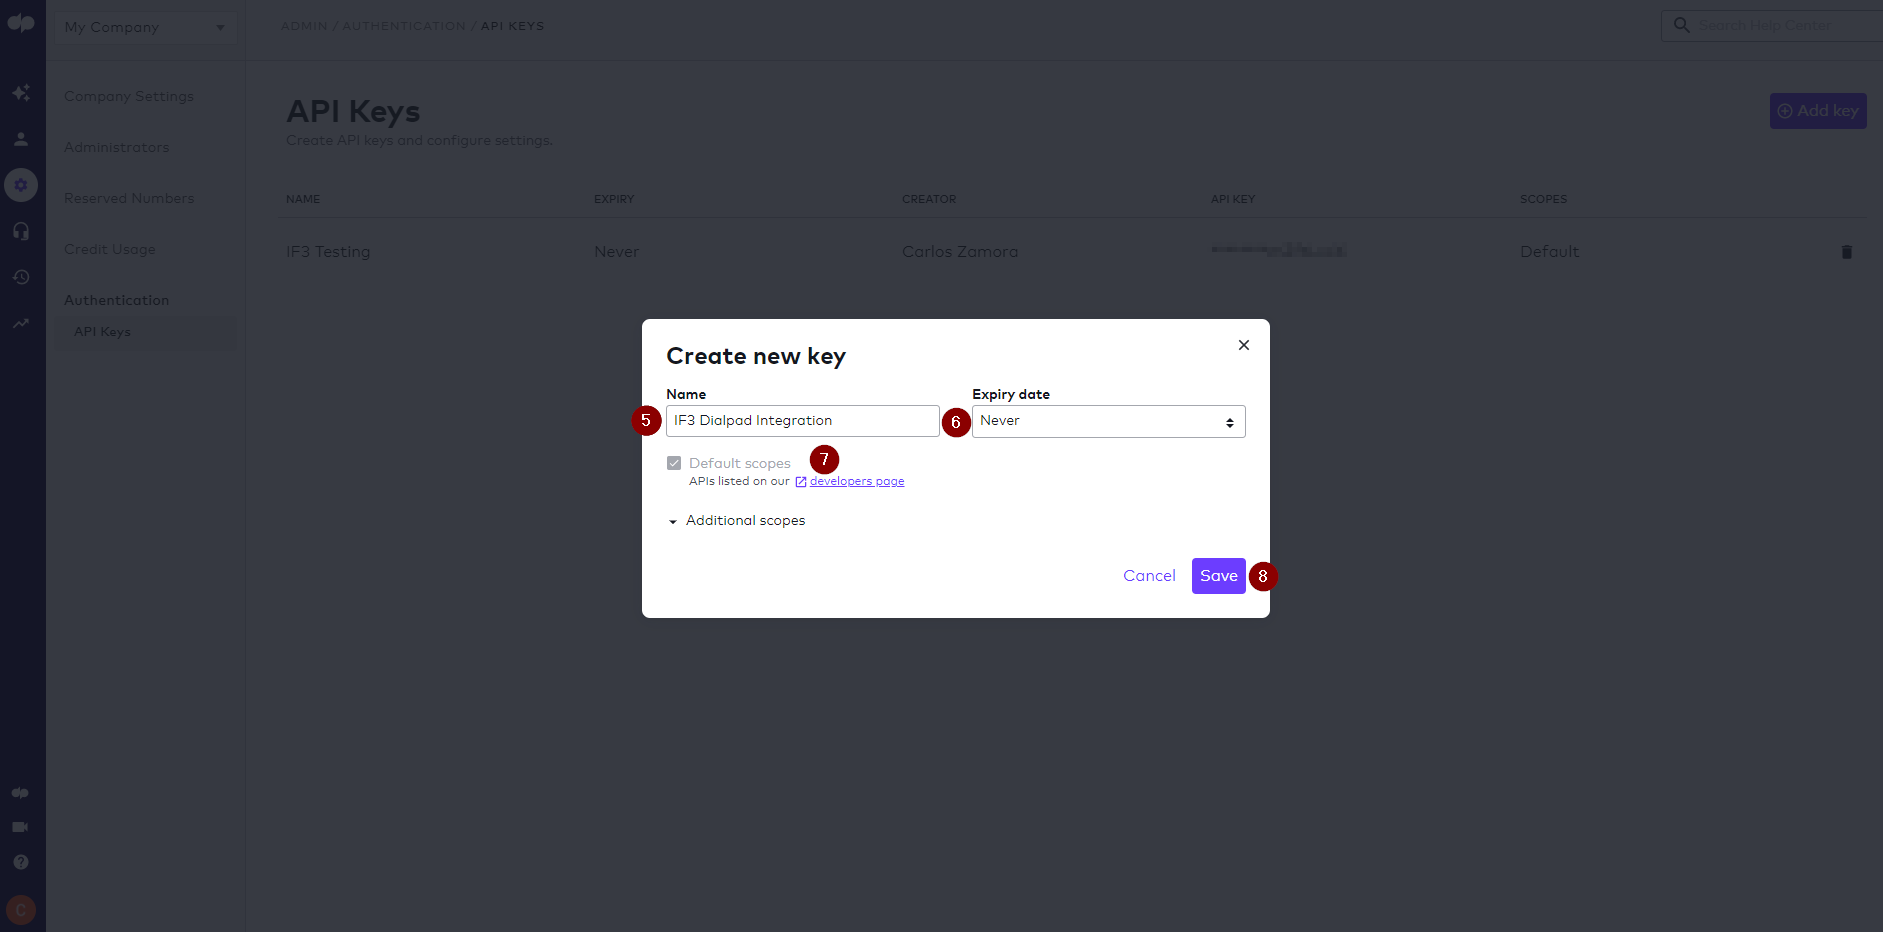
5. After clicking on Add Key a prompt will show for you to add in the specifics of the API Key that you’ll create – name your API Key
6. Always set the Expiry date to Never
7. Ensure that checkbox for Default scopes is checked
8. Click on Save
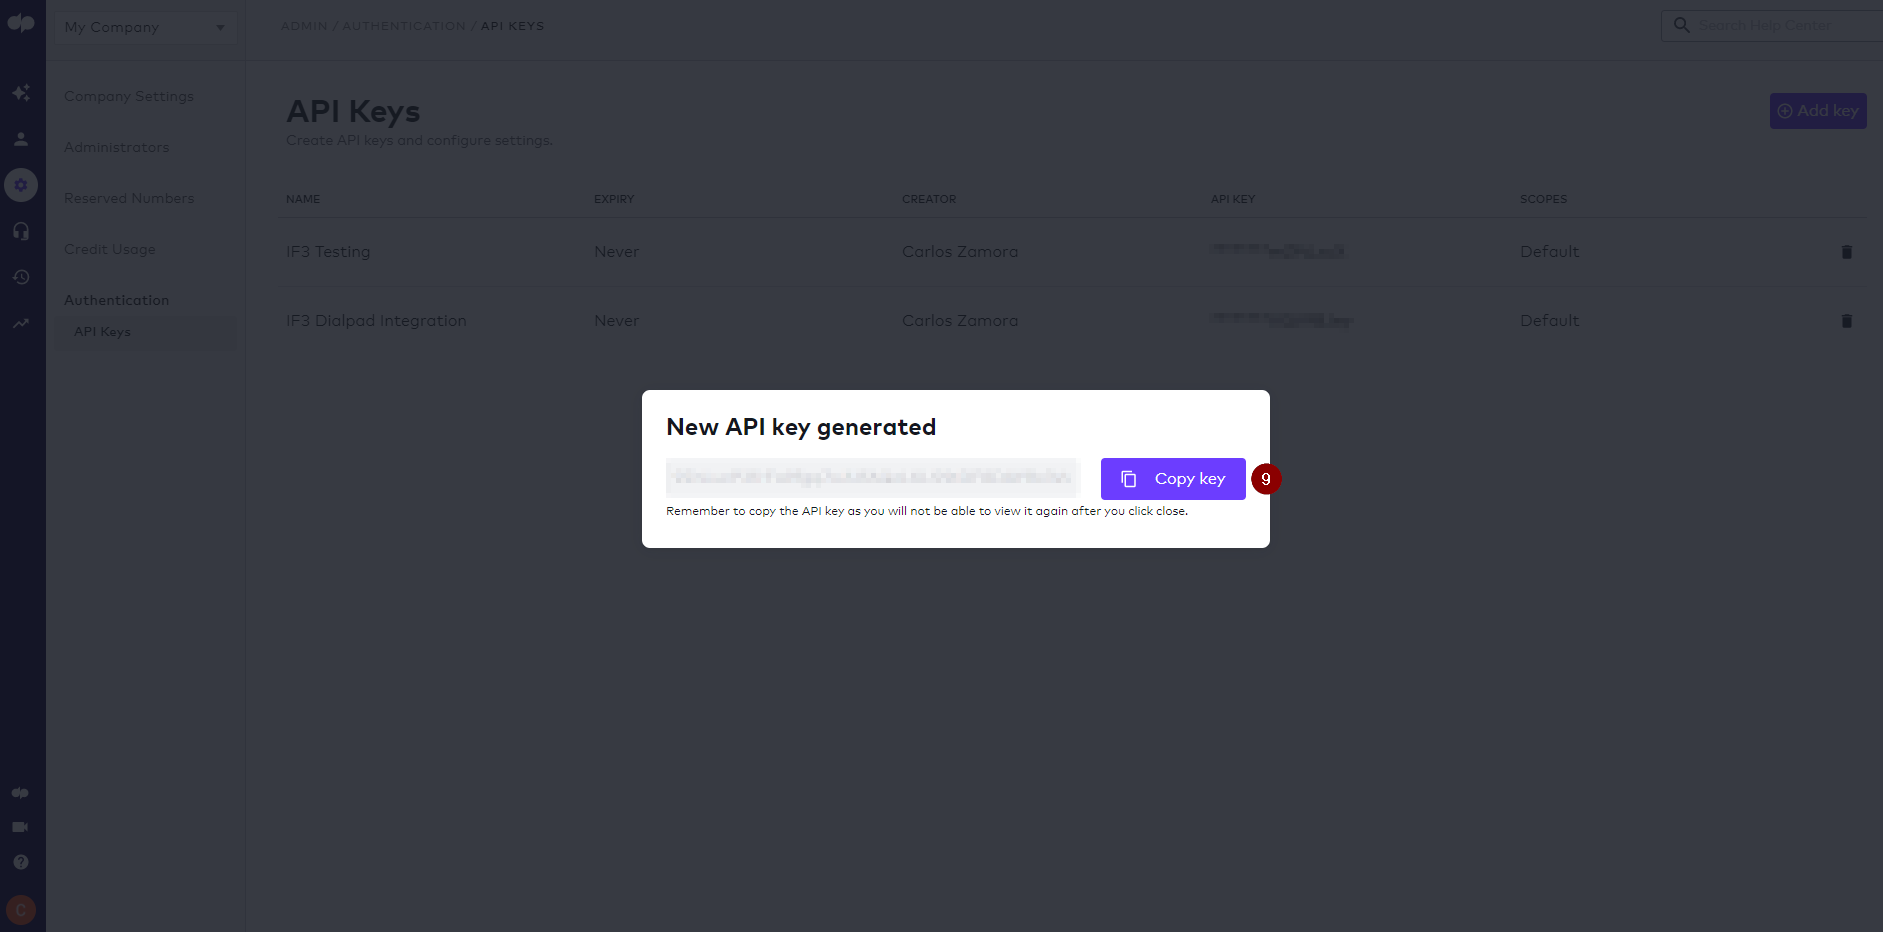
9. Click on Copy key
Your API key will only be available briefly after you save the details of it. You must click on Copy to grab the whole combination and save it. After you close out the prompt where you can copy the API key, it will no longer be accessible for viewing and you’ll have to create a new one if you failed to obtain it.
Your user ID (user_id)
How to get your user ID from Dialpad
This serves as your unique identifier in the Dialpad account that you are using, this would tell the integration that you will create that your user is the one that will send the SMS. You can obtain your user ID by reaching out to Dialpad’s support via chat
Step 3: Completing the Zap
Before you continue, make sure you have the following;
- Dialpad’s End-point URL – https://dialpad.com/api/v2/sms
- Your preferred Dialpad number
- Your Dialpad API key
- Your Dialpad user ID
1. Choose the option Webhooks – this event is only available for Premium Zapier accounts
2. Select POST as the action event
3. Click Continue
.png)
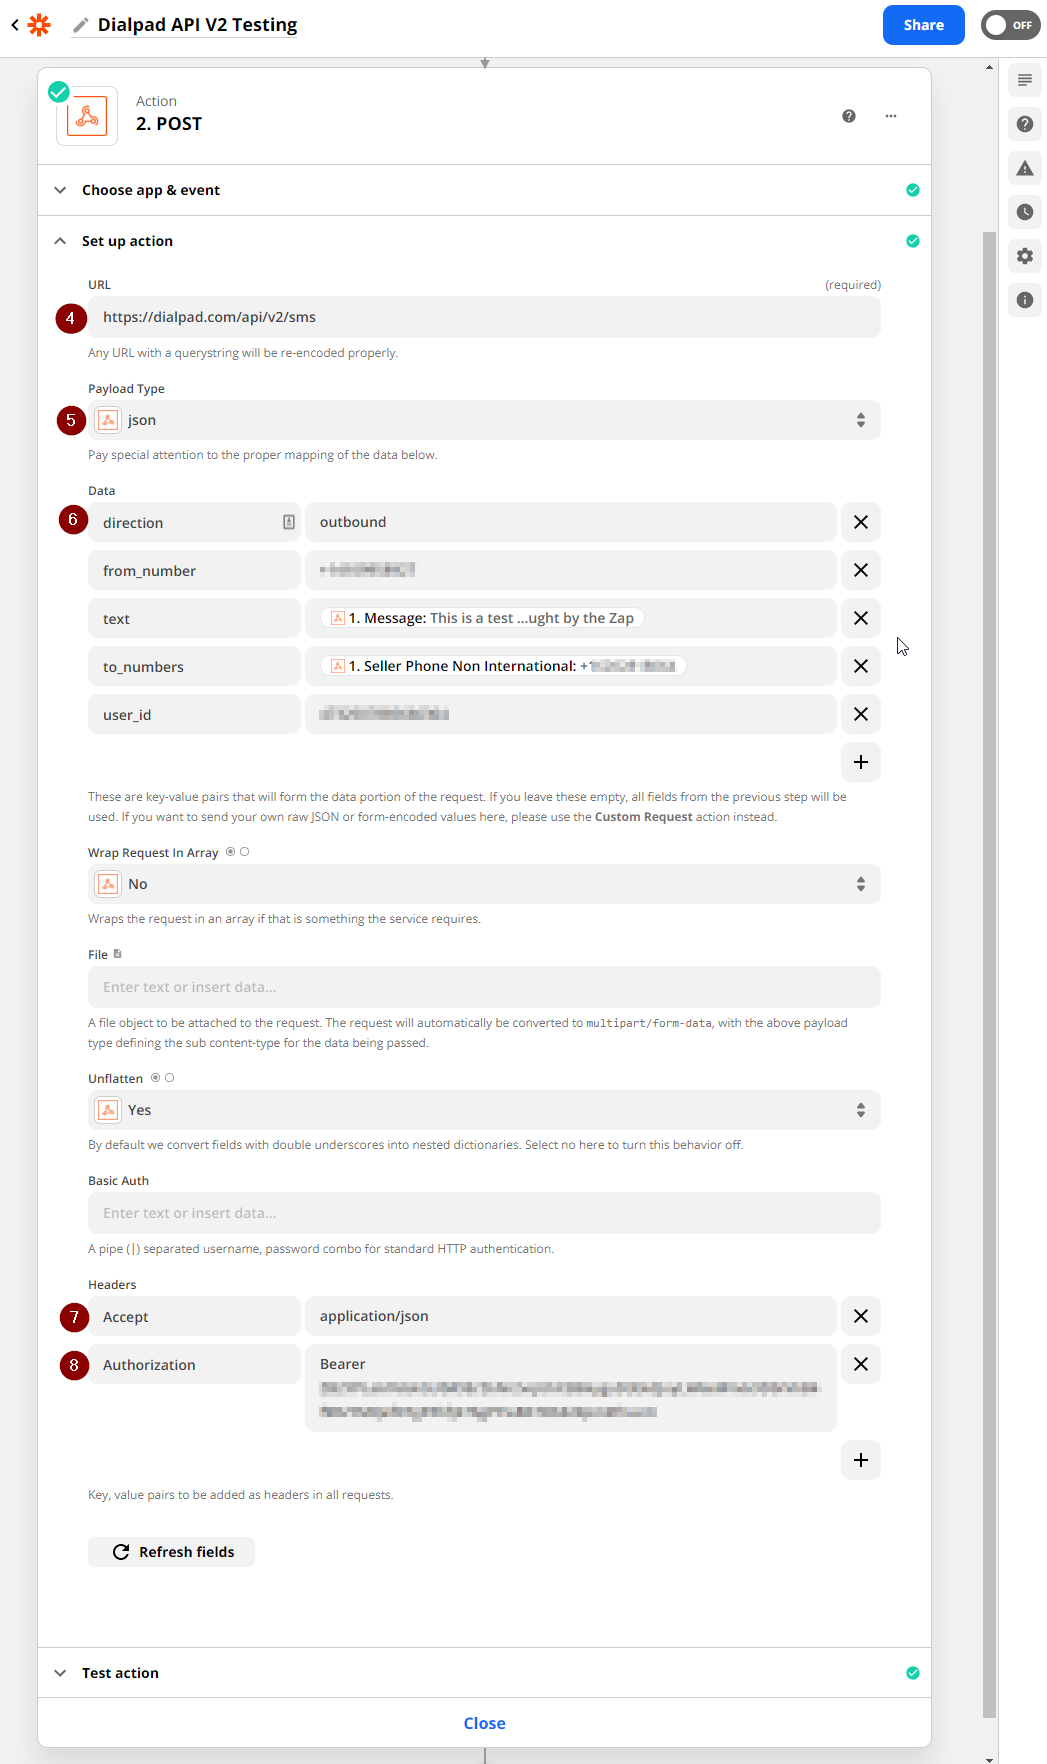
4. Place the end-point URL
5. Choose JSON as the payload type
6. Set the parameters – each parameter will be used by Dialpad to determine how it’s going to send the re-routed SMS
- direction – this should always be set to outbound
- from_number – this is the number that would send the SMS to the recipients phone number (to_numbers)
- to_numbers – this is one of the variables that would be influenced by the payload from IF3 – It is highly recommended that the seller phone non-international parameter is used at all times
- user_id – this is the user ID of the Dialpad user that owns the number (from_number) that will send the SMS
- text – this is the message that was sent from IF3, use the message parameter that is present in the choices
7. Set the first header to this; Accept application/json
8. Set the second header to this and place your API key along with the term Bearer on the second field; Authorization Bearer (API Key)
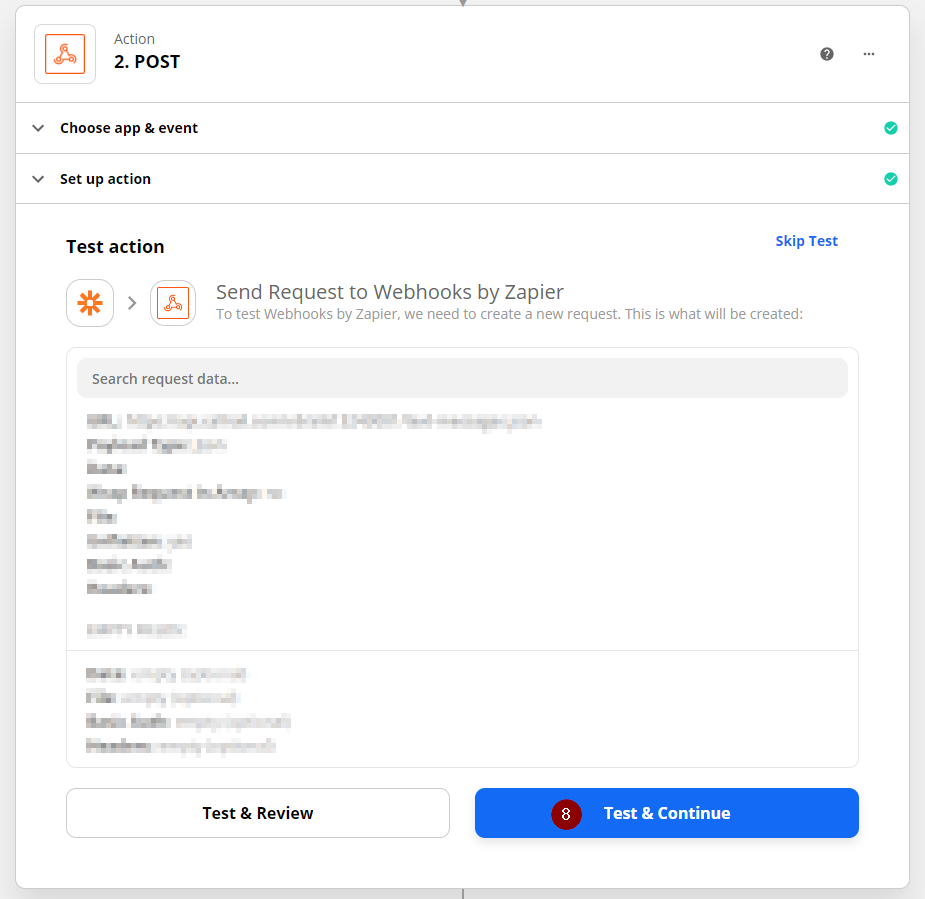
8. Click Test & Continue, shown below are the two (2) possible outcomes. Upon a successful test, it should send the SMS from IF3 using the tracking number of preference from Dialpad.


After integrating Dialpad for texting, any manual text messages sent through InvestorFuse/Carrot CRM will come from a Dialpad number moving forward. If you get stuck anywhere or need help with the integration itself, you can reach out to the Support Team via the Live Chat.
