
Carrot CRM is your new partner in simplifying real estate lead management!
Did you know? Carrot CRM’s Essential, Scale and Team plans come with included setup support. Our team handles setting up lead integrations for you during a simple kickoff call.
Carrot CRM’s automated outreach sequences make sure no lead gets left behind. Sequences are a group of automated messages that are sent out to your leads on a timed basis and can be customized depending on how you want to follow up with the seller.
Sequences are your automated follow-ups and drip campaigns. This powerful CRM feature lets you effortlessly stay connected with your leads, so that you can close more deals.
Craft your custom sequences by setting the types of outreach (text, voicemail, email, etc.), the message, the outreach timing and a next-step if the sequence finishes before the lead reengages.
In this tutorial, we’ll cover how to automate your lead follow-up with Sequences:
- Video Tutorial: Sequences
- Default Sequences
- Create or Edit a Sequence
- Types of Actions: Sequence Steps
- Start a Sequence
- Stop a Sequence
- FAQs
Let’s get started!
Watch Our Sequences Tutorial
This video was recorded for InvestorFuse but the instructions also apply for Carrot CRM. It will guide you through an overview of Sequences and show you the best practices to make the most out of this feature:
Default Sequences
Your Carrot CRM or InvestorFuse account will have a few default Lead Sequences automatically added. You may edit these as you desire.
Depending on your Carrot CRM or InvestorFuse plan, the follow-up sequences that are entered as a default for you are:
- Cold Offer Follow Up – This is a long term sequence for someone who is not interested in selling immediately, but may be long term. Click here to see a PDF overview of all the steps included in this sequence.
- Can’t Reach Lead – Set this sequence for someone who called you or filled out a webform but you cannot reach them. Click here to see a PDF overview of all the steps included in this sequence.
- Hot Offer Follow Up – This sequence is for a hot lead that is very interested in selling and an offer has been made. Click here to see a PDF overview of all the steps included in this sequence.
- Warm Offer Follow Up – This sequence is for a seller who is considered a “warm” seller who isn’t necessarily interested in selling immediately but may be interested down the road and an offer has been sent. Click here to see a PDF overview of all the steps included in this sequence.
🥕 Need more sequences? Each Carrot CRM plan comes with a different number of sequence templates. Our Team plan has unlimited sequence templates! Learn more
Create or Edit a Sequence
You can add your own custom Sequences to your workspace as the needs arise. Once you add a new Sequence you’ll be able to assign it to Opportunities across your entire workspace.
Step 1: Create a New Sequence
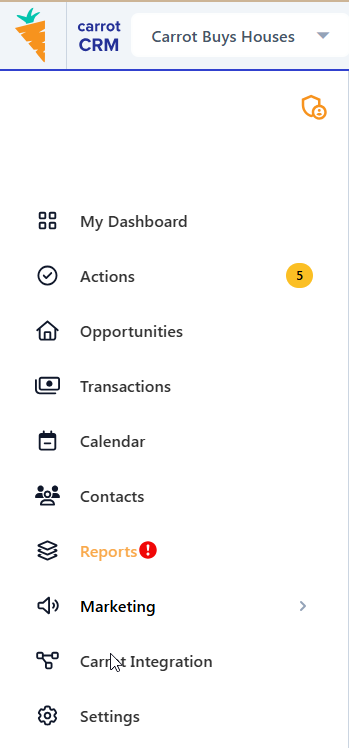
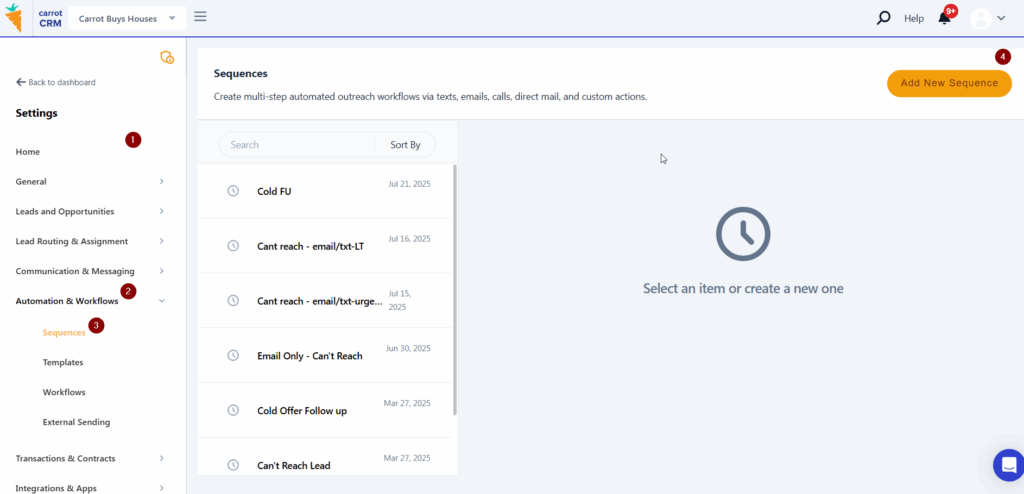
- Click Settings in the left menu
- Click on Automation and Workflows
- Select Sequences in the options
- Click Add New Sequence to create a new sequence
- Type in the name of your sequence
- Type in the description of your sequence
- Click Save
Next, you want to add the steps to your sequence in your preferred order and at specific intervals.
Step 2: Add Steps to Your Sequence
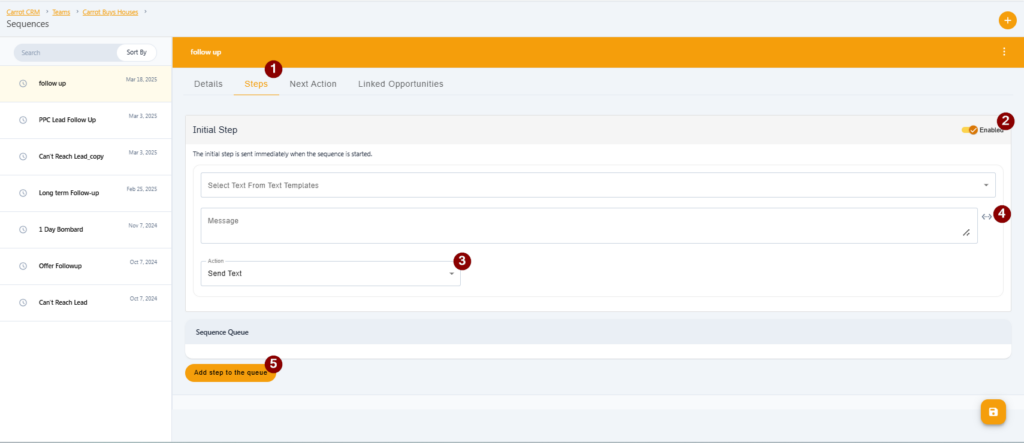
- Click the Steps tab inside of the sequence
- Toggle the Initial Step on or off (enabled or disabled). Turning this on (enabled) will immediately send a message to the seller as soon as the sequence is started. If you turn this off (disabled), you can have the initial message go out a few days, weeks, or months later after starting the sequence.
- Select the Action you want, for example: email message, text, voicemail, direct mail, or a custom task. (See the section below for an explanation of how to edit each of these.)
- If you are sending a message, you can click the bracketed dots to the right of the message area to drop personalized tokens like the seller first name, address, or other opportunity-specific info like size (sqft), etc. to incorporate into your message.
- Click Add step to the queue to add the next step
Step 3: (optional) Rearrange Steps
After your sequence is complete, it will show your list in order by the entry. You can re-order your Sequence or delete a Step by clicking on the three-dot icon to the right of each sequence and click Move Up, Move Down, or Delete Step. Keep in mind that this will not change the order of when your steps will trigger unless you change the Send on Day (X) field as well.
Step 4: Finish your Sequence by Adding the Next Action
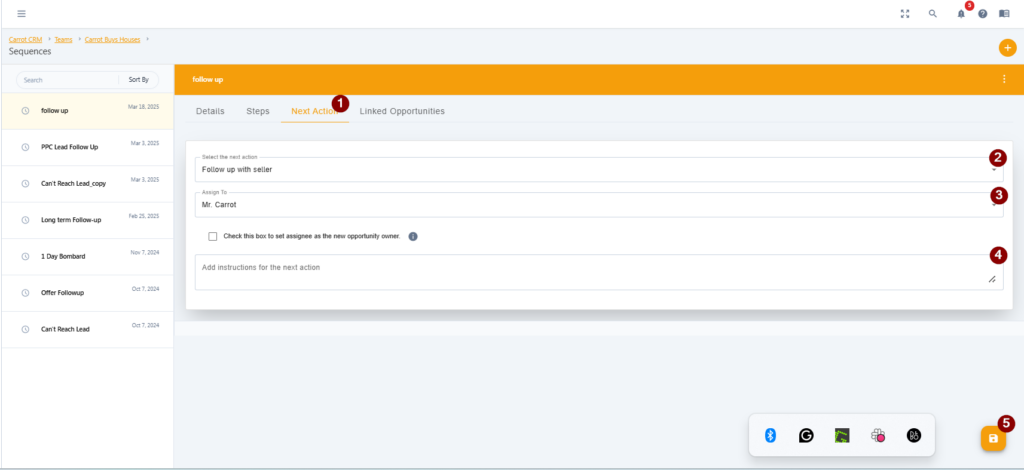
- After you have entered all the Steps, click the Next Action tab
- Select the Action you would like to assign after all steps in the sequence have been taken. The Sequences that are in your Market Space by default are set to Follow up with Seller and assigned to the owner of the Market Space. You can change this to mark the opportunity dead as soon as the sequence is complete, assign a due diligence action, etc.
- Select the Assignee
- Add instructions for the Assignee
- Click Save
🚨 IMPORTANT: Setting a Next Action is crucial to put the opportunity back into the pipeline after the sequence is complete. If there is no Next Action set, the system will assign ‘Follow up with seller’ by default and assign it to the Opportunity Owner.
Types of Actions: Sequence Steps
In the Steps area when setting up or editing a Sequence, you have a few different types of Actions that you can use to send a message to a lead or automate other tasks.
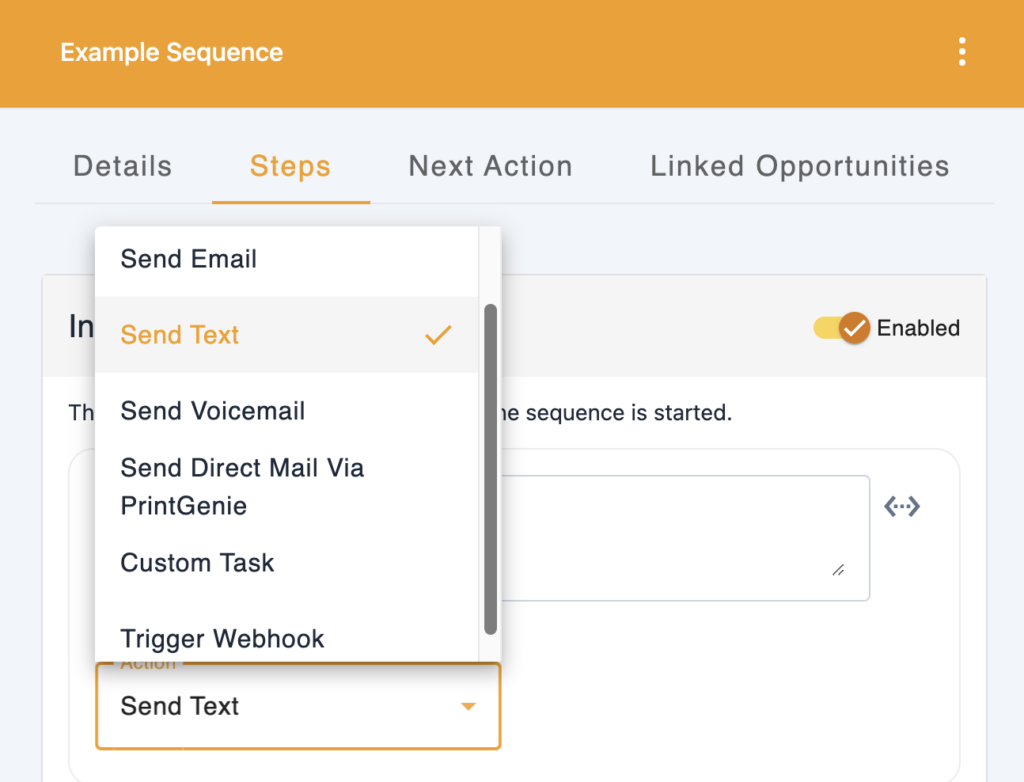
Here is an explanation of how to edit each type of Action available as a step in a Sequence:
Send Email
- Change the Action box to Send Email
- Input the Step Name. This is what you want to call this specific step and is purely internal
- Put a subject for the email
- Enter the message that you want to send
- Set the number of days for the step to trigger once the sequence is started
- Set a time to send this message. If blank, it will send at 9 am on the scheduled day using your team’s timezone
Send Text
- Change the Action box to Send Text
- Input the Step Name. This is what you want to call this specific step and is purely internal
- Enter the message that you want to send
- Set the number of days for the step to trigger once the sequence is started
- Set a time to send this message. If blank, it will send at 9 am on the scheduled day using your team’s timezone
Send Voicemail
- Change the Action box to Send Voicemail
- Input the Step Name. This is what you want to call this specific step and is purely internal
- Enter your preferred Callback number. This is also going to be the Caller ID and what the seller will see when they get the recording.
- Upload your voicemail into this step. It has to be less than 60 seconds and in .wav format. You can use online recorders to record in this format.
- Set the number of days for the step to trigger once the sequence is started
- Set a time to send this message. If blank, it will send at 9 am on the scheduled day using your team’s timezone
Send Direct Mail via PrintGenie
- Change the Action box to Send Direct Mail via PrintGenie
- Input the Step Name. This is what you want to call this specific step and is purely internal
- Go to PrintGenie and log in to your account. If you do not have an account, you can sign up here.
- In their left menu, go to Mail Templates
- Select the template that you want to send through the sequence and click the API / Webhook icon
- Copy the generated Webhook
- Go back to InvestorFuse and paste the webhook into the PrintGenie Webhook URL field
- Set the number of days for the step to trigger once the sequence is started
- Set a time to send this message. If blank, it will send at 9 am on the scheduled day using your team’s timezone
📬 NOTE: When you start a sequence with a Direct Mail step, we will prompt you to double-check the mailing address of the seller. There has to be a mailing address saved on the contact for this to work. If you do not have one on file, click the Pull Mailing Address from Public Records to automatically populate the fields using public information.
Custom Task
- Change the Action box to Custom Task
- Input the Step name. This is what you want to call this specific step and is purely internal
- Enter the Task name. This is what will show up in the Actions of the assignee
- Write a description of the task if needed
- Select an assignee for the task
- Set the number of days for the step to trigger once the sequence is started
- Set a time to send this message. If blank, it will send at 9 am on the scheduled day using your team’s timezone
Trigger Webhook
- Change the Action box to Trigger Webhook
- Input the Step Name. This is what you want to call this specific step and is purely internal
- Input the Webhook URL that you generated.
- Set the number of days for the step to trigger once the sequence is started
- Set a time to send this message. If blank, it will send at 9 am on the scheduled day using your team’s timezone.
Start a Sequence
When you are ready to start a follow up Sequence for a lead, you’ll do so from Opportunity/Actions. Start by locating the Opportunity for your lead, then you’ll complete the next Action for it and place it in a follow up Sequence.
Step 1: Locate your Opportunity
- Select any Team in the left menu
- Click Opportunities
- Search for or filter the Opportunity you’re looking for and click on the address to edit
- Click the Opportunity/Property Address to view the Opportunity
Step 2: Complete the Action
Regardless of the outcome of the current Action you will need to schedule and assign the Next Action.
- Click the Actions menu
- Complete the current Action
Typically you’ll be starting a Sequence for someone who is a cold or warm lead. You cannot add someone to a Sequence for certain Statuses such as Under Contract.
If you find it is necessary to add a lead to a Sequence currently under a Status that won’t allow it, then you can adjust the status first and then place them into a Sequence.
Step 3: Select the Next Action
- Select Place in Follow Up Sequence in the Select a Next Action dropdown menu
- Select the name of the Sequence you want to add them to
- Click Complete Action
The Opportunity has been placed in the Sequence you selected and will be followed up with automatically until the sequence is complete. In the future you can check the start date of your Sequence by checking the Activity and Communication Log in the Info section of your Opportunity.
Stop a Sequence
There may be situations where you need to stop a follow up Sequence that is currently running. To do this, you will locate your Opportunity and then cancel the Sequence assigned to them.
Examples of when you’d want to stop a sequence are when you are able to speak with the seller and have moved the lead in the pipeline, or the seller asked to be removed from your list and wishes to stop receiving messages.
- Select any Team in the left menu
- Click Opportunities
- Search for or filter the Opportunity you’re looking for. Click “All Opportunities” if you do not own the opportunity you are looking for.
- Click the Opportunity/Property Address to view the Opportunity
- Click the Actions menu
- You will see the Sequences list as they will run in the future as well as a history of messages that have been sent
- Scroll to the bottom of the list and click Cancel Sequence
Once you’ve canceled the Sequence you’ll need to select the next Action as appropriate and you’re all set.
Follow Up Sequence FAQs
What happens if a seller responds?
If an Opportunity is in a sequence and the seller responds to the messages, a few things will happen:
- The system will pause the current sequence, stopping the rest of the messages from going out
- The Opportunity owner will receive a task called Sequence Paused. Reply to seller that will show up in their Actions
- You can cancel or resume the sequence depending on what the next step is
- The seller’s response can be seen in the activity log of the Opportunity
Conclusion
That’s it! You’ve learned how to supercharge your productivity with Carrot CRM Sequences.
In this tutorial, we covered how to create or edit a sequence, start or stop a sequence, and the types of Actions and messages you can include in a sequence. Now you know how to put an Opportunity in a sequence and what happens if the seller responds to the messages!
