In this tutorial, you’ll learn how to manually create Location Pages by duplicating and editing a page.
To make it simple, Location Pages are created by duplicating your main/front page, then, editing the duplicate’s content to speak to a specific market location that you would like to target! We will show you how to do this below!
Why make one? Location pages are an amazing tool to use when you would like to market to multiple cities at once. It’s a strategy known as LoopNet Marketing and is the same strategy employed by Zillow and Craigslist.
You should create Location pages when you are marketing in a state, county, nationwide, or multiple cities. This strategy allows you to rank for each market area individually without having to build a new site for each market.
⏰ Time Saver: Our Auto-Locations Pages feature makes this easy by mirroring the parent page they are created from, and eliminating the need to apply any new updates across multiple pages. This saves you valuable time and avoids the need to track which pages have or have not been updated.
Follow the steps below to do this manually:
Part 1: Creating The Location Pages!
Follow Steps 1 – 6 for every market area that you would like to target for now. More Location Pages can be added later, should you want to space out the work!
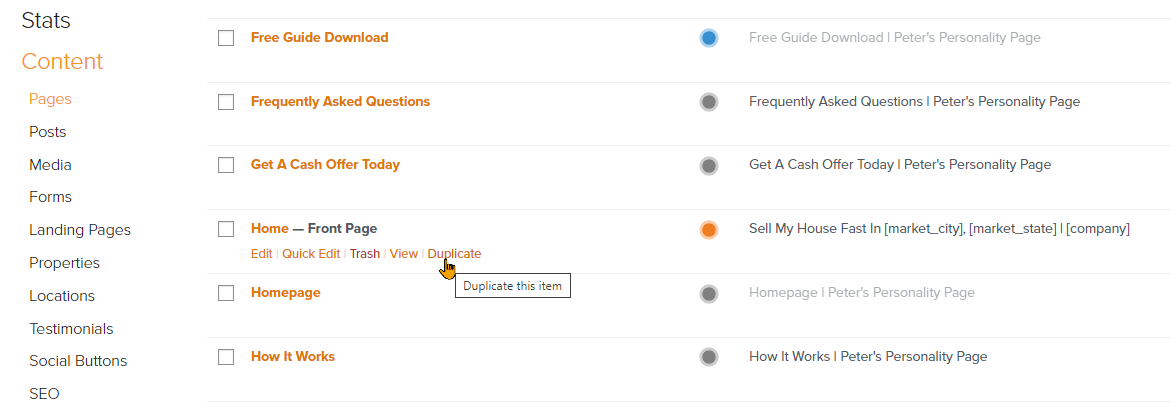
Step 1: Navigate to Dashboard > Content > Pages:
- Then, hover over your homepage, and click “duplicate” from the options that will appear below the page’s title. Your default home page will be titled “Home” but may have been updated/retitled. Please search for the page that has “Front Page” in black letters next to it.
🚨 Please note: Once you have manually duplicated a page, it will be independent of the home page. Any edits you’d like to make to pages created by this method will need to be performed on each individual page. If you want to make an update to the home page and have that carry over to all location pages, you’ll need to update the home page prior to duplicating it. If you don’t want to do extensive customization on each location page and you prefer edits on your home page to automatically carry over to all of your location pages, use the Auto-Locations Pages feature instead.
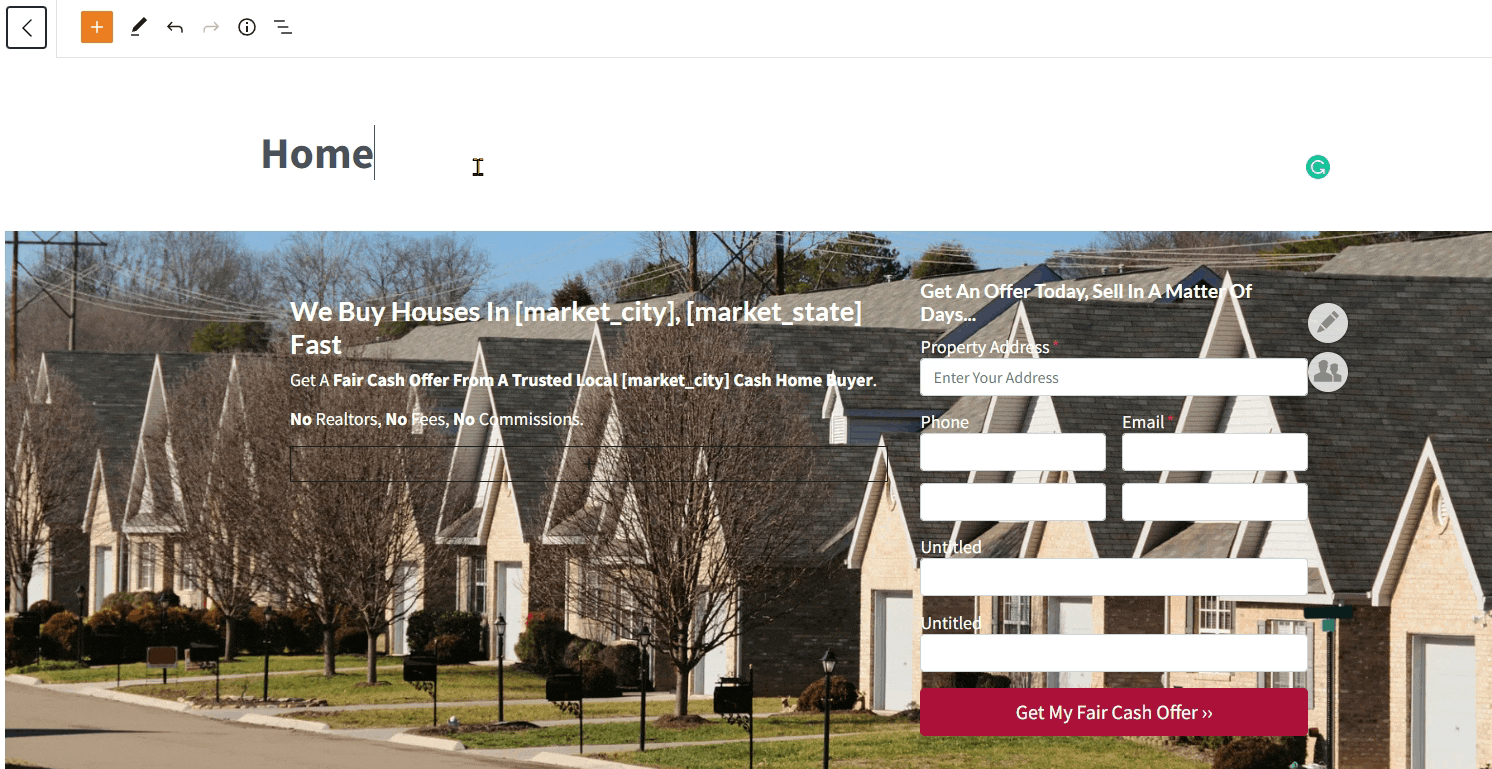
Step 2: Edit the page’s title:
- Click on the Title text, remove it, and then type in your new title.
- The page title should be your chosen keyword phrase for this location. For example, “Sell My House Fast Houston Texas” is a great title for a seller site. “Buy a Riverfront home in Roseburg Oregon” is a great example of a title for a buyer agent!
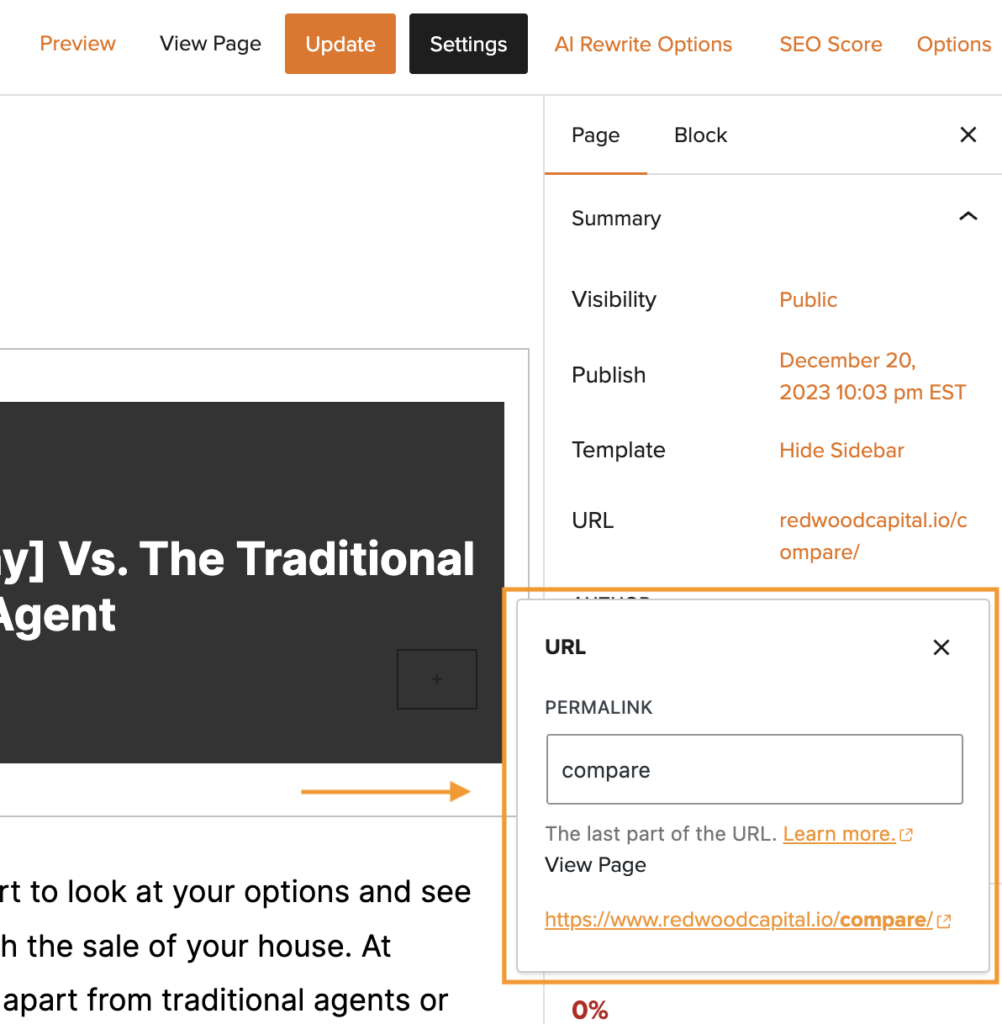
Step 3: Update The Page’s URL (Permalink):
- From the tool panel on the right side of the screen, click over to the “Page” tab. Locate the drop-down labeled “Summary” and click it to open it.
- Once this drop-down is open, you will be presented with a URL option. Click on the URL link in orange.
- When you click on the orange URL link, a popup will open with a field called “PERMALINK” where you can type and customize your new URL permalink.
- Make the permalink for your URL include the keywords that you’re trying to rank for! For example, if you are creating a Location Page for selling in the Houston market then a great permalink would be
/sell-my-house-fast-houston-texas. You could likely use the same title given to your page in Step 2.

Step 4: Override the Market City Settings:
- In the same tool panel where you found the Permalink field, scroll down to the location of the drop-down that is labeled “Override Market Settings”. Click it to open it!
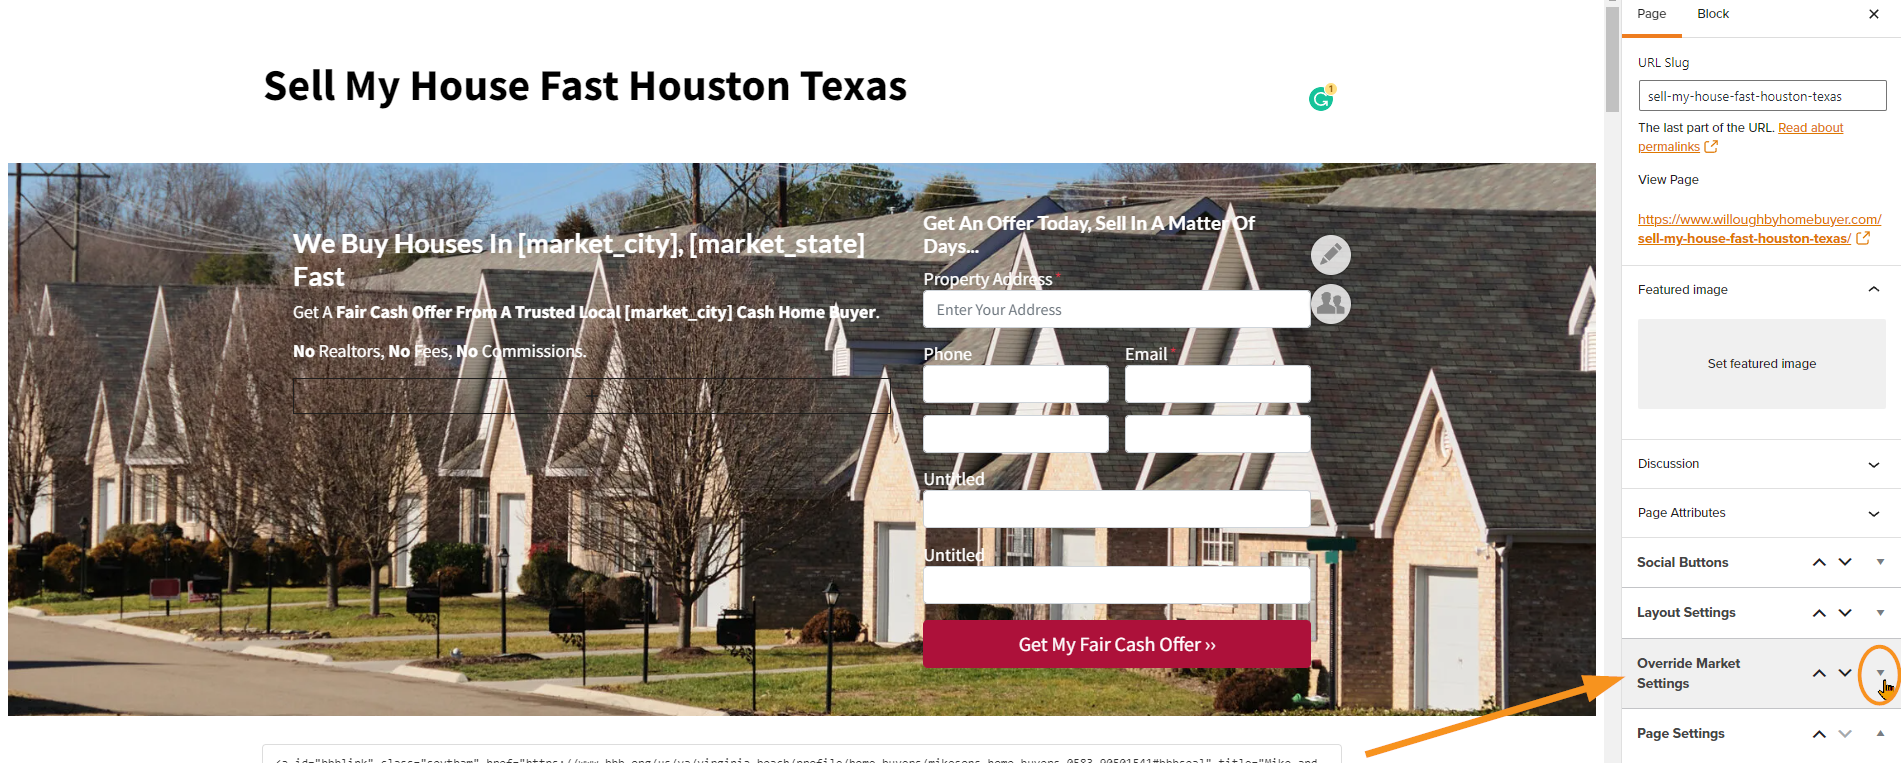
- Change the Market City and State to your chosen area for this page:
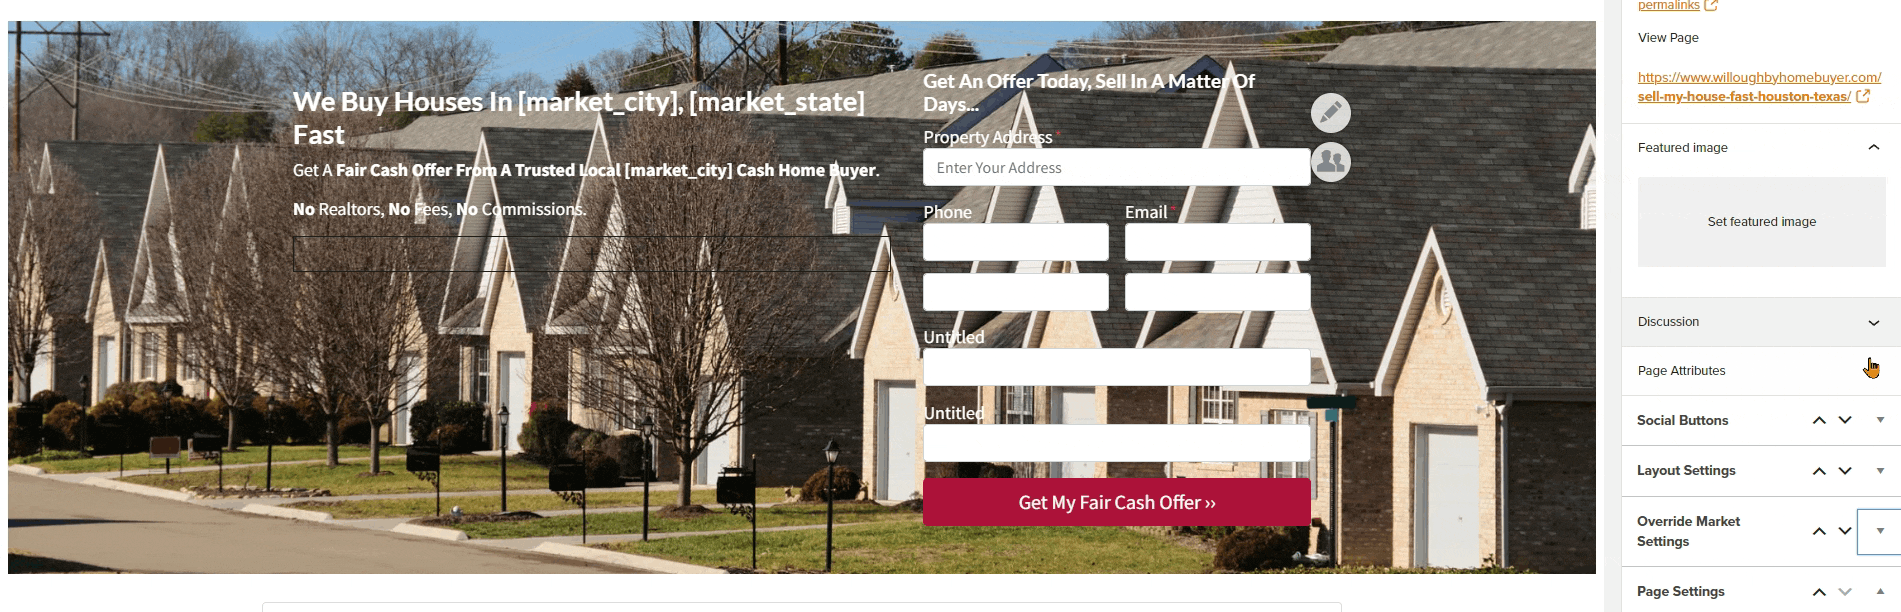
These settings override the market shortcodes throughout the site, such as [ market_city ] and [ market_state ]. Normally these shortcodes draw the City & State from your Dashboard > Settings area.
Step 5: Rework the Location Page’s content
Remember how we duplicated this page using the homepage? You can now go through the content of this page and make it unique from the home page it was duplicated from.
Adding unique content to a location page that is specific to that city or state is exactly why some of our members prefer to build their location pages manually vs. using the time-saving feature of our Auto Location Pages.
For example, if you are a real estate agent building location pages with the goal of attracting people who are moving to your area, you may want to talk about some of the main reasons why people typically move to your city or state.
You can also add specific, relevant info that local people in your market city or state will quickly recognize. This can help with entity-based SEO, and could include:
- City nicknames (e.g., Portland, Oregon is also referred to as the City of Roses)
- Neighborhood or regional names
- Local slang or phrases that are unique to your area
- Popular local businesses or landmarks
You can also update your manually created location pages with specific images, photos, or videos relevant to that location. For example, if you are a realtor creating YouTube videos about the pros and cons of moving to different neighborhoods in your city, you could create location pages for each of those neighborhoods and embed the YouTube video on the relevant location page.
As you update the content on your pages, be sure to check out our on-page SEO guidelines to optimize your content.
Step 6: Publish the Page!

🥕 🥕 🥕
Great work doing that! Take a little break if you need!
Move forward to Part 2 once all of your desired pages are built.
🥕 🥕 🥕
Part 2: Create Internal Links to Your Location Pages
Now, we’re going to add links on your homepage pointing to your most important location pages to get some SEO juice.
You wouldn’t build a new neighborhood or subdivision without making sure there were roads to link it to the rest of town, would you? Internal links are like roads for your website: they help users and search engines discover the different pages of your site.
There are a couple ways you can add internal links to your new location pages, which we’ll explain below.
For most people, we recommend Option 1. For smaller websites with only a handful of location pages, Option 2 also works.
Option 1 (Recommended): Create a Locations List Block Pattern
Our recommended option for linking to your location pages is to create a “locations list” that has links to your locations pages.
With this method you can add an Areas We Serve section on your homepage using the Visual Editor, with lists linking to the location pages that are most important to your business. (This is similar to what’s automatically created by the Auto Location Pages feature.) For example:
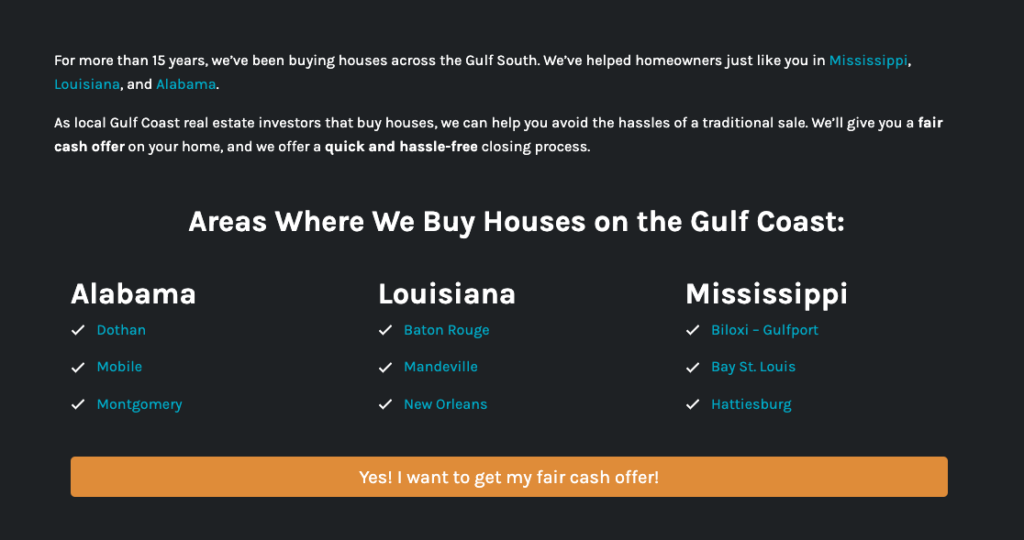
You can also link internally to your location pages within the text content of your website’s posts or pages where relevant. In the example above, we’ve linked to the state pages in the paragraph above the “Areas We Serve” section.
If you have a large number of locations pages, you may want to create an “Areas We Serve” page to link out to all of your location pages.
How to Create a Locations List Block Pattern
Watch this tutorial video to see how it’s done, or follow the steps below:

- Step 1: Add a columns block
- Step 2: Add a list block within each column, and create a list of all the location pages you want to link to
- Step 3 (optional): If you want to be able to reuse this ‘Areas We Serve’ section on other pages, you can save it as a reusable block pattern.
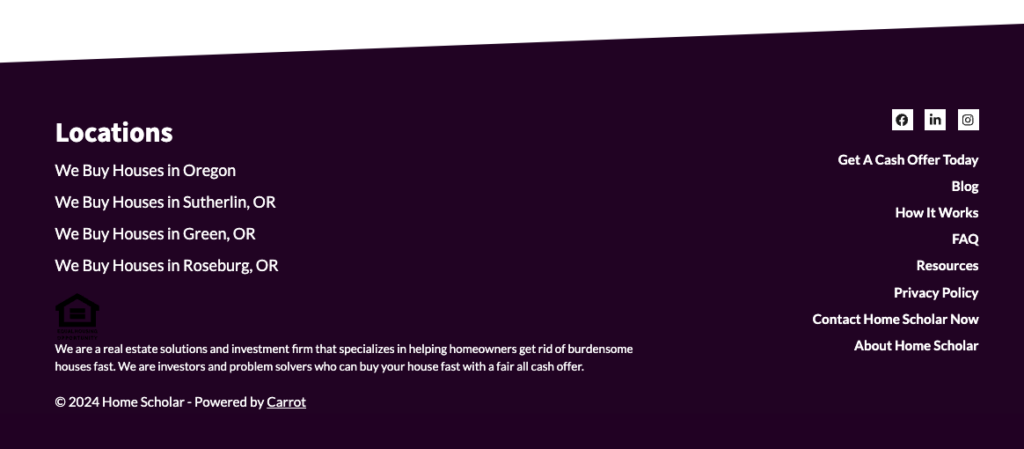
Option 2: Using Menus and the Footer Widget
If you focus on a smaller region and don’t have very many location pages, you can use a menu to add a short list of your location pages to your website’s footer. For example:
How to Create a Location Pages Menu and Add It to Your Footer Widget
Watch this tutorial video to see how it’s done, or follow the steps below:

Part 1: Create the Menus
- Navigate to Dashboard > Design > Menus
- Click “Create New Menu” and give the menu a name such as “Location Pages Menu” (this menu name will only be seen on the Admin side of things, not by visitors to your website)
- Add pages to the menu, and update Navigation Labels as needed (the Navigation Label will be seen by website visitors once you add your menu to your footer in Part 2)
- Click the “Publish” button towards the top to save your work
Part 2: Use Widgets to Add Menus to Your Footer
- Navigate to Dashboard > Design > Widgets
- Choose either Footer Right or Footer Left, depending on where you want to add your menu
- Click the “+ Add a Widget” button
- From the list of widgets options that appear, select “Navigation Menu”
- In the Select Menu drop-down, choose the menu you created in Part 1
- (optional) add a Title like “Locations” or “Areas We Serve”, which will appear above the menu in your footer
- Click the “Publish” button to finish
FAQ
How many location pages should I link to from my home page?
If you have a very large number of location pages, we don’t recommend linking to all of them from your home page or footer. Instead, focus on linking to your most important location pages from your homepage.
For example, if you have 50+ location pages, it would be overwhelming to visitors to see a list of more than 50 links on your homepage.
Instead, we recommend creating a “Areas We Serve” page to list all of your different state and/or city location pages. On your home page, you can create an “Areas We Serve” section with links to a few of your most important location pages and a link to the Areas We Serve page for a full comprehensive list.
Check out our Location Page Strategy FAQs for more information.
Conclusion:
Location pages are a great way to rank for each city or local area individually, without having to build a new website for each area you serve.
If you prefer hands-on customization, you can build location pages manually as described in this tutorial.
If you don’t want to customize the content on your location pages extensively, our Auto-Locations Pages feature is a great time-saving option.
Learn More:
- Location Page Strategy FAQs
- Auto-Location Pages Overview
- Determine The Location Focus of Your Home Page
