Users and Roles is where Carrot CRM Team Owners and Managers can manage CRM team members.
You have a set number of users that you can invite depending on which plan you are on. Additional users past your plan’s limit will be $20/month per user.
In this tutorial, we’ll cover:
- Access Users and Roles section
- Add Users
- Remove a User
- Change a User Level
- Restrict Access
- Opportunity Limit
- Editing Another User’s Profile
- Roles (Permissions & Next Action)
- Assign a role to a user
- smrtPhone Assignment
- Guest Management
Let’s get started!
🥕 To invite team members to your Carrot CRM or give them access to your Carrot website, check out this tutorial: Invite & Edit Team Members with Account Level User Management
Access Users and Roles Section
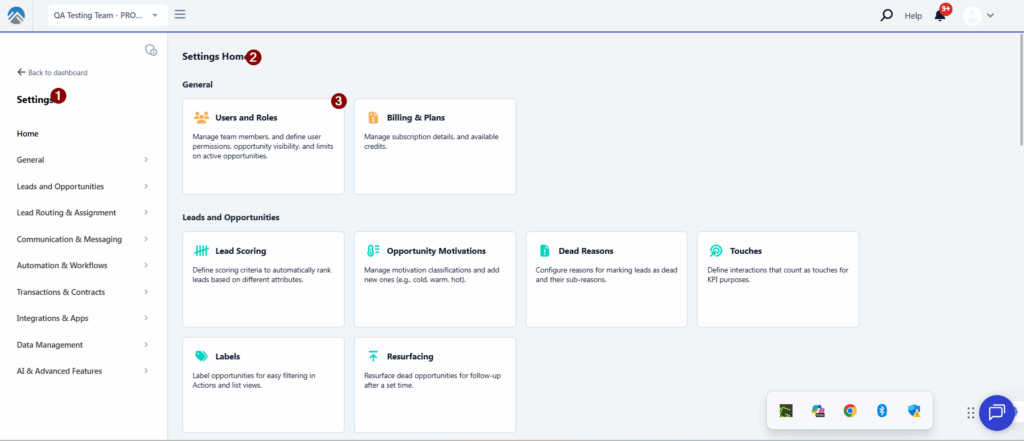
- Open settings in the navigation menu
- Select Users and Roles in the options
- Go to Users
InvestorFuse: Add Users
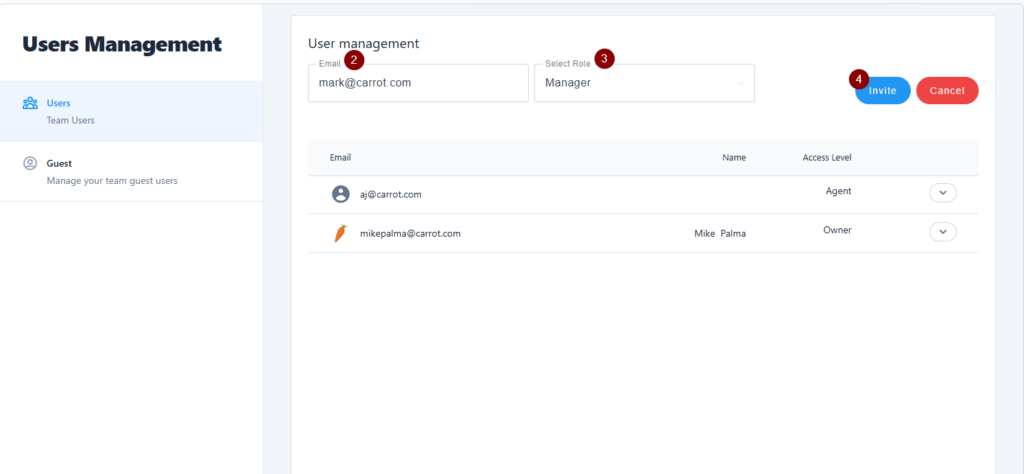
- In the Users section, click the +Add button
- Enter the email of the user
- Choose the access level of the user
- Click the Invite button
Access Level
- Agent:
- Agent permission will have very basic access to the system. They will not have access to Team Settings, Team Users, Campaigns, and Sequences. They will also not receive certain notifications, namely: Offer Made, Under Contract, Closed, and Cancelled deals.
- Manager:
- Manager permission will provide full access to the system.
Remove a User
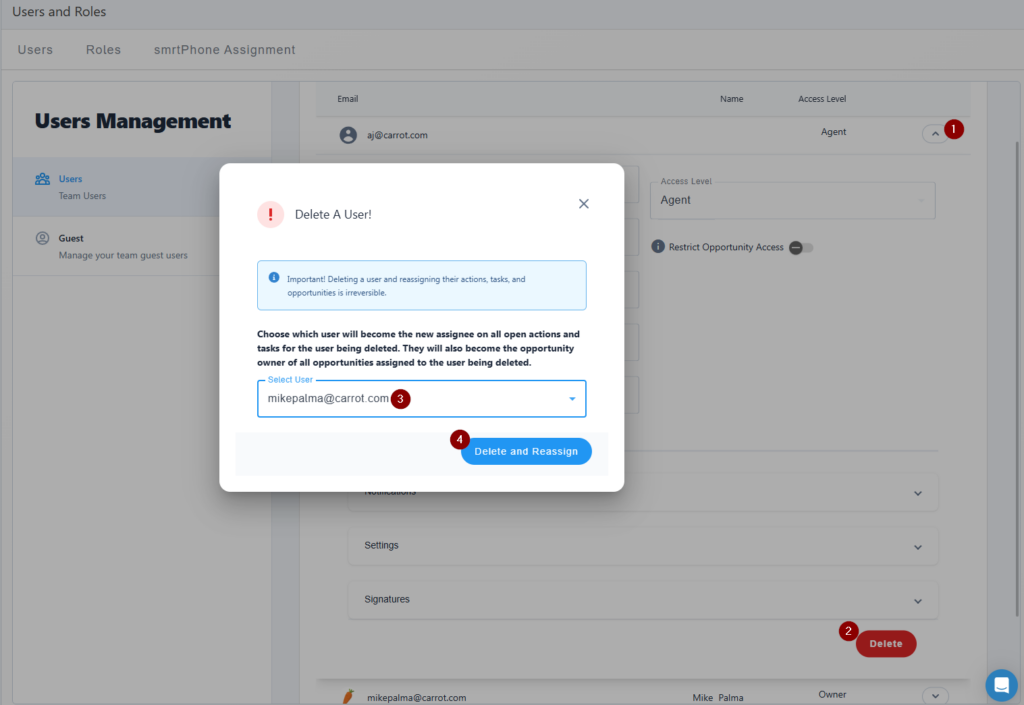
- In the Users section, open the user’s profile that you want to remove
- Scroll down and click the Delete button
- This will prompt you to reassign the user’s opportunities to someone else. Choose a user from the drop-down
- Click Delete and Reassign to complete
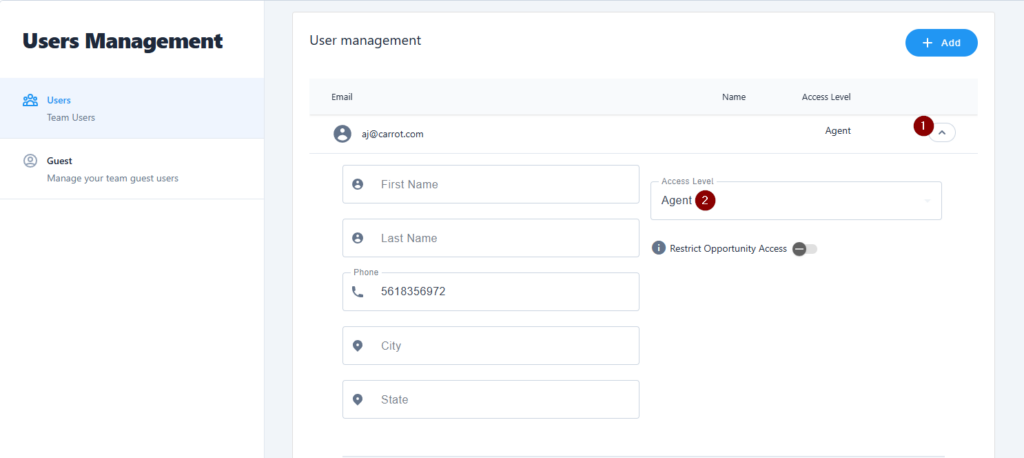
Change a User’s Access Level
- In the Users section, open the user’s profile that you want to change
- Click the Access Level drop-down and change accordingly
Restrict Access
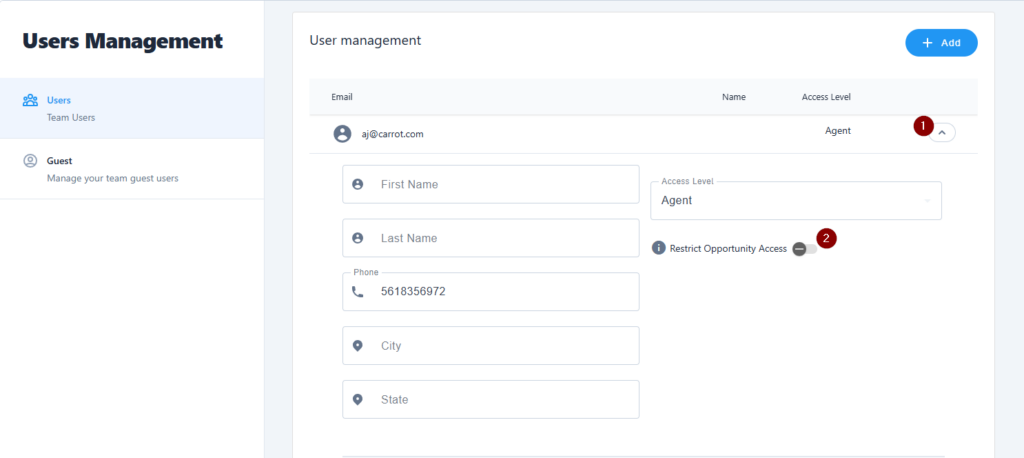
Restrict access is a tool that allows you to blind your team members to opportunities so they can only see items that are assigned to them. Use this feature if you want your team members to focus only on what is assigned to their account. The Restrict Access option can only be applied to Agent roles.
🥕 Restrict Access is only available for Premium Users. If you’re interested in upgrading your Carrot CRM account, choose your new plan here. To upgrade your InvestorFuse account, please email billing@investorfuse.com.
- In the Users section, open the user’s profile that you want to change
- Click the toggle to turn Restrict Opportunity Access on or off
Opportunity Limit
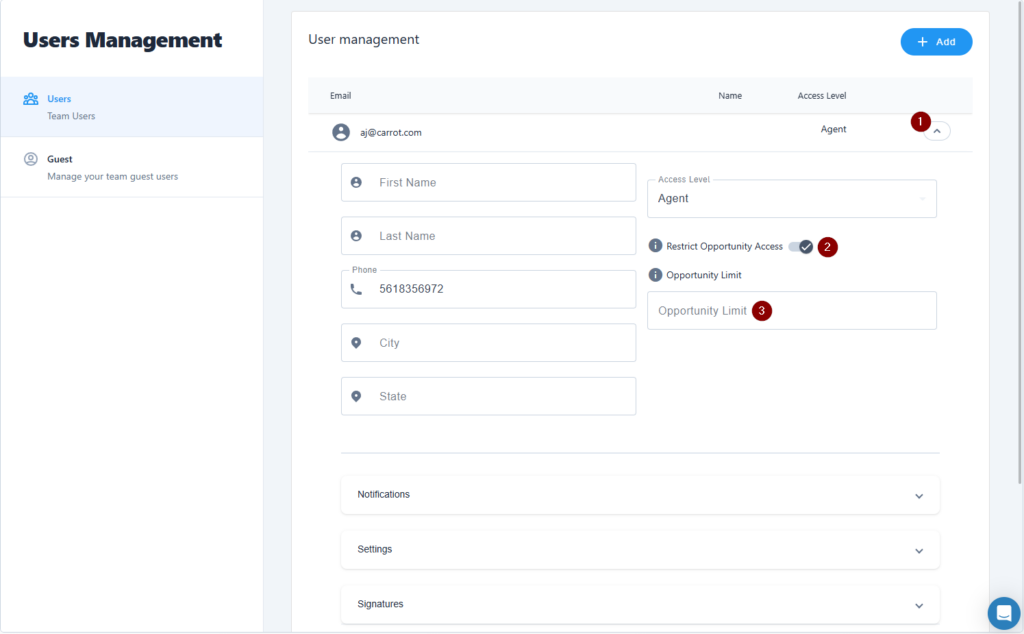
This feature allows you to cap the number of opportunities your team members can take ownership of. This prevents them from biting more than what they can chew and ensures that they work on the ones assigned to them before taking on the next one.
🥕 Opportunity Limit is only available for Premium Users. If you’re interested in upgrading your Carrot CRM account, choose your new plan here. To upgrade your InvestorFuse account, please email billing@investorfuse.com.
- In the Users section, open the user’s profile that you want to change
- Click the toggle to turn Restrict Opportunity Access on or off
- Enter the desired number of Opportunity Limit the user can own
Editing Another User’s Profile
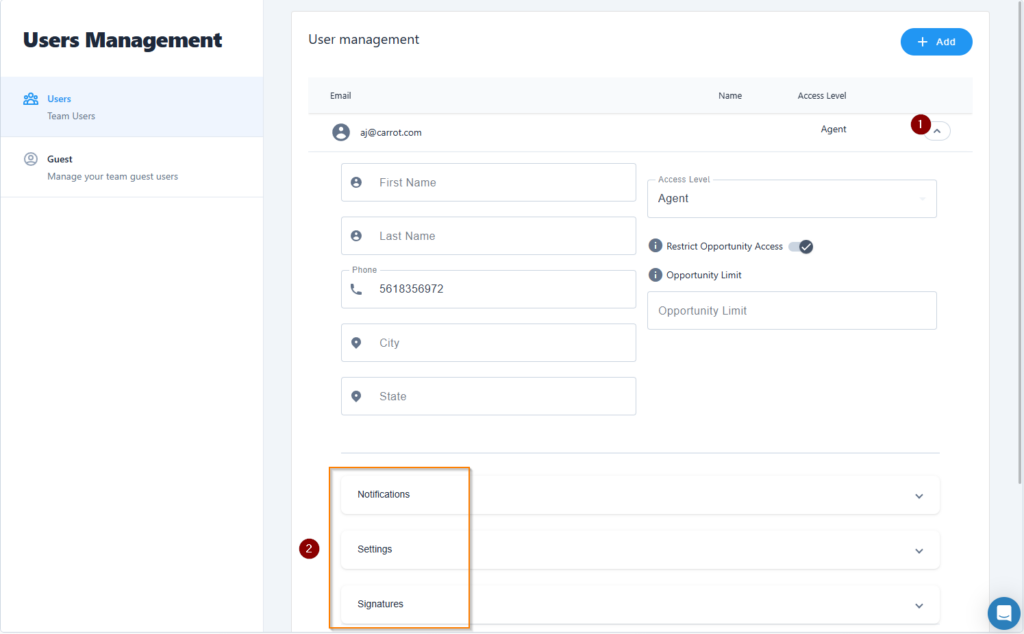
Owners and managers can now edit account/ profile information for other users.
- In the Users section, open the user’s profile that you want to change
- Open the different sections in the profile for you to change. You can adjust their notifications, profile settings, and signatures.
Roles
Roles let you customize what your team members will have access to depending on their role in your team. If you have a Follow-up Specialist in your team, for example, they do not need the ability to make an offer or put an opportunity under contract. This will let you remove those options in their access.
🥕 The Roles feature is available for Pro and Premium Users. If you’re interested in upgrading your Carrot CRM account, choose your new plan here. To upgrade your InvestorFuse account, please email billing@investorfuse.com.
Step 1: Create a Role
- In the Users and Roles section, go to the Roles tab
- Click +Add Role at the bottom
- Enter the Role name and save
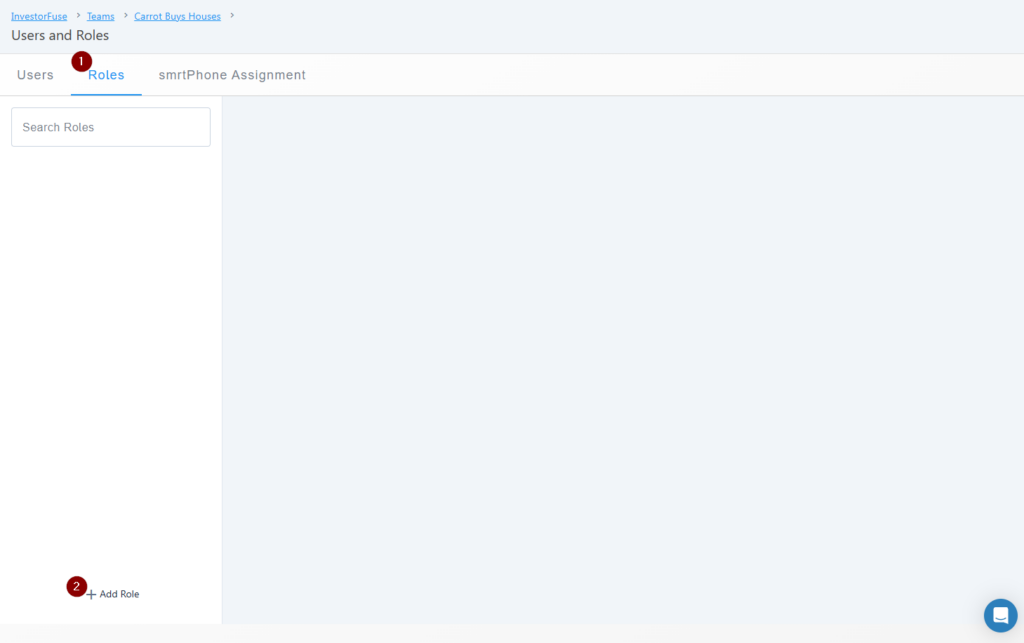
Step 2: Set Role Permissions
- From the Roles tab, open the role that you created
- In the Permissions tab, designate which functionalities this role will/will not have access to. For example, give a Transaction Coordinator role access to the Transactions portal.
- Click 💾 the save button in the bottom-right corner of the page
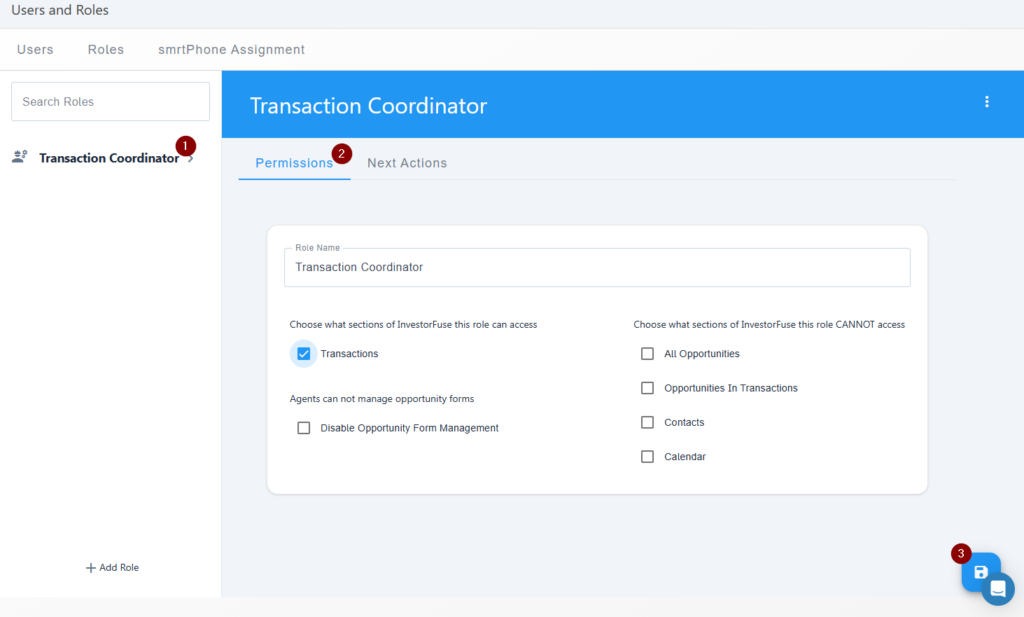
Step 3: Next Action
Assign which actions this role can assign to their opportunities for a streamlined workflow. For example, follow up specialists do not need the option to send offers, put opportunities under contract, etc.
🥕 Restricting next actions on a Role is available for Premium Users. If you’re interested in upgrading your Carrot CRM account, choose your new plan here. To upgrade your InvestorFuse account, please email billing@investorfuse.com.
- In the role we are editing, go to the Next Actions tab
- Select the next actions that this Role will have available in the drop-down. Leave everything turned on for standard access.
- Click 💾 the Save button at the bottom-right corner of the page
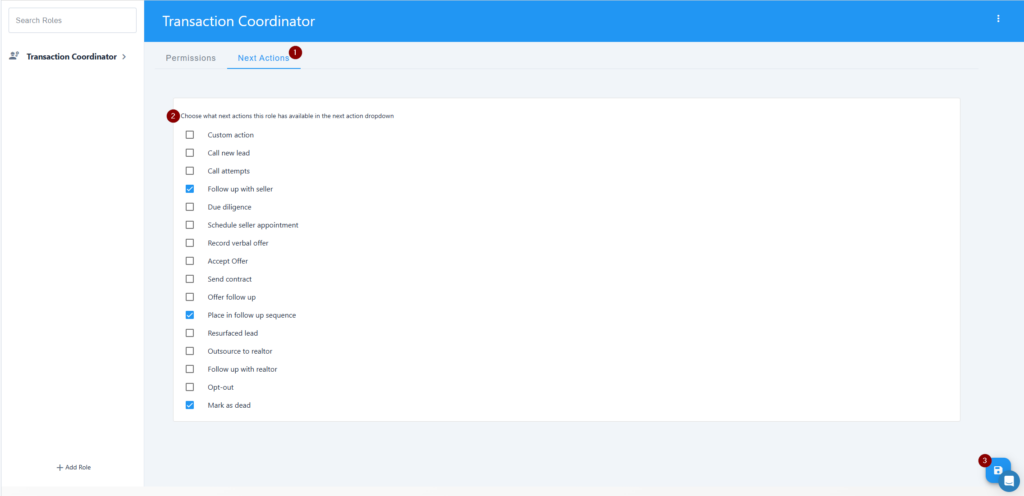
Assign a Role to a User
- In the Users section, open the user’s profile that you want to change
- Click the Role drop-down field and select a role for the user. You can assign multiple roles to a user.
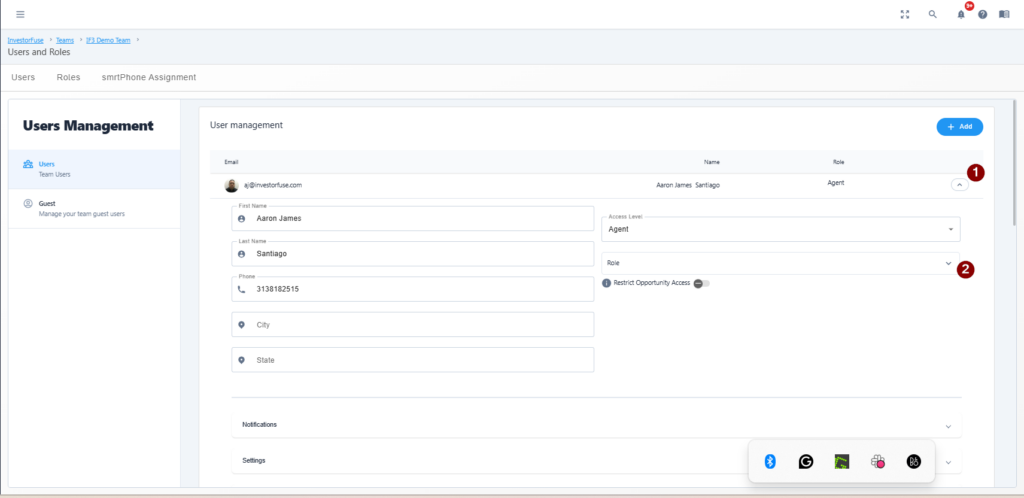
SmrtPhone Assignment
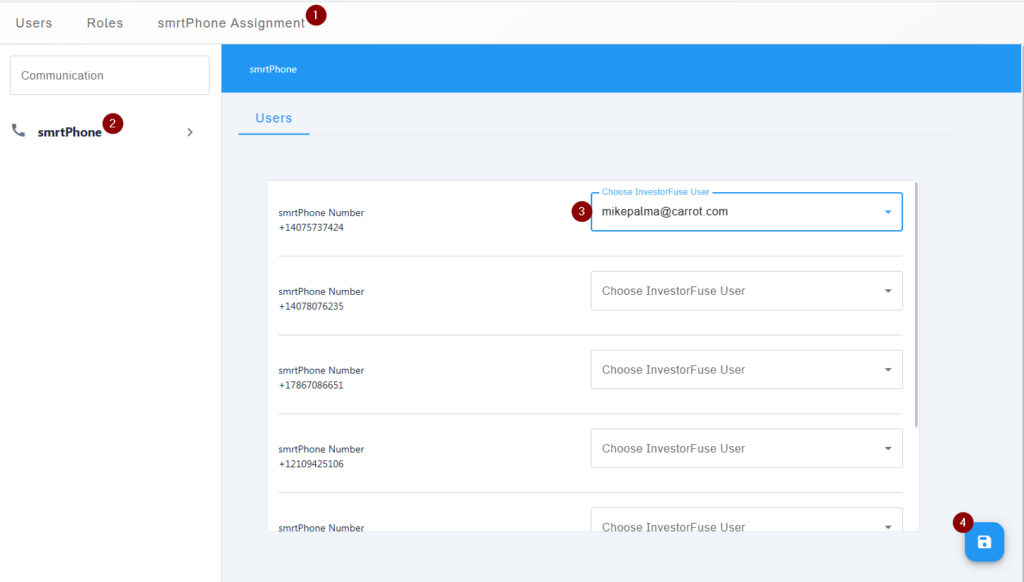
SmrtPhone Assignment is where you assign your smrtPhone numbers to users for KPI tracking. Metrics from each number will be applied to the selected user, like # of outbound/inbound calls, talk time, etc.
🥕 Communication Assignment is available for Pro and Premium Users. If you’re interested in upgrading your Carrot CRM account, choose your new plan here. To upgrade your InvestorFuse account, please email billing@investorfuse.com.
- From the Users and Roles section, go to the SmrtPhone Assignment tab
- Click smrtPhone
- All of your smrtPhone numbers will appear in this menu. Assign a user for each number to track phone metrics like # of outbound/inbound calls, talk time, etc.
- Click 💾 the save icon at the bottom-right corner
Guest Management
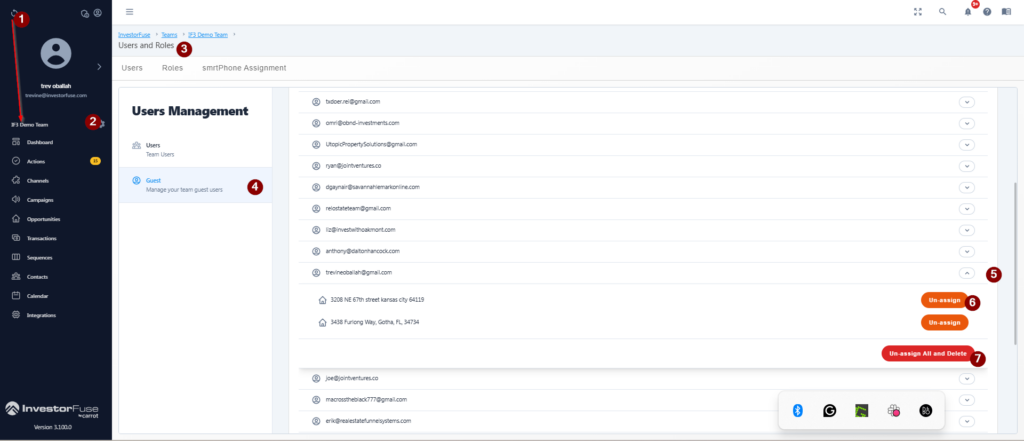
This feature allows you to manage all the Guests in your Team and all the Opportunities they have been invited to. In the Guest Management section you should be able to see the Guest email, all the opportunities they have been invited to and an option to remove their access from the opportunities.
- Select the Team you’d like to edit
- Click ⚙️ the cogwheel icon
- Select Users and Roles
- Scroll down to the Guest Management section
- The email addresses of the guests will appear on the left of the screen.
- If you click on the drop down next to their name, You should see all the Opportunities they have been invited to. From this list you can un-assign them individually.
- The red button on the right “Un-assign All” is an option to remove their access to all of the opportunities they have been invited to.
