Optimizing your images can decrease your website’s load time, enhance the user experience, and help your site appear in organic (unpaid) search results.
Image optimization primarily consists of making sure images don’t slow down your site and making sure Google and visually impaired users understand what is “seen” in an image.
In this guide to image SEO, we’ll cover:
- General guidelines for optimizing images
- Adding descriptive file names
- Image resizing, cropping & compression
- Alternative text (alt text)
Now, let’s dive into the best ways to improve your site’s SEO performance and load speed via image optimization.
General Guidelines for Image Optimization
Resizing and Compressing Images
Nobody likes a slow website! Optimizing images by resizing and compressing them can help your website load faster, which benefits both search engine rankings and user experience.
High-quality photos are important for user experience. However, images are one of the biggest factors contributing to page speed.
Luckily, Carrot takes care of a lot of that for you. We’re proud to offer one of the fastest and highest performing website platforms around.
For optimal performance, there are a few things you can do to prepare your images prior to uploading them to Carrot, which we’ll cover below.
ℹ️ Carrot uses Google’s PageSpeed Insights when running page speed tests. All page speed reports differ, but we have found using the most popular search engine’s system is best when improving overall rankings. Keep in mind image sizes differ for both mobile and desktop, but PageSpeed Insights runs one test for both. These two (mobile and desktop) require different sizes, but tests aren’t set up to show a combined score. To balance these results, we are focusing on the optimal option that will give the best results for both platforms.
Carrot Optimizes Images For You
Carrot automatically compresses your images when you upload them to the site.
Compressed images are basically images with aspects bundled together to efficiently store an image so it can be displayed quickly.
Without compression, your site’s load time increases, your media storage fills up faster, and you can cause visitors to bounce/leave your site because images take too long to load properly. There’s a lot of information around image compression, and we’ve done our best to automate that part for you.
In addition to what we automate for you, there are some things you can do to prepare and upload your images for optimal performance, which we’ll cover below.
Descriptive File Names and Alt Text
Google reads. While search engines and AI tools are getting smarter all the time, they still can’t see an image the way a person can.
Each written piece of information on your website is an opportunity to help Google understand what your page is about. There are two main ways we can add written descriptions of images: file names and alt text.
We’ll cover how to optimize these in more detail below.
Securely Link Images
If you are using a script that pulls an image from another source, such as the Better Business Bureau rating badge, be sure the images are from a secure source. If they are not, then you will receive a warning that you have insecure images on your site.
What does this mean? Secure images are hosted on sites with SSL certificates, meaning the site is encrypted to add a layer of security. Some sites may not have an SSL certificate and use a script to host an image, badge, rating, et cetera that will then cause a mark on your site. This is fairly nominal but can be fixed by removing the script and using a static image you upload to Carrot and then link to the respective item or site.
Step 1: Prepare Images for Upload
Here are a few steps you can take to prepare and upload your images to Carrot for optimal performance:
Give Your Images Descriptive File Names
A brief yet descriptive file name can help Google better understand what is depicted in the image.
Before uploading images to your website, rename the files.
Avoid using generic filenames. Briefly describe what is seen in the image. For example:
✅ downtown-houston-city-skyline.jpg
❌ IMG04863.jpg
Separate words with hypens. Don’t include spaces in your file names.
File names should be easy to read for both people and Google. For example:
✅ house-in-san-diego-neighborhood.jpg
❌ houseinsandiegoneighborhood.jpg
If it’s an image of your company logo or your staff, you should include your company’s brand name in the file name. For example:
✅ williams-hvac-services-repair-team.jpg
✅ awesome-home-buyers-logo.jpg
❌ our-team.jpg
❌ logo.jpg
If the image is specific to the local market area you serve and you will use the image on a city or state location page, include the name of that location in your file name. For example:
✅ foreclosed-home-for-sale-detroit.jpg
✅ furnace-repair-technician-cleveland.jpg
Resize Large Images Prior to Upload
If you have high-quality professional photos, that’s great! But the file size and resolution necessary for a printed brochure is much larger than the file size you should upload to your website.
When images are uploaded to Carrot sites, they are automatically compressed to a smaller file size so that they load faster. We also offer built-in image resizing and cropping tools.
If you have a very large image, you can resize it before uploading to your Carrot site for optimal performance. The maximum file size for images is 8MB.
ℹ️ Note: When looking at the size, we will typically refer to pixels, the number you typically see for width and height. A good general size for images is 1920 pixels wide.
Step 2: Resizing & Cropping Images in Carrot’s Visual Editor
To make additional sizing quick and easy, Carrot offers resizing and cropping tools that you can see in the sidebar of the Visual Editor immediately after uploading an image:

Resizing Images in Carrot’s Visual Editor
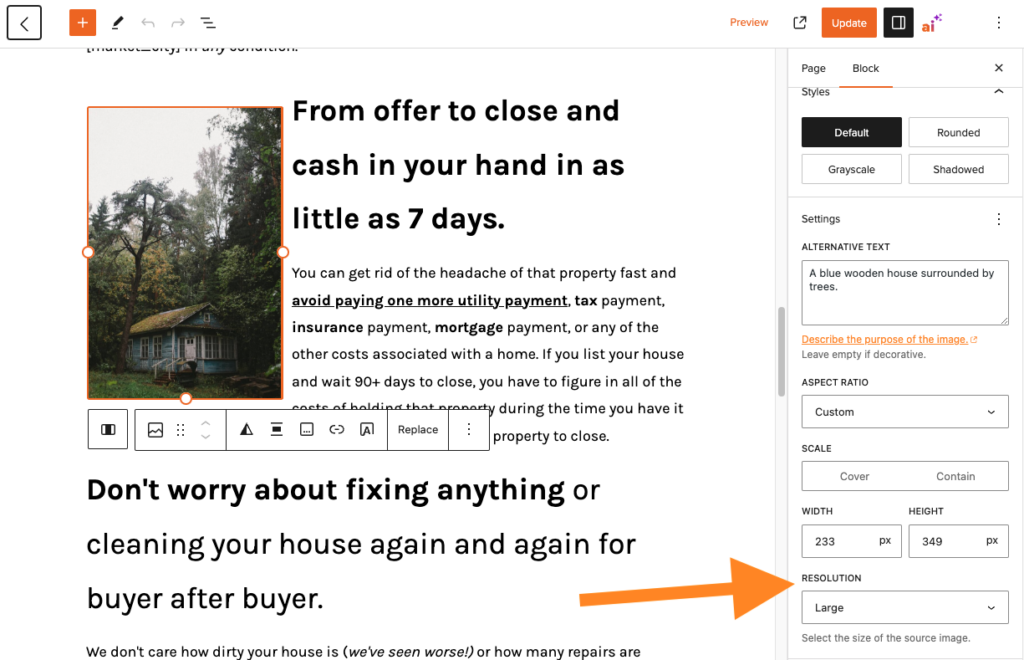
Whenever you upload an image to your Carrot site, our platform automatically creates 4 different image sizes. This is done automatically so you don’t have to keep resizing images manually.
You can select these in the Resolution dropdown:
- Thumbnail image: 150 x 150 pixels
- Medium image: maximum 300 x 300 pixels
- Large image: maximum 1024 x 1024 pixels
- Full Size image: Use for hero & cover blocks only
As a general rule of thumb: If you are going to use an image that takes up at least half of your screen, select the Large option under Resolution. If your image is less than half of the page, choose Medium or Thumbnail under the Resolution settings.
Full width images used in Hero Blocks and Cover Blocks do best when uploaded at 1920 pixels wide. (The height is less important.)
You can also choose an Aspect Ratio to change how the image looks. For example: Square, Portrait, Wide, etc.
Cropping Images in Carrot’s Visual Editor
You can now crop images right inside the Carrot editor—no extra tools needed.
Our built-in cropping tool is handy for polishing headshots and creating clean layouts in seconds. It works when inserting new images or when replacing images in a Block Pattern.

Just click on an image, hit the crop icon in the toolbar, and adjust the zoom or aspect ratio to get the perfect shot (square, portrait, etc.). Click and drag to reposition the image within the new size. Once you’re happy with it, hit “Apply” and we’ll save a cropped version to your media library—ready to resize and drop into your page.
Watch the video below to see it in action:
Step 3: Add Alternative Text (Alt Text)
It is very important to consider all people who may visit your site, including those with visual impairments.
Alternative text (commonly known as alt text) is primarily used by screen readers for blind and visually impaired users and also serves as a fallback if the image fails to load.
Adding alt text also helps with image SEO. Google likes it to be an actual description of the image!
ℹ️ Moz.com: Learn more about why Alt Text is important →
Make sure to include relevant keywords related to the image content while keeping it concise and informative. Remember, the alt tag should provide meaningful information to users who can’t see the image, so strive for clarity and relevance.
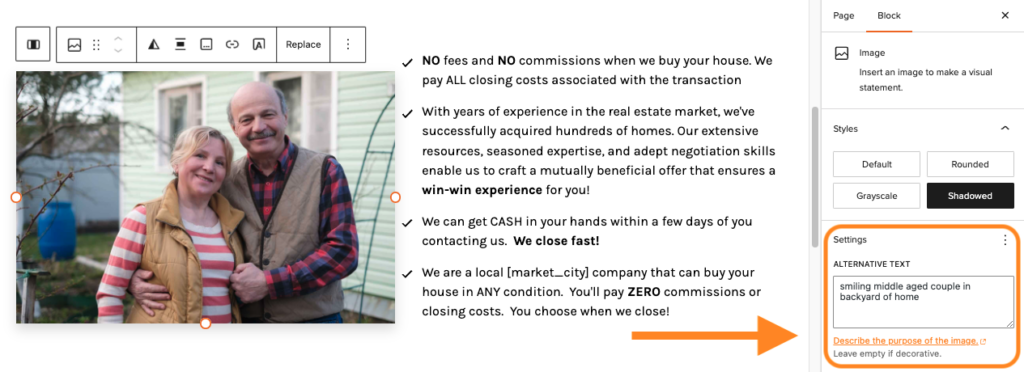
Avoid keyword stuffing or using generic phrases like “image” or “image of” unless necessary. Here are a few examples of how to write alt text for an image:


Each time you upload a new image to your website, you should add descriptive alt text.
When editing an Image Block, you can add Alternative Text under the block’s settings in the sidebar of the Visual Editor:

Tool Tip: If you later go to the Media Tab and add Alt Text to your images that were loaded in an image block, the Alt Text will not be pulled onto the images that are already on the pages. This is a function of WordPress that we cannot control. Make sure to add the Alt Text when adding the images to your page!
FAQ
How do I add an image next to my website’s search results? I want an image to appear next to my site’s URL in the Google search results.
The image displayed next to your URL in the search results is completely dependent on Google. According to Google, “While you can’t directly upload images into search results, searchable images posted on a website can show up in our search results.”
By adding images to your site and optimizing them following the steps above, you can improve the changes of those images appearing in search results. In particular, be sure to use descriptive “alt” text and file names to help Google understand what the image is showing. Learn more at Google’s Search Help Center.
Conclusion
Carrot offers built-in image compression and resizing tools to make your website load fast. You can also take steps to optimize your images prior to uploading them to your Carrot site by giving them descriptive file names. Be sure to add alternative text (alt text) to your images so that search engines and people who can’t see the images know what’s depicted inside them.

