Ever make content updates and wonder if your site is optimized for a keyword? Want to control more of how Google and search engines display your site? We certainly did! This is why we added the on-page SEO analysis tool to your site.
When you are editing a page or blog post, Carrot’s On-Page SEO Analysis Tool can be found close to the bottom, under SEO Settings.
You can use this tool to optimize your on-page SEO details like your Meta Title and Meta Description, social share details (such as the image displayed when you share the link on Facebook), and visibility features.
This On-Page SEO Analysis Tool includes 4 areas:
Let’s get started on the specifics of the SEO Tool and how to use it (including what the different colors mean!):

This feature is included in our SEO Tools add-on! If you currently have only limited access but would like to take advantage of this helpful feature, you can update your membership options.
Step 1: Locating the SEO Tool
From your main Dashboard area, navigate to Content > Pages and hover over the page you would like to optimize for your keyword.
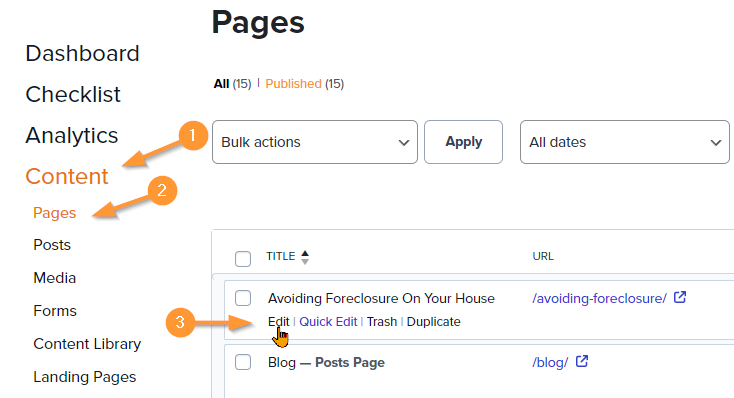
Note: The “Posts” area also has access to the SEO Tool, if you need to optimize a blog post!
Step 2: Using and Interpreting the SEO Tool
After clicking “edit” on a particular page, scroll to the bottom of the page under SEO Settings to find the SEO Tool. You can navigate between four different areas of the tool: General, Social, Visibility, and Audit.
General Tab
Your General tab is the default tab when you find this tool. Here’s what it will look like:
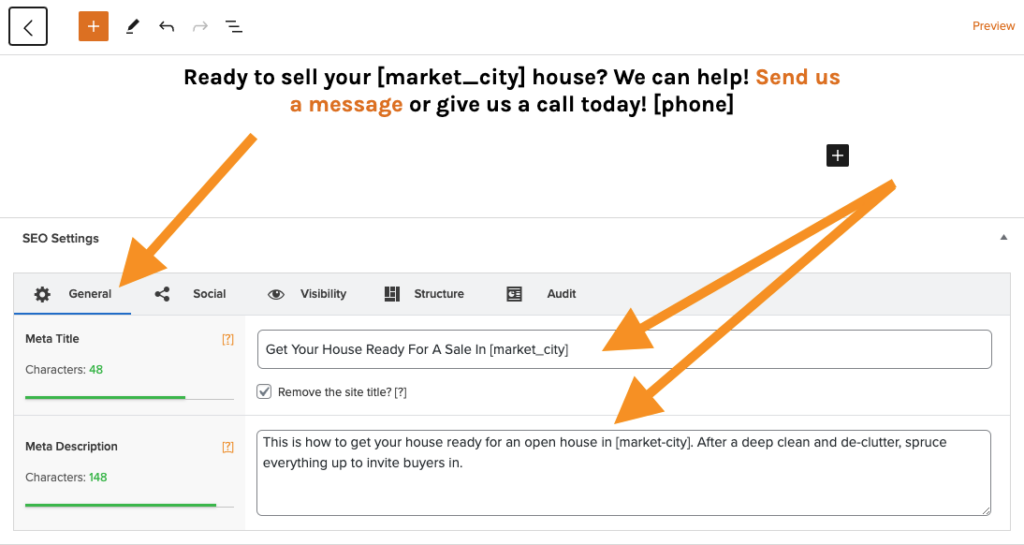
Here you can edit your page’s meta title and meta description.
There are two main boxes available for review.
The left-side box is uneditable and shows how long your meta title and meta description are. It’s ideal for visitors to read these in their entirety, so try to keep them within the character limits (65 for the title and 160 for the description).
The right-hand side displays the content for those sections and is where you can edit the meta title and meta description.
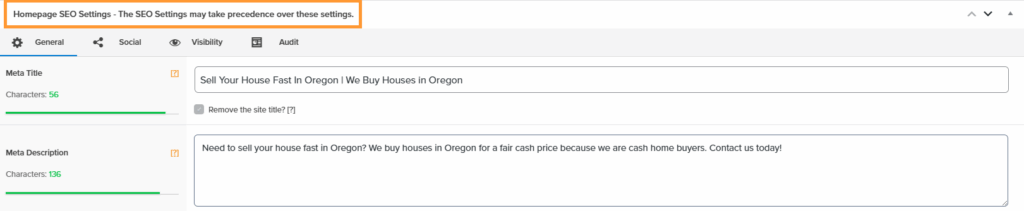
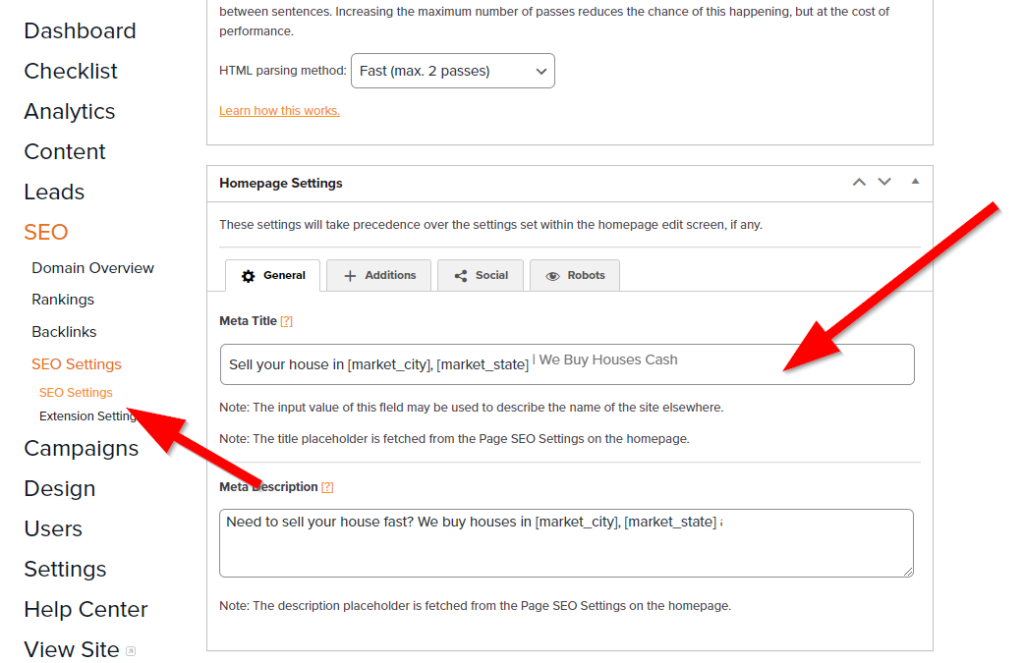
ℹ️ NOTE: The exception to this is your homepage. When you want to edit the meta title and meta description for your homepage, instead of using this tool, go to the Homepage Settings found under the main SEO section in your dashboard. The SEO Analysis tool will have a warning that states: “Homepage SEO Settings – The SEO settings may take precedence over these settings.“
Learn more about writing good Meta Titles and Meta Descriptions:
- On-Page SEO: Meta Title and Meta Description
- Optimize Your Meta Titles and Descriptions for Organic CTR, via Backlinko
The Social Tab
The Social tab is used to edit the content and image shown when a link from your site is shared on social media.
Every social media platform automatically pulls details from the page so you don’t have to set these. However, doing so will allow you to have control over what platforms such as Facebook present for that page’s details. You can find it to the right of the General tab:
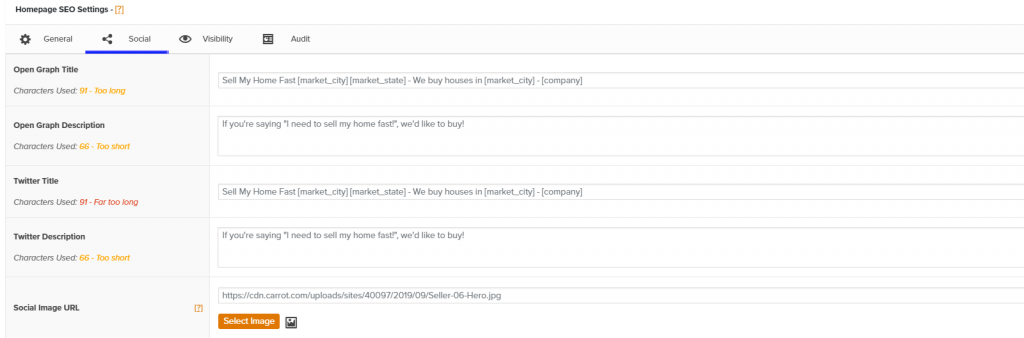
- Open Graph Title – This is similar to the Meta Title and will be the first sentence displayed when you share your URL
- Open Graph Description – This is similar to the Meta Description and will be the paragraph displayed below the Graph Title
- Twitter Title – Sets the first line of a link shared on Twitter
- Twitter Description – Sets the link’s description below the title
- Social Image URL – You can select the specific image you’d like to be pulled in automatically when the link to your post or page is shared on social media sites like Facebook. If you don’t set a specific image here, the social media platform will pull in whatever image it can find that best represents the page, which is often your header image or your business logo.
The Visibility Tab
You can set the visibility of the page on this tab. It’s the third tab of the tool and includes technical SEO items to stop search engines from indexing pages as well as redirect the URL of a page.
Let’s dive into these settings below:
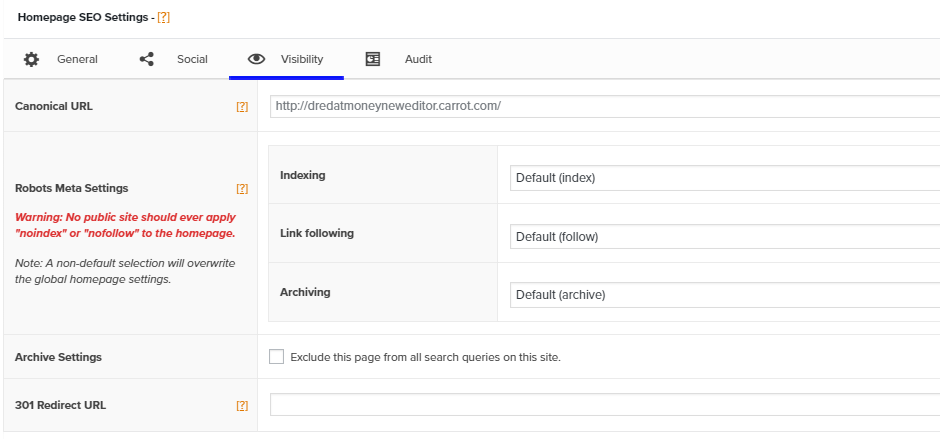
- Canonical URL – sets a canonical url asking search engines to go to the URL you put in this field instead of the URL for the page you are editing.
- This is an advanced setting. You should only add a URL to this field if you don’t want search engines to index the page you are editing and instead want them to index the URL that is inserted into the canonical URL field.
- Robot Meta Settings – Default settings mean your page is optimized to be found and followed. Change these if you want a different option:
- Indexing – An index directive allows a page to be included in search engine results, while a noindex directive prevents the page from appearing in search engine results, even if it’s crawled.
- Link following – A follow link passes SEO value (link juice) to the linked page, helping it rank higher in search engines, while a nofollow link does not pass SEO value, signaling to search engines to ignore it for ranking purposes.
- Archiving – Change to noarchive If you want to ask robots not to create a cached copy of this page.
- Archive Settings – Change this if you want to hide your page
- 301 Redirect URL – Change this if you want to redirect this page to another URL. Add the new URL in this box to redirect the page.
Why would you want to use these Visibility settings?
Maybe you have a “Thank you” page for a form that you don’t want appearing in search results. You could set that page to noindex so it doesn’t get picked up by Google.
Perhaps you have a landing page for a PPC campaign with content that is very similar to another page. You don’t need the PPC landing page to rank in search engines, and for tracking purposes, you only want traffic from your PPC ads coming to that page. Here’s another reason you’d want to set that page to noindex.
Or maybe you’ve discovered some keyword cannibalization on your site, where you have two pages with similar content competing with each other for rankings. You may want to set up a canonical URL or 301 redirect to help fix this issue.
Learn more:
- Learn about Keyword Cannibalization
- rel=canonical: the ultimate guide, via Yoast
- What is a Noindex tag? via Ahrefs
The Audit Tab
This last tab is the Audit tab and walks you through the process of verifying the page is optimized for your chosen keywords.
Click on the Audit tab and enter 1 to 3 keyword phrases you want the page optimized for, as seen in this example:

In the screenshot above, the SEO Tool is reviewing this page for the primary keyword phrase sell my house fast – this tells you how well this page is promoting the “sell my house fast” keyword within its content.
Once a keyword phrase is added, click the arrow on the right-hand side to toggle open the analysis:
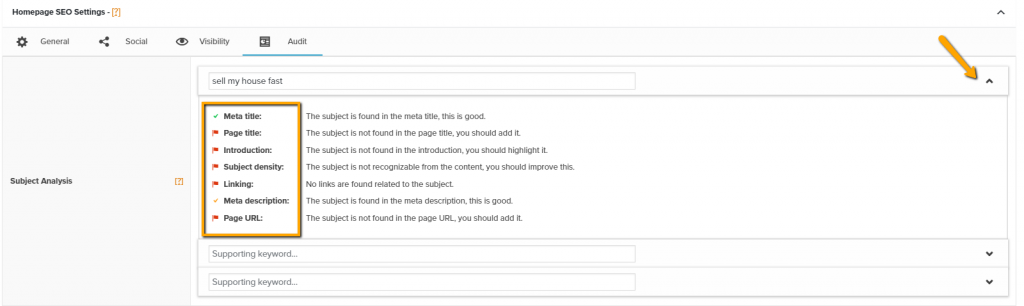
As soon as the keyword is added, the tool starts to analyze the page and you will see 7 ways you can optimize the page, marking each area with either a red flag (not optimized), yellow check mark (slightly optimized), or green check mark (optimized).
- Meta title is edited in the General tab of the SEO Tool.
- Page title is the title found at the top of your page or post.
- Introduction is the first paragraph on the page or post.
- Subject density refers to how many times the keyword is mentioned on the page.
- Linking will review how many links you have on the page that are related to your keyword and if the link’s anchor text is optimized for your keyword. Anchor text is the words that are hyperlinked to another page on your website or to an external website.
- Meta description is edited in the General tab of the SEO Tool. This is a short summary of what a particular page is about.
- Page URL will look to see if your keyword phrase is included in the URL for your page.
The red flags mean that this keyword phrase is not found often enough in the specified areas, such as page title and introduction.
If you were to put the phrase “sell my house fast” more often in the “introduction” area of the page’s content, the rating would improve and the red flag would change from red to orange to green. Green is the goal for healthy SEO!
The green checkmark that is seen next to “Meta title” means that the keyword phrase is found often enough in this specified area.
More green checkmarks mean that this page of yours will have a better shot at ranking well in Google when people search for this particular keyword. It means that this page is well optimized for the keyword you have entered.
Supporting keywords:
In addition to setting a primary keyword, you can also add up to 2 supporting keywords to the SEO Audit tool.
Supporting keywords, or secondary keyword phrases, offer an opportunity to add very similar keywords into the same page so that the blog post ranks for similar keyword phrases. Supporting keywords should be synonyms of your primary keyword that have the same meaning and search intent.
For example, if you were creating a page for an air conditioning company, your primary keyword phrase might be “ac repair.” You might add “air conditioning repair” and “air conditioner repairman” as supporting keywords.
You’ll want to include your supporting keywords in the content of your page in addition to adding them to the SEO audit tool.
Be careful that you don’t have other pages already targeting the supporting keywords, as this could lead to keyword cannibalization.
Learn more about picking what keywords to target for each page:
ℹ️ How to Do Keyword Research for Local SEO with Carrot’s Keyword Explorer
A few notes about the SEO Tool Audit tab:
The Audit tool scours each page for usage of a specific/chosen keyword and then ranks that page on how well it is using that keyword.
You must use the keyword phrase exactly as it is listed in the tool in order for it to recognize the keyword.
For example, “We buy houses Houston” will not trigger the SEO Tool that is on your page if you use “We buy houses in Houston.” The addition of “in” will stop the matching process.
We do not recommend inserting a long-tail keyword within the tool. For example, “Sell Your Land Houston, Texas” won’t be useful if you are using shortcodes such as [market_city] in the content. Shortcodes save time when editing your market information but they are not readable in the Carrot SEO Tool. However, you will still rank for the long-tail keyword if you include the city in the page content, headings, and descriptions.
The Audit tool provides guidance, particularly for SEO beginners, but a green or red signal will not necessarily make or break your on-page SEO rankings.
Also, not all pages need to be optimized for search. A landing page used only for a PPC ad campaign, for example, won’t need to be optimized to turn green within the Audit tab of the SEO Tool.
NOTE: we do not set a focus keyword within the tool on every page of your site but that doesn’t mean the page isn’t optimized. Our team chose to set a couple of pages for your reference but the other pages are yours to choose the focus keyword.
If you want to find out what keywords to use, try our Keyword Explorer tool or check out our SEO Keyword Bible (listed in the Learn More section below).
What do the SEO Tool’s colors mean?
You’ve likely seen the colors within your Pages or Posts admin view telling you the optimization grade for a page. Wondering what those mean? Here’s a quick reference:
- Gray = Unknown
- Gray = noindex
- Red = Poor
- Yellow = Fair
- Blue = Good
- Green = Excellent
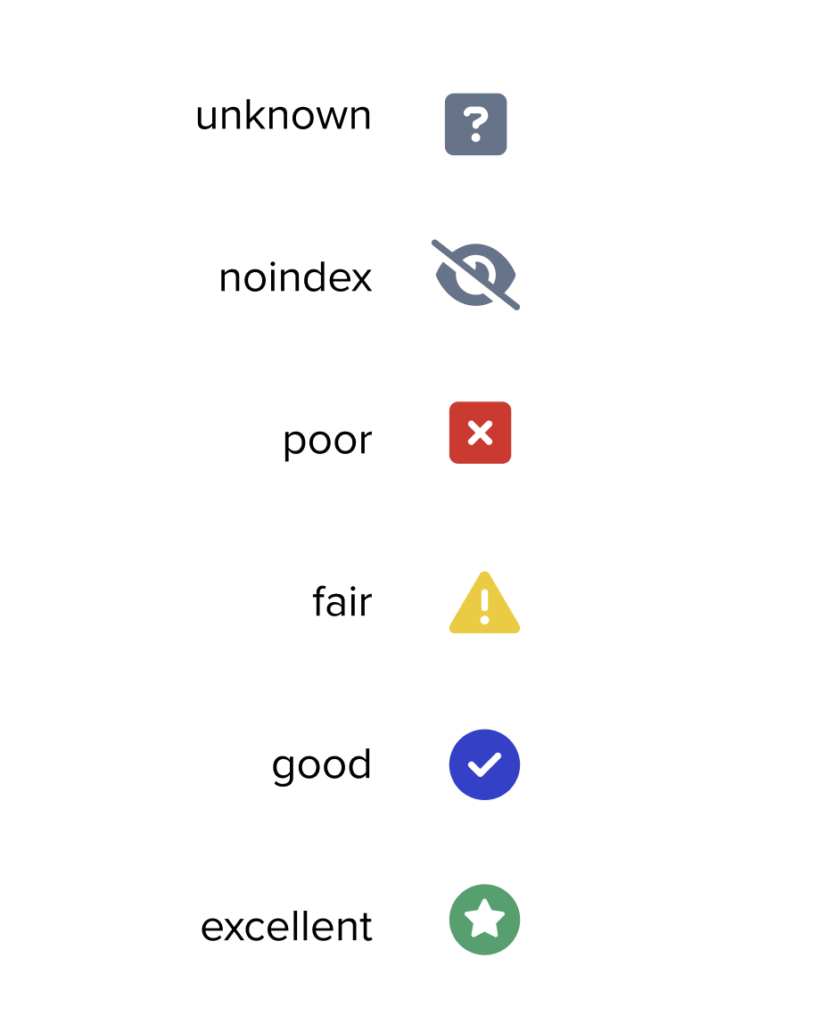
While gray eye and gray questions mark may seem similar, the gray question mark is used if there’s an error trying to get a score, or if it’s unknown (such as no keyword set) and the gray eye means the page has specifically been set to noindex from the visibility settings. Learn more about noindex tags.
Using our SEO Tool, you will be able to estimate how well your page is going to perform for a specified keyword!
If you have any further questions, please reach out to our support and we’d be happy to help!
Learn More:
- How to Do Keyword Research with Carrot’s Keyword Explorer
- How To Optimize Your On-Page SEO
- Blog Content Strategy for SEO
New to Carrot?
Welcome!

Here’s our full guide for what to do when getting started with your Carrot website:
Want Us to do Some
Editing for You?
You are busy doing what you do best, running your business. Leave the site work in Carrot’s hands.