Landing pages are simplified website pages that are designed to have traffic driven to them, often from a specific ad campaign such as PPC advertising like Google Ads or via a QR code used in direct mail.
A visitor “lands” on the page, where our goal is for them to take an action to convert to a lead, such as submitting a form.
Carrot’s Landing Pages feature has been rigorously tested and designed to boost conversion rates and lead generation. It prioritizes rapid loading, a critical aspect for retaining paid traffic.
Use Landing Pages to Increase Conversions & Reduce Ad Costs
When driving paid ad traffic to a landing page, you’ll want to make sure that the messaging on the landing page matches the messaging & targeting options you’ve used in your Google Ads or paid advertising campaign.
By aligning the messaging and audience of your landing page with your paid ad campaign, you can not only increase conversions but also potentially reduce ad costs. Landing page messaging that matches your ad can help improve your Google Ads Quality Score.
Let’s dive into this tutorial so you can kickstart the creation and use of Carrot’s Landing Pages feature:
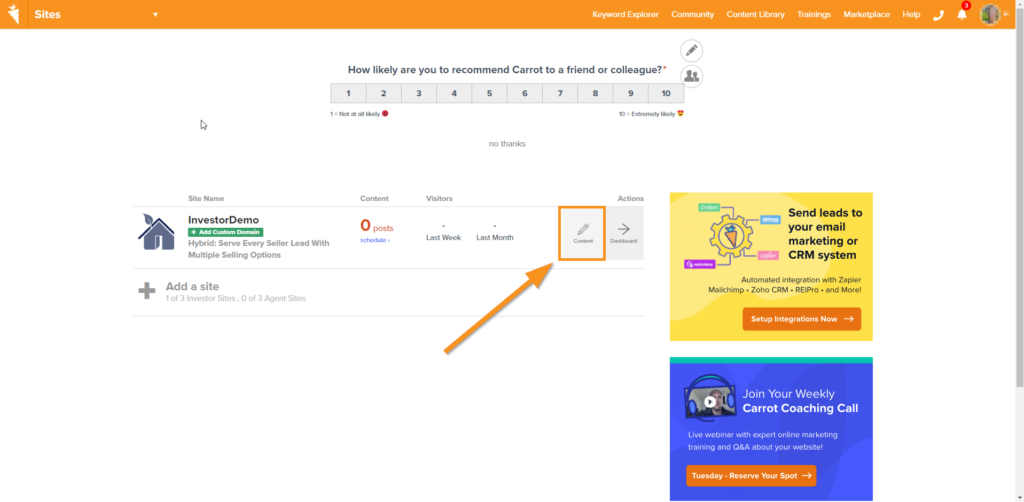
Step 1: Click Content
Start off by clicking the ‘Content’ button next to one of your websites on your account dashboard.
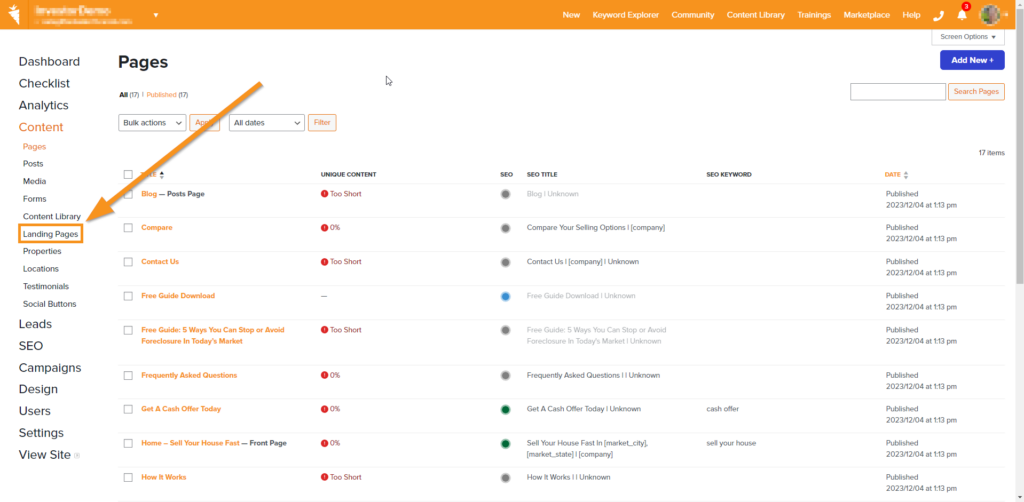
Step 2: Click Landing Pages on the Left
Now, let’s head over to the Landing Pages section. You can find it in the left sidebar navigation on your screen.
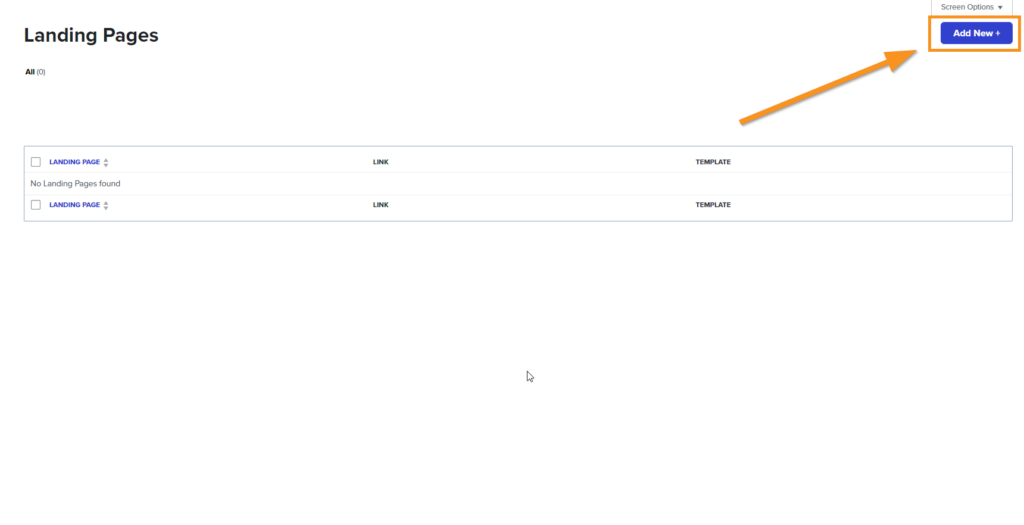
Step 3: Creating A New Landing Page
Simply hit the ‘Add New’ button to kick off the creation of a fresh niche marketing landing page.
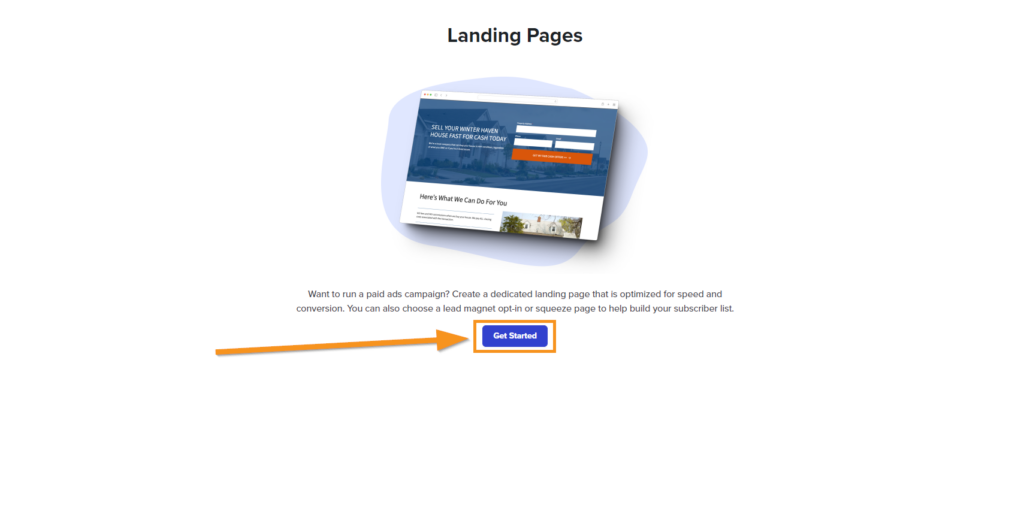
Step 4: Getting Started
Click on the ‘Get Started’ button to progress through the page creation wizard and start choosing the type of lead funnel you’d like to create.
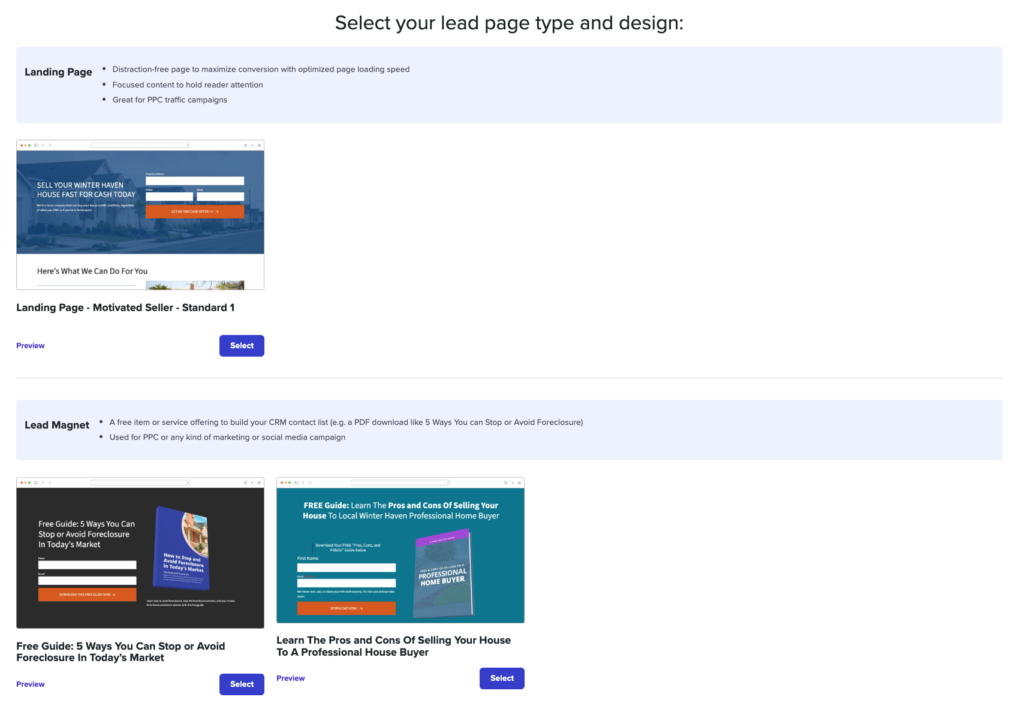
Step 5: Choosing Your Landing Page Type
Now, it’s time to pick the type or template for your niche marketing landing page. Below each template, you’ll find concise key points that explain the purpose and use of each type, segmented into two different categories.
Depending on the site type you are adding a landing page to, different landing page templates will appear under these categories. These templates are curated to your site type and the typical needs of the end user.
Step 6a: Previewing And Confirming The Design
You can also preview how your new niche marketing page will appear on both desktop and mobile devices.
If you’re happy with the preview, hit ‘Continue’ to proceed to the editing stage.
If you want to explore other templates, simply press ‘Previous’ to step back in the setup wizard.

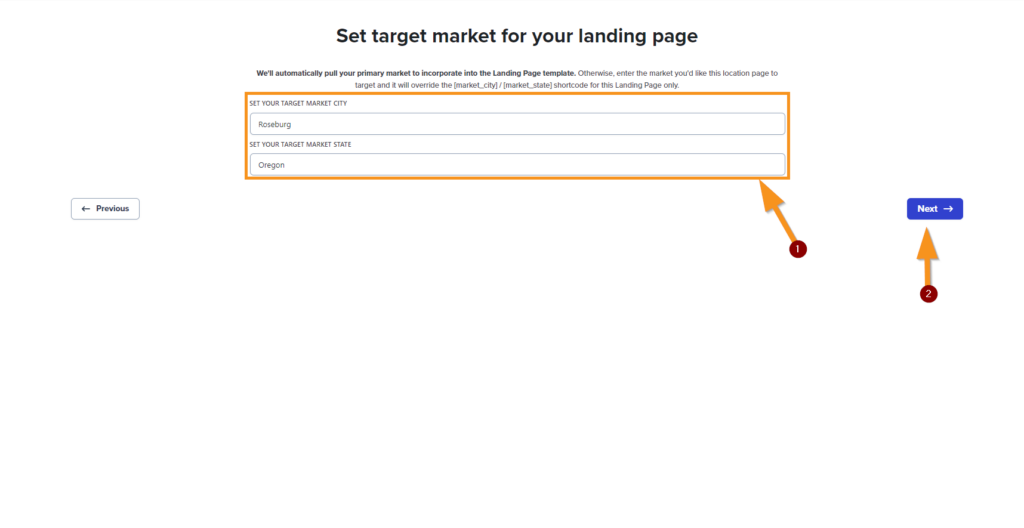
Step 7a: Set Your Target Market
Now that you’ve locked in your landing page lead type and design, it’s time to add your personal touch. First, define the target market for your lead funnel landing page.
Step 7b: Create A Campaign Tracking Link (Optional)
After hitting ‘Next,’ you’ll have the chance to craft a Campaign Tracking Link for your landing page.
These links make it easy to generate concise, trackable links for any page on your website, so you can see what’s driving your traffic and leads. By swapping out long URLs with user-friendly Campaign Tracking Links, you can track clicks and form submissions to help you monitor your campaign’s performance.
Simply give your campaign a Name, select the Type of campaign (such as PPC ads, email marketing, or retargeting campaign), and choose a Source like Google or Facebook:
Feel free to click the checkbox to create a Campaign Tracking Link, or uncheck the box and hit ‘Skip’ to dive into page editing.
If you decide to skip for now, you can always create a Campaign Tracking Link later. Out of campaigns? You can add more in the Campaign feature after you’ve created your Landing Page.
Step 8: Edit Your New Landing Page
Congrats! The setup wizard for your niche marketing landing page is done.
It’s time to make it your own by tweaking the content—whether it’s the text, logo, images, or design—using our Visual Editor and Blocks system. It’s as easy as editing a standard Page or Post:
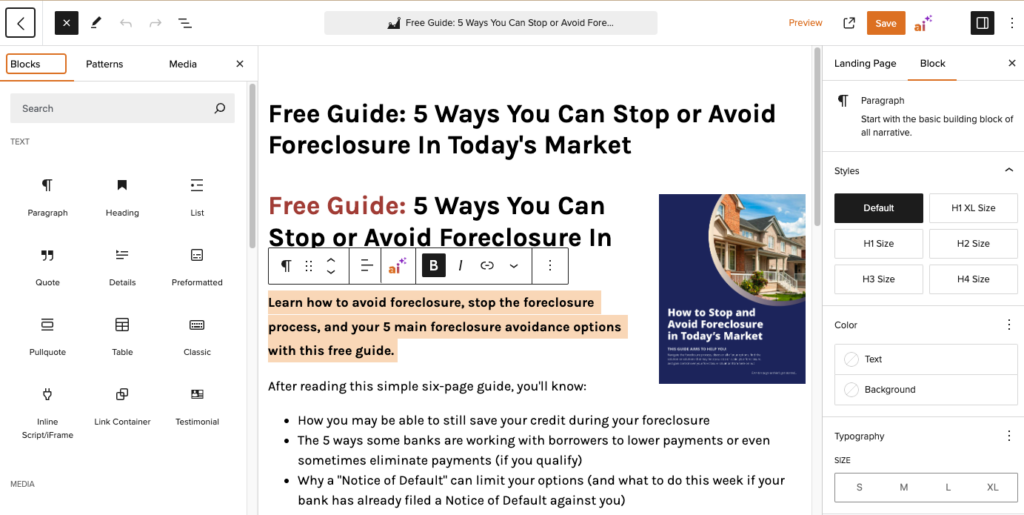
If you’re not quite sure how to navigate the Block editing system used throughout the rest of the site editing experience, feel free to check out this helpful guide: Customize Your Pages with the Visual Editor and Blocks
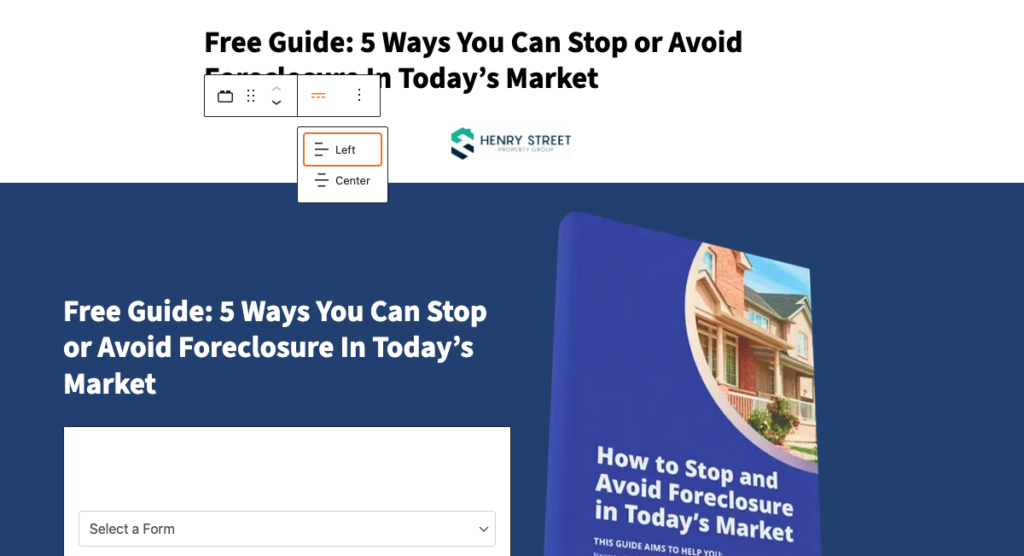
Additionally, each Landing Page includes your company logo within the header. You have the option of aligning your logo to the left or center of the page header, or removing it entirely (remember, you can always preview how the page looks and make changes prior to running a PPC campaign!).
If you delete the block and want to add it back in, you can do so by searching for ‘Logo’ within the block library or by typing ‘/logo’ in the header immediately above the hero block.
Step 9: Publish Your Landing Page
When you’re satisfied with your new landing page, it’s time to hit Publish!

🚨 Note: when Carrot Landing Pages are published, they are set to ‘noindex’ by default.
Carrot Landing Pages are set to ‘noindex’ by default because they quite often target the same keywords phrases as other core pages on the site and we want to help you avoid unintentional keyword cannibalization (where two pages with similar content competing with each other for rankings).
Not all pages need to be indexed by Google, and using the ‘noindex’ tag where appropriate helps manage your site’s SEO strategy by controlling what search engines see and rank.
Landing Pages are typically meant to be used as part of non-SEO marketing campaigns, like Google PPC ads, television advertising, or postcard mailer campaigns.
For example, you may have a city location page for Cincinnati that you want to rank organically through SEO and be found when people search for “sell my house fast for cash Cincinnati.” But you may also want to run a Facebook ad campaign targeting people in Cincinnati.
Your Cincinnati location page that’s created for SEO rankings and your Cincinnati Facebook ad landing page may have similar content, but very different purposes. If both of these pages get indexed by Google, it could confuse both search engines and potential visitors.
You’ll want your location pages created for SEO to be found by Google, but you don’t want landing pages created for specific ads or other marketing campaigns to compete with them.
You probably also want to be able to track the traffic and lead submissions coming to your Facebook ad landing page so that you can monitor the performance of your Facebook ads. By setting your Landing Pages to ‘noindex’ by default, you can ensure that the traffic coming to that page is from your related ad campaign.
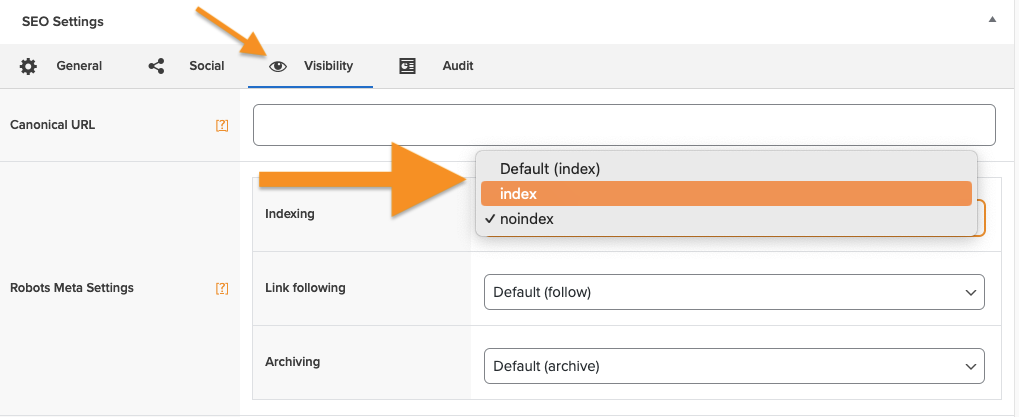
If you decide to use Carrot’s Landing Pages feature to create a page that you do want indexed by Google and other search engines, you can change the page’s indexing settings to ‘index” via the Visibility tab of the SEO Settings tool at the bottom of the page:
Learn More:
- How to Edit Your Forms
- Adding PDF’s to Your Site
- Embed Videos on Your Landing Page
- Intro to Pay-Per-Click (PPC) Marketing